Thursday, January 16, 2014

A Chess Project, Part 2

Intro

We're going to continue our chess project, the one we introduced last week in Part 1 of the series. In week 1 we covered the requirements of the project. The capabilities we are looking for and the input and output required. Here in Part 2 we will start creating the "interface" that our clients will use. This interface will be in the form of a Web API HTTP Service that client code can call from anywhere, as long as they have an internet connection.

Introduction to Web API

What is Web API? Web API is Microsoft's platform for building RESTful HTTP services. I'll assume you already know what HTTP is, but let's take a look at RESTful. First, REST stands for Representational State Transfer. The concept of RESTful architecture has been around for some time in the programming world; the Web is based on it. It basically means that the client doesn't necessarily need to know anything about what information and processes the server contains, as long as it has a uniform way to communicate with the server (via HTTP for the web). For our purposes we will be able to call our service RESTful if it properly applies HTTP verbs and resources. For example, if we want to post information to the service to have it calculate the best move and return it, we would use an http POST to accomplish this. There are of course other HTTP verbs such as GET, DELETE, PUT, and more, but for our small service POST will be the only applicable one. With Microsoft Web API HTTP Services you can rely on JSON and/or XML data. They are extremely portable due to accepting both JSON (very easy to find libraries based on JSON) and XML (also easy to find libraries based on XML). The coding is really quite simple I promise, so let's see how to create one.

Step-by-Step Instructions for Creating our Web API HTTP Service

First off, I assume that you have Visual Studio 2013. I am using Express for Web 2013 myself, so your screens may look a little different if you are using a different version.

Start by clicking on File-->New Project. Choose Visual C#, and ASP.Net Web Application. Type in the name BlogChess for the solution and hit the OK button.

On the next screen choose "Empty", click the checkbox to add folders and core references for Web API and hit the OK button.


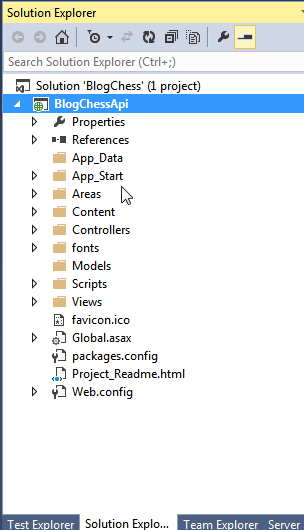
You now have your very own Web API Service. I'd like to rename the project (not the solution, the project) to BlogChessApi so do that now. Right-click on the project, click Rename, type in the name BlogChessApi. Your Solution Explorer window should now look like this:


The next step is to decide how the client will communicate with the service. I believe a single post should do nicely for us, so we only need a single method. We'll call it CalculateMove. What will the client send for data? We'll create a ChessGame class that has a list of boards, and a single enum for whose turn it is. The board object will actually be just an 8x8 2-dimensional array of short where each short value represents a different piece (or no piece).

Just in case we use the ChessGame class elsewhere (and we probably will!), let's put it in a DLL rather than directly in the web service. Add a new DLL (class library) named BlogChess. Right-click the solution, choose Add and New Project.


In the window that comes up choose Visual C#, Windows, Class Library, type in the name BlogChess.Backend, and hit the OK button.


Now rename the file Class1.cs to ChessGame.cs, as this will be our data class.
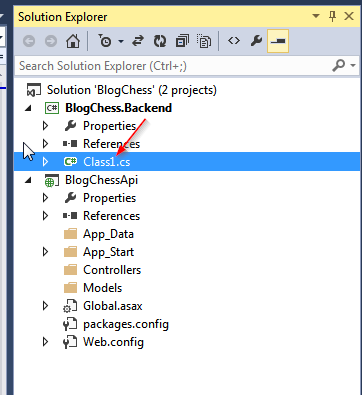


Go ahead and add a public struct to BlogChess.Backend as well. This struct will be named ChessBoard. It's the easiest way we have to ensure that everywhere we want to represent a board as an 8x8 array of shorts that we will get it right. The code for Chessboard.cs is shown below.

using System;

namespace BlogChess.Backend
{
    public struct ChessBoard
    {
        public short[,] Board;

        /// 
        /// Constructor
        /// 
        /// as implied by the parameter name, this parameter is useless.
        /// It is only here because you cannot have a parameterless constructor in a struct.
        public ChessBoard(bool throwAway) : this()
        {
            Board = new short[8, 8];
        }
    }
}

Now we need to setup the ChessGame class so that it contains a list of ChessBoard objects as well as an enum that represents the status of the board position (black's turn, white's turn, draw, win for black, win for white). The code for ChessGame.cs is shown below.

using System.Collections.Generic;

namespace BlogChess.Backend
{
    /// 
    /// Current status of a chess game
    /// 
    public enum GameStatus
    {
        BlacksTurn,
        WhitesTurn,
        Draw,
        BlackWin,
        WhiteWin,
    }

    /// 
    /// A game of chess
    /// 
    public class ChessGame
    {
        public IEnumerable<chessboard> Positions { get; set; }
        public GameStatus GameStatus { get; set; }
    }
}

Lengthy post huh? Hang in there, we're making good progress here. If you've made it this far, drop by my office sometime and I'll give you a hearty pat on the back.

We've done what we needed to do in the backend dll, so let's dive back into the Web API Service.Web API Services follow the Model-View-Controller pattern (we'll probably discuss this more in the distant future) so you have to add a Controller class. The controller is what contains your methods that clients of your web service can see.

Right-click the Controllers folder in the BlogChessApi project and select Add, Controller.


On the next dialog select "Web API 2 Controller - Empty" and click the Add button.


Name the controller BlogChessController.


We're about to create the method BestMove that our clients will call, but first we need to add a reference in BlogChessApi to BlogChess.Backend. In the BlogChessApi project, right-click References, and click Add Reference.


Click Solution, BlogChess.Backend, and click OK.


The reference to BlogChess.Backend from BlogChessApi is now complete. It's time to get codin! Below you can see the entire BlogChessController.cs unit. It's really pretty sparse:

using System.Linq;
using System.Net;
using System.Net.Http;
using System.Web.Http;
using BlogChess.Backend;

namespace BlogChess.Controllers
{
    public class BlogChessController : ApiController
    {
        public HttpResponseMessage PostBestMove(ChessGame game)
        {
            //basic input validation...if required fields not specified, return an error message wrapped in an http "bad request" 400 result
            if (game == null || game.Positions == null || game.Positions.ToList().Count == 0)
                return Request.CreateErrorResponse(HttpStatusCode.BadRequest, "The game and at least 1 position must be specified.");
            //calculate move here
            string bestMove = "e4";
            //return the best move wrapped in an http "ok" result
            return Request.CreateResponse(HttpStatusCode.OK, bestMove);
        }
    }
}


Yes that's the entire unit. The first thing to note is our class descends from ApiController. This was already here when we generated the class. ApiController is a basic web api controller class that gives us a few goodies to make life a little easier.

The 2nd part of note is our single method PostBestMove. Let's start with the return type HttpResponseMessage. Here we are telling the service to return a valid HttpResponseMessage so that our result conforms to http message protocol. We could return a 404 (url not found), 400 (invalid request), 200 (OK), or any other http response we want by specifying this as the return type. The next noteworthy item is the name of the method, PostBestMove. When you put the word Post in the front of a method name in a Web API controller, you tell .Net what HTTP method your method will accept and respond to. In our case we want the user to send an HTTP post containing the information, so we use the word Post. You can also see that we accept a single parameter of type ChessGame. This is the list of board positions that we expect the client to provide in order for us to calculate and return the best move.

The 3rd thing to be aware of is our input validation section. The validation itself isn't very interesting; pretty mundane actually. The interesting part here is the return statement. Using Request.CreateErrorResponse, we can tell .Net to create an HTTP error response with the specified error code (in our case it's 400, Bad Request) and optionally tack a helpful string for the client onto the response.

The last thing to note is the calculation and return of the best move. The calculation is bare-bones for now. We'll fill that in a couple blogs from now. The return statement looks similar to the last return statement, except here we use CreateResponse instead of CreateErrorResponse. We're just telling the client that all is hunky dory.

Calling and debugging your brand new service is pretty easy; however, this post is already huge so I'll save that for next week. Teaser: you can access the debug version of your Web API service at http://localhost:11482/api/BlogChess/bestmove. You'll have to replace the port # with whatever port # your asp.net server runs on though.

What's Next?


That's it for this week guys! Tune in next week to see how to call the web api service using JavaScript and C#. I'll also cover how ASP.Net knows to access your service at http://localhost:11482/api/BlogChess/bestmove. Hint: the magic of routing!

 Feel free to read up on routing, Web API, and of course chess if you want to get ahead of the class. We've still got a good amount of work to do to round out this series!

Resources

http://www.asp.net/web-api
http://www.asp.net/web-api/overview/getting-started-with-aspnet-web-api/tutorial-your-first-web-api

Thursday, January 9, 2014

A Chess Project, Part 1

Intro

For the next few weeks I want to shake things up a bit. Rather than blogging about a specific topic for a post or two, I will detail a project and we will create it from start to finish. Along the way we will discuss requirements gathering, technical design, and probably some json and web api along with other things.

Project Overview and Requirements

I like to play chess. I'm really not too good at it but I find it fun and the concept of creating a computer opponent fascinates me. I'm not looking for a fully-fledged chess-playing app here though, as that would take more blog space and time than we've got, so we'll limit the scope a bit. I would like for us to create a reusable Chunk of Awesomeness (CoA) that can be called from multiple languages and different types of interfaces (web GUI, windows, IOS, etc). This CoA should be fed a chessboard/game, and spit out what move it thinks should be made; ie the "best" move available. Sounds simple neh? Wrong!

Before we get into the technical design, let's start with the business side of things. What exactly does a CoA need to know (input) in order to calculate the "best move" (output)?


Inputs:

  • You need to know every single board position that has occurred this game. Why? 
    • A threefold repetition of the same position means that either player can claim a draw. Because the point of the game is to win, or if all else fails you try for a draw, knowing when a draw might occur is useful knowledge. We will not code "draw" logic into our "best move" calculations in this project however due to our desire for simplicity.
    • 50 moves in a row that involve no captures and no pawn movements results in a draw. We won't code this logic in there either, but hey we might in the future.
    • You need to know if either player has moved their king or each rook. Moving the king and the rook that would be used in a castling in any way forfeits the ability to castle with that pair of pieces, so it takes away one potential type of movement the king has. This is very important logic that we will code into this initial release of our project.
    • Note: we will only require a single board position as input. This is because we want our project to be able to handle chess puzzles too, and in puzzles you don't usually get the full game history but instead get just a specific position and are asked to find the best move(s). So, we require only a single board position, but we allow the user to send up the whole game's board positions. Due to sheer laziness, if the initial board position sent up is not the standard chess game starting position then we will assume castling is still possible if a king and rook are in the proper positions.
  • Whose turn is it? This value is required only if we were not sent the entire game's board positions. If we have those, we can pretty easily figure out whose turn it is based on who moved last.
Note that there is an alternative input to every board position that's occurred: You could have the project assume a standard starting position and just send in the chess notation for all moves that have been performed this game. Again, I don't like this option because it limits our ability to have the project evaluate chess puzzles.

Outputs:

  • Algebraic chess notation of the move that the CoA deems best. (see below for a link to algebraic chess notation; we'll use the short form)
  • It's possible the computer may wish to offer a draw or offer to resign; however, that's outside the scope of this project. A draw offer is covered by chess notation anyways so it doesn't really mean we would need further output field(s), and our computer foe will never surrender!

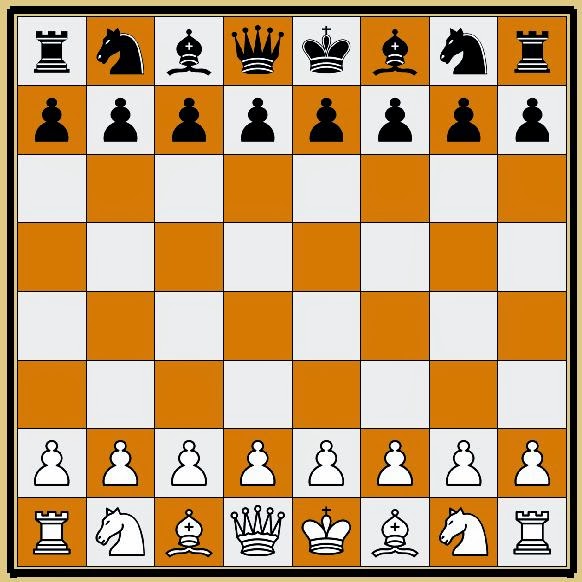
(bonus points for anyone that figures out why i pasted this image in here)

Technical Overview

First, the requirement to have this be a "reausable chunk of awesomenss" that can be called from multiple languages and different types of interfaces. To me this pretty much screams "web service". The evolution of web services in .Net over the past few years has gone something like this: Soap Web Service-->WCF-->Web API.

Soap web services have 2 main drawbacks: 1) They are a little bloated due to SOAP. SOAP is xml which is verbose compared to many other formats. I'm really not too worried about that for this project though as I don't think bandwidth will be that much of a concern. 2) SOAP web services have a rigid definition for calls into the service, so making modifications to the interface of your web service (the method signatures) requires that clients be updated/recompiled. I find this to be a large pain point with SOAP web services in .Net, so they're out.

Windows Communication Foundation (WCF) services were the next evolution of callable services on the web for the .Net platform. I've disliked them from day 1; the big drawback with these is they are a huge pain in the arse to configure correctly. They also have the same flexibility problem that regular web services do (and again, they are XML), so these are also out.

This takes us to Web API. These handy little services are built on a JSON foundation rather than XML. JavaScript Object Notation (JSON) is the new fad for data communication because of its portability (just about every platform out there today can create/parse JSON files), and it is less verbose than XML. Web API services don't really have any pain points in my opinion as they are easy to configure, and as long as you know what you are doing, updating a Web API service is much less likely to require clients to update their references/code.


The logic for determining the "best move" might get complex however, so we don't want this logic plopped directly into our web api service. This logic and any associated classes will be in a backend DLL. This gives us 2 advantages: 1) Unit testing the code will be both possible and much easier with the business logic being in a backend dll. 2) We can reuse this DLL later if we desire, for example in a GUI.


What Next?

I hope the above project description and technical overview got you interested in what's to come. For those of you that aren't familiar with chess, or just want a refresher, there is a link below in the resources section that gives some info. You can also pick up a book or two from pretty much any bookstore, or if you know me personally just ask and you can borrow one of the many chess books I have in my library.

You are also welcome to dip your toes into the world of JSON and web api, or you could review some of the older blogs on this site. You can even experiment with evaluating a chess position on your own via c# code if you're super-bored!

Resources

http://en.wikipedia.org/wiki/Rules_of_chess 
http://www.asp.net/web-api
http://en.wikipedia.org/wiki/Chess_notation

Sunday, December 29, 2013

Soap Web Services Troubleshooting Tip

Intro

On many an occasion I've had something go wrong with a web service. Maybe a user calls in to report an error message being returned, or perhaps I've got my own exception handling that reports an exception was handled. For the sake of this article I'll assume you've got good exception handling and are logging exceptions that are thrown in your web service. Now let's pretend though that the stack trace by itself just isn't good enough. I've had one web service that threw a tricky error during a sql call, and the exception said it didn't like one of the parameter values. Well thanks, that helps a ton! Now if I can just figure out which of the 20 parameters it was...

Tha Meat Yo!

We can log the entire soap request! If this doesn't help debug the problem then my name isn't Jehosephat McJunkNStuff. Let's see how to log the full soap request:

    /// 
    /// Retrieves the full xml of the raw soap request. We use this for logging purposes.
    /// 
    /// the full xml of the raw soap request
    private string GetRawSoapRequest()
    {
      string soapRequest = "";
      try
      {
        // Get raw request body
        if (HttpContext.Current != null && HttpContext.Current.Request != null && HttpContext.Current.Request.InputStream != null)
        {
          using (Stream receiveStream = HttpContext.Current.Request.InputStream)
          {
            // Move to begining of input stream and read
            receiveStream.Position = 0;
            using (StreamReader readStream = new StreamReader(receiveStream, Encoding.UTF8))
              soapRequest = readStream.ReadToEnd();
          }
        }
      }
      catch { /*eat it*/ }
      return soapRequest;
    }

Copy the above method into your web service. As you can see, what it does is get the full raw SOAP request as a stream and reads it into a string value, which it then returns. Because it's a soap request this value is XML. As for what you do with this value, well that's entirely up to you! Here's a quick sample containing some not-fully-fleshed-out code that logs the raw soap of the request in an exception handler:

try
{
    //...
}
catch (Exception e)
{
    DoLogException(e, GetRawSoapRequest());
}

Armed with the raw SOAP request XML, you can now set about debugging the exception by recreating the exact request to your web service, stepping through it in the debugger to see where the exception lies. Heck, you might not even have to; I've seen some requests where there was one obviously bad value so use of the debugger wasn't even required. That's it for this week's blog, stay tuned for next week! I suppose that phrase "stay tuned" really doesn't make sense in the context of teh interwebs. Heck it really wouldn't make sense in much of any context for a full week...who would "stay tuned" to a single tv station or radio station for an entire week? Well, have a good week anyways, hope you enjoy the blog.

Thursday, December 26, 2013

Custom Attributes in C#, Part 2

Intro

Back in Part 1 we looked at what attributes are, a reason or two why you might be interested in using them, and how to get their values through reflection. A bit more work was left to your imagination regarding custom attributes. Now it's time to get yer thinkin cap on (maybe it's a beer hat!) and get crackin!

Create Your Own Custom Attribute

Not only can you use built-in .Net framework attributes, you can also create your own custom attributes. I've used them for property validation, object serialization and storage, and many more things. Basically anywhere you need to describe, or give extra information about a code element, you should at least consider using a custom attribute to do the trick. Here's a silly example:

    public enum SillinessFactor
    {
        SuperSilly,
        KindaSilly,
        NotSoSilly,
    }

    public class SillyAttribute : System.Attribute
    {
        public SillinessFactor SillinessFactor { get; set; }

        public SillyAttribute(SillinessFactor sillinessFactor)
        {
            this.SillinessFactor = sillinessFactor;
        }
    }


In the above code we have created an enum to describe the level of silliness that something represents. Just below that enum we have a class called SillyAttribute that derives from the System.Attribute class. Creating your own custom attribute is as simple as that; just derive from System.Attribute. I decided that I would like users to be able to state the level of silliness when applying the Silly attribute to a piece of code, so I coded a constructor that allows the user to pass in one of the valid SillinessFactor enum values. Using this new custom attribute is just as easy as what you saw in the last lesson:

    [Silly(SillinessFactor.SuperSilly)]
    public class SillyClass
    {
    }


Well lookie there pilgrim! We've got a silly class here who is officially marked as being Silly (through the custom attribute), and is assigned a silliness factor of SuperSilly. Yee haw!

Limiting attributes to specific scope(s) 

It's also possible to limit the application of your custom attributes to specific scope(s). Let's say for example that only classes can be Silly, not properties or anything else. How would we accomplish such a monumental feat?

    [System.AttributeUsage(System.AttributeTargets.Class)]
    public class SillyAttribute : System.Attribute
    {
        public SillinessFactor SillinessFactor { get; set; }

        public SillyAttribute(SillinessFactor sillinessFactor)
        {
            this.SillinessFactor = sillinessFactor;
        }
    }


Oh, sweet irony! Yes you accomplish the limitation of attribute scope through another attribute! In the redone sample above, we've told the compiler to limit the Silly attribute to application on classes only. What happens if you try to stick it on an attribute? I could tell you, but then I'd be spoiling all the fun!

What's Next?

There's really not much left with attributes. Experiment with using some of the built-in ones, google around to see how other people use them, and make your own even if it's just a sample. Who knows, you might find a real-world application after you've cemented this little gem in yer noggin.

Resources

Thursday, December 19, 2013

Custom Attributes in C#, Part 1

Intro, Including Why to Use Them

Attributes are yet another tool in your programming arsenal (hee hee, I said "arse"). If they're not already, we'll fix that right now! What is an attribute? It's a declarative way to associate information (usually called meta-information) with your code. What can you use attributes for? Just about anywhere you want to associate information with your code. Helpful answer huh? Like a judge and jury, I try. Here's a sample that might give you an idea:

    public enum VehicleBody
    {
        [Description("Sedan")]
        Sedan,
        [Description("Coupe")]
        Coupe,
        [Description("Station Wagon")]
        StationWagon,
        [Description("Crossover")]
        Crossover,
        [Description("Mini-van")]
        MiniVan,
    }

Above we have a simple enumeration that represents a few possible vehicle body types. Those attributes above each body type associate a specific user-friendly string with each entry. If we had a GUI driven by this information we could fill a drop-down list with those descriptions as the text, and the enumeration value as the value. Ooh, gotta love foreshadowing...

Example of Using a Built-in .Net Attribute, and Hey Some Reflection!


using System;
using System.Collections;
using System.Collections.Generic;
using System.ComponentModel;
using System.Linq;
using System.Web;
using System.Web.UI;
using System.Web.UI.WebControls;
using BlogAttributes;
using System.Reflection;

namespace BlogWebGui
{
    public partial class Default : System.Web.UI.Page
    {
        protected void Page_Load(object sender, EventArgs e)
        {
            if (!Page.IsPostBack)
            {
                var enumNames = Enum.GetNames(typeof(VehicleBody)).ToList();
                foreach (var enumName in enumNames)
                {
                    var type = typeof(VehicleBody);
                    var member = type.GetMember(enumName)[0];
                    var attribute = member.GetCustomAttribute(typeof(DescriptionAttribute));
                    var bodyDesription = ((DescriptionAttribute)attribute).Description;
                    uxVehicleBody.Items.Add(new ListItem() { Value = enumName, Text = bodyDesription });
                }
            }
        }
    }
}
The first code snippet above shows a rather simple section from an aspx page. Just a dropdownlist here.
The second code snippet is the code-behind for the aspx page. In the page load we populate the dropdownlist with the names and descriptions of our enums. Let's look at the important lines:
  1. "var enumNames..." This line just gets the names of our enumerated type values. All this means is we get a generic list containing the .ToString() representation of all members of our enumeration.
  2. "var member = type.GetMember(enumName)[0];" This sets the value of "member" to the correct value from the enumeration. For example, if enumName is set to "StationWagon", this code sets member to the value VehicleBody.StationWagon.
  3. "var attribute..." Here we set attribute to the attribute placed on the current enumeration value. In this case the attribute is of type DescriptionAttribute.
  4. "var bodyDescription..."Now we're getting the meat of it! Here we take the attribute we got above and grab its Description property to get that actual value we put into the attribute. So if we are looking at [Description("Station Wagon")]StationWagon, then this code returns the value "Station Wagon".
  5. "uxVehicleBody.Items..." Now we add each enumeration name and description attribute value to the dropdown list.
Here's the relevant portion of the html generated by the above code, which should help to further explain what the code is doing:


Pretty cool huh? Yeah I know this doesn't use up any less code than creating an array which contains the descriptive strings, but this code does have one large advantage over that approach: with enums and attributes, the lists will not get out of synch. With separate arrays holding values associated with enumerated types it is very easy to get the lists out of synch.

What's Next?

You might be thinking "has Peeticus misled me? I thought this article was about CUSTOM attributes, not using pre-canned ones?". Sorry, I only have so much space on each individual post and my attention span is being artificially shortened by an angry cat. Feel free to peek ahead though! We'll create our own custom attributes next week, I promise.

Resources

  • http://msdn.microsoft.com/en-us/library/aa288454%28v=vs.71%29.aspx

Saturday, December 7, 2013

Unit Testing, Part 4 (More Tips and Tricks)

Intro

In Part1, Part2, and Part3 we covered the mechanics of unit testing, why to use unit tests, we created some of our own unit tests, we saw a tip for making your unit tests smaller and more focused, and we gained some knowledge of Dependency Injection and how to use it to make your unit testing life easier. In this final piece on unit testing (admit it, you were hoping I'd lay off this topic), We'll cover just a couple more useful tricks with unit testing.

 Test Method and Test Class Initialization

We've already seen how unit test methods require an attribute on the method named TestMethod (example below).

[TestMethod]
public void TestStuff()
{
  //test some stuff here...
}

Well there are a couple other attributes that you can use on methods within your test classes that will save you some time, and they are ClassInitialize and TestInitialize. A method marked with the ClassInitialize attribute is automatically run (as part of running unit tests) only a single time regardless of the number of TestMethod methods. A method marked with the TestInitialize attribute is automatically run (as part of running unit tests) once for each test method within the test class. Let's look at an example:

    [TestClass]
    public class BaseTemplateValidatorTest
    {
        public static BaseTemplate m_object;
        IEntityValidator validator;

        [TestInitialize]
        public void TestInitialize()
        {
            m_object = new BaseTemplate();
            validator = ValidatorFactory.GetValidator(m_object);
        }

        /// 
        /// title trim
        /// 
        [TestMethod]
        public void TestTitleTrim()
        {
            m_object.Name = " b ";
            var temp = validator.IsValid;
            Assert.IsTrue(m_object.Name == "b");
        }

        /// 
        /// title too long
        /// 
        [TestMethod]
        public void TestTitleTooLongChop()
        {
            m_object.Name = "b".PadLeft(ValidationConstants.TemplateNameMaxLength + 1, 'a');
            var temp = validator.IsValid;
            Assert.IsTrue(m_object.Name.Length == ValidationConstants.TemplateNameMaxLength);
        }

        /// 
        /// title max length
        /// 
        [TestMethod]
        public void TestTitleMaxLength()
        {
            string originalName = "b".PadLeft(ValidationConstants.TemplateNameMaxLength, 'a');
            m_object.Name = originalName;
            var temp = validator.IsValid;
            Assert.IsTrue(m_object.Name.Equals(originalName));
        }
    }
Here we have a method in our test class decorated with the TestInitialize attribute. Within this method we initialize a couple of member objects that we use in multiple TestMethods. This means that we don't have to initialize these member objects within each test method, thus saving us some code.

A method marked with ClassInitialize must be static. Why? For every test method that is run during unit testing, a new instance of your test class is created. So, in order for a method related to that class to only be run a single time (which ClassInitialize decorated methods are), it must be static. Here's an example:
    [TestClass]
    public class UnitTest1
    {
        private static Class1 m_class1;

        [ClassInitialize]
        public static void InitalizeTheClassYo(TestContext testContext)
        {
            m_class1 = new Class1();
        }

        [TestMethod]
        public void AddStuffNullParams()
        {
            var actual = m_class1.AddStuff(null, null);
            Assert.AreEqual(-1, actual, "AddStuff should return -1 when both parameters are null");
        }

        [TestMethod]
        public void AddStuffNullParam1()
        {
            var actual = m_class1.AddStuff(null, 3);
            Assert.AreEqual(-1, actual, "AddStuff should return -1 when the first parameter is null");
        }

        [TestMethod]
        public void AddStuffNullParam2()
        {
            var actual = m_class1.AddStuff(4, null);
            Assert.AreEqual(-1, actual, "AddStuff should return -1 when the second parameter is null");
        }

        [TestMethod]
        public void AddStuffValidNumbers()
        {
            var actual = m_class1.AddStuff(4, 3);
            Assert.AreEqual(7, actual, "AddStuff should return the sum of 2 numbers when numbers are passed in");
        }
    }
The method InitializeTheClassYo is decorated with the ClassInitialize attribute, so it is run once and only once as part of running our unit tests. We use it here to initialize a static class member, thus saving ourselves a little code and a little bit of processing time.

ExpectedException Attribute

ExpectedException is another attribute you'll end up using to decorate your test methods. When you write a method that purposely throws an exception under certain conditions, the ExpectedException attribute is how you tell your unit test to expect the correct type of exception. Here's an example:
        public int AddStuff(int? param1, int? param2)
        {
            if (!param1.HasValue && !param2.HasValue)
                throw new ArgumentNullException("param1 and param2", "param1 and param2 cannot both be null");
            if (!param1.HasValue || !param2.HasValue)
                return -1;
            else
                return param1.Value + param2.Value;
        }
There's nothing special about the above method, in fact you might recognize this method from a prior post. You can tell what it does pretty easily by looking at it. Take special note of the fact that it throws an ArgumentNullException if both of the parameters are null. Now here is one of the unit tests for this method:
        [TestMethod]
        [ExpectedException(typeof(ArgumentNullException))]
        public void AddStuffNullParams()
        {
            var actual = m_class1.AddStuff(null, null);
        }
That lovely little ExpectedException attribute takes a parameter that is the type of exception to look out for, and as long as the code within this unit test throws an exception of the appropriate type, the test passes! As you may have guessed, if your unit test doesn't throw the exception (for example, if the code within was "var actual = m_class1.AddStuff(null, 34);", then the unit test would fail because the code doesn't throw the expected exception.

What's Next?

  • There are other unit-test-related atrtributes you can use on methods. Look them up, you might find them useful.
  • What other parameters can you pass in to the ExpectedException attribute?
  • How would you test a private or protected method/field? Why would you want to? What are some arguments against testing fields and methods scoped private or protected?

Thursday, December 5, 2013

Unit Testing, Part 3 (Tips and Tricks)

Intro

In Part 1 we gave a brief overview of unit tests and when to use them. In Part 2 we learned how to create our own unit tests in C# and Visual Studio using MSTest. This week we'll cover a couple tips and tricks to get you really humming with unit testing.There's a ton to unit testing, so please stick with me here! There will be at least one more unit testing article after this one, but we're getting into the really meaty stuff in this post so if you can get past this, the rest will be a breeze.

Tip1: Small, Focused Unit Tests

One of the best pieces of advice I've seen regarding unit tests is to keep each individual test method small and focused. This makes your code (the code you're testing, and the actual production code) easier to maintain, due to simplification and clarity of purpose. Could I be more vague? Probably, but I'm not paid by the word so let's see an example:

(Production code)
        public int AddStuff(int? param1, int? param2)
        {
            if (!param1.HasValue || !param2.HasValue)
                return -1;
            else
                return param1.Value + param2.Value;
        }
(Focused unit testing)
        [TestMethod]
        public void AddStuffNullParams()
        {
            var actual = new Class1().AddStuff(null, null);
            Assert.AreEqual(-1, actual, "AddStuff should return -1 when both parameters are null");
        }

        [TestMethod]
        public void AddStuffNullParam1()
        {
            var actual = new Class1().AddStuff(null, 3);
            Assert.AreEqual(-1, actual, "AddStuff should return -1 when the first parameter is null");
        }

        [TestMethod]
        public void AddStuffNullParam2()
        {
            var actual = new Class1().AddStuff(4, null);
            Assert.AreEqual(-1, actual, "AddStuff should return -1 when the second parameter is null");
        }

        [TestMethod]
        public void AddStuffValidNumbers()
        {
            var actual = new Class1().AddStuff(4, 3);
            Assert.AreEqual(7, actual, "AddStuff should return the sum of 2 numbers when numbers are passed in");
        }
(Mosh pit unit testing)
        [TestMethod]
        public void AddStuffTests()
        {
            var actual1 = new Class1().AddStuff(null, null);
            Assert.AreEqual(-1, actual1, "AddStuff should return -1 when both parameters are null");
            var actual2 = new Class1().AddStuff(null, 3);
            Assert.AreEqual(-1, actual2, "AddStuff should return -1 when the first parameter is null");
            var actual3 = new Class1().AddStuff(4, null);
            Assert.AreEqual(-1, actual3, "AddStuff should return -1 when the second parameter is null");
            var actual4 = new Class1().AddStuff(4, 3);
            Assert.AreEqual(7, actual4, "AddStuff should return the sum of 2 numbers when numbers are passed in");
        }
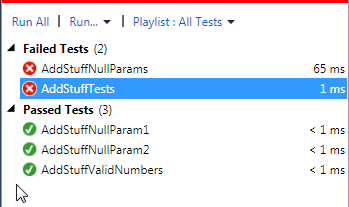
Now pretend somebody comes along and breaks the production code such that if both parameters are null, it starts throwing an exception. It might not seem like a big deal, but with the mosh pit unit test method you have a harder time telling what went wrong. You lose some extra time debugging the problem due to not knowing what could have happened. The error you get for the more focused unit tests is however more useful, as you can see in the screenshot below:


Yeah it's not a huge deal really, but every bit of assistance helps. The name "AddStuffNullParams" lets you know that the method no longer works properly when you have null params. The name "AddStuffTests" really tells you nothing and you have to dig a little longer to get to the same depth. Smaller and more focused methods also means less chance of ripple effects when you modify things, so it's a no-brainer.


Tip2: Dependencies, Dependency Injection (DI), and Mocks

What is Dependency Injection? Dependency Injection is just a fancy way of saying that you pass dependencies your code has, into your code. DI can easily be a full blog post of it's own, but I have to keep things short to account for my meager attention span so we'll just cover a quick scenario: You need to access a database in your code to pull in some data, so you write a method to pull in the data. You then write some other code to process that data. Now you wish to unit test the code that is processing the data...woops! Your code hits a database, so how in the world are you going to exercise that code with a unit test? It really adds no value to your tests to hit the database, as it's 1) comparatively slow, 2) volatile, and 3) difficult to setup test data. This is a problem that comes up fairly often with accessing external resources such as databases, files, web services, and many other things. Your unit tests should not exercise these external dependencies, they should exercise only your own code. Dependency Injection is your friend in these cases! First, here is some code that returns true if there are rows in a table. It directly accesses the table via a sql connection/command.
    public class DataProcessor
    {
        public bool ProcessData()
        {
            using (var conn = new SqlConnection("some conn string"))
            {
                var cmd = conn.CreateCommand();
                cmd.CommandText = "select count(1) from tblSomeTable";
                cmd.CommandType = System.Data.CommandType.Text;
                using (var reader = cmd.ExecuteReader())
                {
                    if (reader.Read())
                        return true;
                }
            }
            return false;
        }
    }
How would you unit test this? Well you could go through the trouble to setup sample data in the database at the beginning of a positive test and a negative test (one test where the db has data, one test where it doesn't), but you don't really care to test the data itself; just the code. So, instead you would pass in the data dependency using an interface and a mock.
    public class DataProcessor
    {
        private IDataRetriever m_dataRetriever;

        public DataProcessor(IDataRetriever dataRetriever)
        {
            m_dataRetriever = dataRetriever;
        }

        public bool ProcessData()
        {
            return m_dataRetriever.HasData();
        }
    }
First we see the revamped DataProcessor class. It now has a constructor which accepts an object of type IDataRetriever. The method ProcessData then uses this data retriever object to pull the data, and does what it needs to do based off of that call.
    public interface IDataRetriever
    {
        bool HasData();
    }
Here's the interface for IDataRetriever; short and sweet.
    public class ConcreteDataRetriever : IDataRetriever
    {
        public bool HasData()
        {
            using (var conn = new SqlConnection("some conn string"))
            {
                var cmd = conn.CreateCommand();
                cmd.CommandText = "select count(1) from tblSomeTable";
                cmd.CommandType = System.Data.CommandType.Text;
                using (var reader = cmd.ExecuteReader())
                {
                    if (reader.Read())
                        return true;
                }
            }
            return false;
        }
    }
And here is a concrete implementation of that IDataRetriever interface. This class is now responsible for communicating with the database, not our DataProcessor class.
    [TestClass]
    public class DataProcessorTest
    {
        [TestMethod]
        public void ProcessDataTrue()
        {
            var dp = new DataProcessor(new DataRetrieverMock() { EmulateHasData = true });
            Assert.IsTrue(dp.ProcessData(), "DataProcessor should have data");
        }

        [TestMethod]
        public void ProcessDataFalse()
        {
            var dp = new DataProcessor(new DataRetrieverMock() { EmulateHasData = false });
            Assert.IsFalse(dp.ProcessData(), "DataProcessor should not have data");
        }
    }
    class DataRetrieverMock : IDataRetriever
    {
        public bool EmulateHasData { get; set; }

        public bool HasData()
        {
            return EmulateHasData;
        }
    }
Now, through the magic of DI we are able to write unit tests that exercise the method ProcessData without hitting the database! You can see in the above 2 test methods when we create an instance of DataProcessor, we also pass in a brand new instance of DataRetrieverMock. DataRetrieverMock is a concrete implementation of IDataRetriever (just like ConcreteDataRetriever is) that doesn't actually hit the database. Yay dependency injection!

You may also be thinking to yourself "hey, with the logic code (the class DataProcessor) decoupled from the data retrieval code (IDataRetriever and DataRetriever), I bet it would be easier to switch out the data storage mechanism huh?" Well you're right! that's another side benefit of DI; in general, it keeps your external dependencies separate from the business logic, so if you need to retrieve the same data from somewhere else you just write another Concrete implementation of the external retriever interface. Spifferiffic!

What's Next?

I think your time would best be spent Christmas shopping, so get that out of the way. Come back refreshed next week for part 4.

References

http://msdn.microsoft.com/en-us/library/ms182517(v=vs.100).aspx