Showing posts with label Visual Studio. Show all posts

Thursday, May 28, 2015

Visual Studio Plug-In: Developer Assistant

Visual Studio Developer Assistant Plug-In

This will be a quick blog folks, I'm just covering a nifty plug-in for Visual Studio called the Developer Assistant. It's a free plug-in from the folks at Microsoft. What's it do? It helps find code samples (github, Bing search, and even your own local code repositories) with a search feature, it enhances the built-in intellisense feature of Visual Studio, there is a compiler error search assistant feature, and there's probably more but that's all I've run across so far.

You can find out more here: Visual Studio Developer Assistant Plug-In

Note: I've only used it in VS 2013 Community Edition. It may be usable in other versions of Visual Studio.

Thursday, February 5, 2015

ASP.Net Web.config Transformation

Intro

Did you know there's an easy way to change your web.config when you deploy it? This doesn't involve you manually modifying the web.config after or prior to deployment, or writing some special script to edit the file for you on the live server. Nay fellow coders, nay! All you have to do is create something called a transformation file, put a little bit of xml in it, and when you deploy, the web.config that gets deployed will be magically transformed by Visual Studio. Let's see how the magic is woven.

Note: This blog was done using VS 2013 Community Edition. VS 2013 Express should work the same. Earlier and later versions of VS may differ.

Howdie-Do

First, fire up Visual Studio and create a new Web Application. Make it an empty web application. We don't need any special technologies like Web Forms or MVC as the site won't do anything. We're just demoing how to transform web.config files.

You should now have a web application in Visual Studio that looks like the below screenshot. It's pretty sparse, but that's ok; that's what we want. Notice how your web.config file can be expanded with that little arrow to the left of it? Go ahead and click that. You'll see that 2 files live underneath web.config, namely web.debug.config and web.release.config.


These 2 gems are where we cast our spell. First things first though, let's see what's in the web.config. Open 'er up. Yours should look similar to the one below. Not much in here either, and that's perfect. It will make illustrating this technique easier.


The key element for our purposes will be the compilation tag. See that debug="true" in there? It's generally considered bad practice to leave that in your deployed web.config file, as it creates potential performance issues and security vulnerabilities. Our goal then is to have the configuration transformation process set debug to false or remove it.

OK let's get crackin! Open up your Web.Release.config. I'll assume that when you want to push your website live you'll be building the solution in release mode, but I'll show you how to set the compilation mode during deployment in a little bit.

This file has more content than the web.config. Still not very many tags though. And hey, what's that? A compilation tag? Yeppers it is! Visual Studio has assumed for you that you'll want to modify the compilation tag when deploying in release mode. Most importantly, see the xdt:Transform attribute? This attribute, with its value of "RemoveAttributes(debug)", tells Visual studio to remove the debug attribute from your web.config during deployment. Well slap me and call me Jill, that's precisely what we wanted. Yeehaw! No coding necessary even!


Now it's time to see how to deploy the site. Right-click the web application project in Solution Explorer and choose the menu item "Publish".


Normally you might deploy to Azure or something else equally nifty, but for the sake of brevity we'll deploy to the local machine. Choose "Custom" as the publish target. A popup window will come up asking what you want to name the publish profile. Name it whatever you like.


On the next screen choose "File System" as the publish method, and point the Target location wherever you like on your computer.


On the next screen of the wizard choose "Release" as your Configuration, then click the "Publish" button.


Once VS is done publishing, use Windows Explorer to browse to the directory you published the site to. Open up the deployed web.config in whatever text editor you like. See that lovely compilation tag? No debug attribute! Success! FYI, if the debug attribute is not present, its value defaults to false.


What's Next?

There is a lot more you can do with Web.config Transformation files. You can replace elements, remove elements, add elements, add/remove/modify attributes and more. Check out the link below in the Resources section to see how to do all that you could possibly want and then some.

Resources

Web.config Transformation Syntax

Thursday, January 22, 2015

VS 2010 Web Deploy Projects and web.config File Section Replacement

Intro

Let's pretend you want to have a different web.config file for live vs qa vs dev. If you're working on a web site (not web application) in Visual Studio you don't have access to web.release.config and web.debug.config, the easiest of the transformation methods. However, don't fret! With a web site you still have the option of creating a Web Deployment Project and enabling web.config file section replacement.

Why might you want to use this? Here's one common scenario. It's common knowledge that in the compilation element of your web.config, you don't want to leave it set to debug="true" in your production deployment. This has both security and performance implications and is just a good idea to have your site set to live mode rather than debug mode. Using web.config file section replacement with a Web Deployment project makes this quick and easy.

Creating a Web Deployment Project

For the remainder of this blog I'm assuming you already have a VS2010 solution with a web site project in it. If not, find one or create one. Onward...

Step #1 in getting all this going is creating a Web Deployment Project. Open up your VS 2010 solution (feels weird doing that; I've done nothing but VS2013 for this blog so far). Hey I suppose this probably works in VS2013 too, I just haven't tested it there. But I digress. Right-click the web site and select "Add Web Deployment Project...".


Name it whatever you like on the next screen and click "OK" when ready.


That was painless. You've got your first web deployment project ready to roll.


Web.config File Section Replacement

Open up the web.config if your site and scroll down to the "compilation" tag. It probably looks something like this:

    <compilation debug="true" targetFramework="4.0">

It's that debug attribute we want to do something about. You want to leave it true when you're debugging, as it makes debugging possible. But when you push this somewhere that the outside world can get at it, say on a production server, you want that set to false as it's more performant and more secure than the alternative. Let's do this! Right-click on your new web deployment project and select "Property Pages". On the window that comes up, click on "Deployment" in the left-side view. Check the box that says "Enable Web.config file section replacement" and put the following text in the big textbox: "system.web/compilation=web.compilation.config;". I tend to do this for both the Debug configuration (the drop-down in the upper-left) as well as the Release configuration, and if you're not sure which build configurations are used for what just do this in both of them. Click OK when you're done.


That's half the picture; we told the web deploy project to use a file called web.compilation.config, but that file doesn't exist yet. Create this file in your web site. Open up your web.config, copy the contents of the "compilation" tag and it's children, and paste it all into your new web.compilation.config file. Now set that debug attribute to "false" in the web.compilation.config file and save it. Mine looks like this, yours will be similar (though my sub-tags are probably different):

<compilation debug="false" targetFramework="4.0">
  <assemblies>
    <add assembly="System.Design, Version=4.0.0.0, Culture=neutral, PublicKeyToken=B03F5F7F11D50A3A"/>
    <add assembly="System.Windows.Forms, Version=4.0.0.0, Culture=neutral, PublicKeyToken=B77A5C561934E089"/>
    <add assembly="System.Web.Extensions.Design, Version=4.0.0.0, Culture=neutral, PublicKeyToken=31BF3856AD364E35"/>
    <add assembly="System.Speech, Version=4.0.0.0, Culture=neutral, PublicKeyToken=31BF3856AD364E35"/>
  </assemblies>
</compilation>


Arrsome! Now we have web.config file section replacement running, so what do we do with it? Post the site!

Deploying The Site Manually

The simplest method of posting your site to take advantage of replacement is to just copy the files. Right-click on the web deployment project and select "Build". When it's done building, right-click the web-deployment project in VS again and select "Open Folder in Windows Explorer". Open up either the "Debug" or "Release" folder (depending on which build configuration you're using), and voila! Them files be yer website. If you want to verify that your web.config file was properly transformed, just open it up from this folder and find the compilation element. It should have debug set to false.

Caveats

Web deployment projects are kind of slow to compile. For that reason you don't want to build the deploy project every time you compile your website. You can tell VS to only compile your web deploy project when you explicitly compile it (by right-clicking it and selecting "Build"). To do this, right-click your solution in VS and select "Configuration Manager...".


 On the Configuration Manager screen select the solution configuration(s) you want to change (I usually set both Debug and Release), and uncheck the "Build" checkbox for the deploy project. Click "Close" when you're done and save everything. Now when you build the solution the deploy project won't compile.


What's Next?

Web applications (not web sites) have a cleaner method of web.config transforms, using web.debug.config and web.release.config. Play around with it, see if you like it.

You could also see what other transforms are possible using the above method. Hint: You can transform just about any element, not just the "compilation" element!

Friday, December 26, 2014

Visual Studio: SQL Server Database Projects Part II

Intro

Last week in Part I of this 2-part series we saw how easy it is to setup a database project in Visual Studio, allowing us to treat databases similarly to how we treat our other code. Because our creations and changes are represented as .sql files, we can source-control our database systems which makes releasing and deploying our systems just a little bit easier and more predictable. Last week we saw how to create a new database via one of these projects. This week, we'll see how to create a database project for a database that already exists, as well as how to compare your project schema to the target database's schema. Hold on to yer hats! Or if you're Dan, eat a hat.

Hook up to an Existing Database

If you created a solution file last week for the databases in Visual Studio blog, open that solution file back up. If not you can just create a new solution, however the instructions given here are using last week's solution file as the base. You may have to make slight modifications to your own steps if you create a new solution but I bet you can get there. I also have a pre-made database named BlogLinq.ZooContext. This is one we made many moons ago in a blog posting far far away. If you don't have a pre-made database you can hook up to then go create one real quick and add a small table or two to it. OK, on with the show!

Right-click your solution in the Solution Explorer and add a new project. Select "SQL Server Database Project" as the project type, name it whatever you want, and click OK. You should have a new project in your solution.


Right-click on the new database project and select Import-->Database.

On the "Import Database" screen that comes up, click the "New Connection..." button. Type in the proper information for your connection and click the "Test Connection" button. Assuming things work out OK, click the OK button.


This takes you back to the "Import Database" screen where you can click the "Start" button, which will import your database schema into the database project. If all goes well, you now should have new folder(s) and within those some new sql files that represent your tables. Cool huh?


Schema Comparison

Now that we've seen how to create a database project from an existing database, what do we do with it? As you can imagine, we're going to want to make changes to the schema and eventually deploy said changes. I'm going to open up the Shows table and add a new column for the time of the show. Here's my new table structure:

I've added a column, so obviously this definition is different from the live database schema. Let's prove it by comparing the schemas. Right-click the project in Solution Explorer and select "Schema Compare...".

This brings up the schema comparison window. On the left side is your database project. On the right-side is nothing! Open up the drop-down and choose "Select Target...".

This brings up the "Select Target Schema" window. Select your database and click the "OK" button.

Now click the "Compare" button.

You are presented with the results of the comparison. Yippee! It can tell that we've added a new column to the Shows table named showtime. This is so freakin sweet. I don't want to get too in-depth on what you can do from here, but if you take a look at those other buttons in this window you can see there is an option to deploy the changes, generate sql scripts for later deployment, view unchanged items, and more. Have fun!


What's Next?

Play around with some of the other options available to you. Make a couple databases, update them, etc. It's fun! If you have any questions or comments, leave them in the comments section below and I'll be happy to help out.

Resources

SQL Server Database Development in Visual Studio

Thursday, December 18, 2014

Visual Studio: SQL Server Database Projects

Intro

Did you know that you can create and modify your SQL Server databases from within Visual Studio? Further, did you know that you can then put your database modification scripts into source control? Yes that's right folks, fully source controlled SQL databases right from within your favorite code editor. This goes beyond just running SQL queries against your database (which you can also do from Visual Studio by the way) and into modifications of the structure of your database using DML.

Why would you want to do this? Well you may have noticed, but as a coder you use source control. This allows you to easily version your code, branch your code, and it simplifies releasing of your code (somewhat) since you know what changes were done when and for what version of your system. If you've never source-controlled a database, which I'm sure many of you haven't, then you know releasing database modifications in tandem with code is an error-prone process. You have to rely too much on the right people remembering what they did at release time, and it can cause issues. Well having your SQL modifications in source control does the same thing for databases that source control does for code: it simplifies versioning. The rest of this blog will be dedicated to showing you how to perform the amazing feat of database development via Visual Studio. Hang on to your hats folks, this is gonna be a fun ride!

Note: The rest of this blog assumes that you have SQL Server 2014 Express Edition installed, or you have access to another SQL Server 2014 database engine. If you do not, please install from the previous link or contact your local friendly DBA for access to a non-production SQL 2014 box.

Create a New Database Project

To start things off we'll see how to create a new database using Visual Studio. Go ahead and fire up VS 2013. Once you get in there, create yourself a new project. Select "SQL Server Database Project" as the type of project and name it whatever you want. I've named mine BlogDatabase.


We've got an empty database project, which would make for a pretty boring deployment scenario. That script would be as blank as Keanu Reeves's whoa face. Let's create a table to put in this database to spruce it up a bit. Right-click the solution over in the Solution Explorer, then click "Add" and "Table...".


Name your table ElTable. Yeah, I'm feeling quite creative this evening. So sue me.

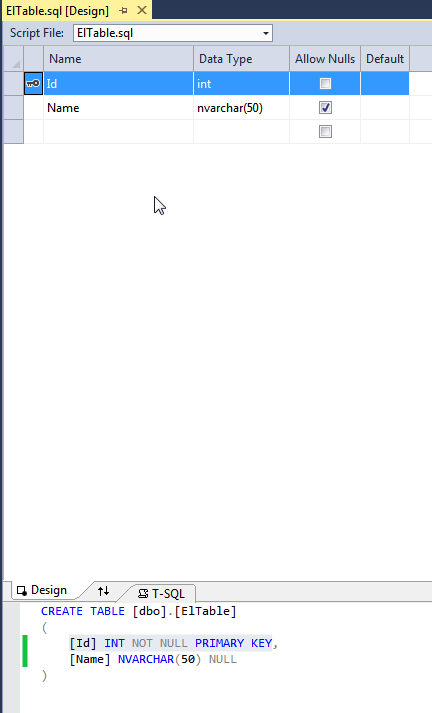
You can now modify your new table with either the designer or with script. Most of you will probably feel more comfortable with the designer portion, and in truth using it is a great way to get used to DML (data manipulation language) if you're not already used to it. Make a change in the designer view, and see what script is generated below it. This script is what SQL Server uses behind the scenes to make the actual database changes, so it's quite helpful to know what it's doing and how it's doing it. In the below screenshot, you can see I've added 2 fields: Id and Name.


Id is an integer and is the primary key field, and Name is just a nullable nvarchar (string) column.

Well that's nifty huh? OK so where's the database that it made? Well, it hasn't actually created a database yet. All this has done is create a script that can setup a database. We still have to publish/deploy this lovely conceptual database before it molts and becomes a real database. First things first though: we need to make sure that our project has the correct version of SQL server selected. These projects can publish to SQL Server 2K8 and up, and it defaults to publishing to the latest which is currently SQL 2K14. Depending on your environment, you may not be working with the latest and greatest.

Right-click on your database in the solution explorer and select "Properties". Select the version of SQL Server that you will end up publishing your database to and save your project. Below you can see my screen where I've set the "Target platform" to SQL Server 2014.


Now that we've made sure we're publishing to the correct version of SQL server, on with publishing the database! In the solution explorer, right-click on your database and select "Publish". A dialog window will come up asking you what server to connect to. Click on the Edit button.


This will bring up another dialog where you can specify your database server connection properties. Enter whatever information you have for the connection. For me you can see it's a local SQL installation on my compie named Peeticus-PC\SQLExpress.


Don't bother hitting "Test Connection", as it will fail. Your database doesn't actually exist yet so it can't connect properly, but that's OK. We're about to create the database. Just hit the OK button when you have your information entered here.

Now back to the first dialog: you have 2 options for deploying the database. You can either click the "Publish" button to have Visual Studio automatically create the database and all of it's structure for you, or you can click the "Generate Script" button which will obviously generate the SQL scripts you need and you can then run them manually to set things up. For simplicity's sake, we'll just have Visual Studio publish the database for us, so click the "Publish" button. If all went well, your "Data Tools Operations" window should have a green success message like the following:

Go ahead and connect to your database server with SQL Server Management Studio (SSMS), you should see your new database along with the table you plopped into it:


You can query your database via SSMS or yell at it or whatever, as it's now a real database.

What's Next?

Next week we'll see how to hook up a database project to an existing database, how to compare your current set of modifications to the target database, and we'll see some advanced options you can set within a database project. 


Resources

SQL Server Database Development in Visual Studio

Thursday, October 30, 2014

SignalR - C# Client

Intro

In Part 1 of this duet of posts I gave a brief overview of WebSockets, creating a basic SignalR server, and a JavaScript/html SignalR client. Here in the 2nd part we'll see how to create a C# client of SignalR. For the example we'll be using a WinForms project, but you could easily adapt this to a console program, windows service, WPF, DLL, or whatever you desire in C#. On to the code!


Code Sample

First, here's where we left off with our code last week. Download it and open it up in VS 2013. Review Part 1 if you're fuzzy on how some of this stuff works then come on back.

We'llstart today's coding by creating a new WinForms application in VS Express 2013. Go ahead and create yours. I've named mine BlogSignalRClient. Open up Form1 in designer view and add a textbox. Make it MultiLine and give it both scroll bars.

Now add the Microsoft.AspNet.SignalR.Client NuGet package to the new project. Open up the Form1.cs file in code view and paste in the following code:

using Microsoft.AspNet.SignalR.Client;
using System;
using System.Windows.Forms;

namespace BlogSignalRClient
{
    public partial class Form1 : Form
    {
        public IHubProxy HubProxy { get; set; }
        public const string ServerUrl = "http://localhost:61376/";
        public HubConnection Connection { get; set; }

        public async void Connect()
        {
            Connection = new HubConnection(ServerUrl);
            HubProxy = Connection.CreateHubProxy("NotificationHub");
            await Connection.Start();
            HubProxy.On("BroadcastMessage", (message) =>
                this.Invoke((Action)(() =>
                    textBox1.AppendText(String.Format("{0}" + Environment.NewLine, message))
                ))
            );
        }

        public Form1()
        {
            InitializeComponent();
        }

        private void Form1_Load(object sender, EventArgs e)
        {
            Connect();
        }

    }
}


You'll notice that in the Load event we're calling our Connect method. This creates a connection to the SignalR Hub named "NotificationHub" that we created last week. It then creates an instance of HubProxy that will mirror the methods from our SignalR hub. It then opens up the connection, and finally creates an event on the proxy such that when a message is broadcast via the BroadcastMessage method, we will respond in the app by adding the message to our textbox.

Let's test this sucker. If you haven't already, open up last week's project in Visual Studio 2013 and run it. Navigate to the admin.html page as it's where we send messages. Take note of the port you have in your browser window, and modify the code from above appropriately. Now launch the new WinForms app. Click back on your browser window again and type something into the box, then click the Disseminate button.


Click back on your WinForms app again and voila! You should see the message displayed in your textbox.


What's Next?

That's about it for my foray into SignalR. I suggest you experiment with it on your own, see what apps you can think of that would benefit from a real-time 2-way conversation and make them.

Resources

Using SignalR in WinForms and WPF
My WinForms SignalR Code

Thursday, April 10, 2014

A Chess Project, Part 11

Intro

Last week we wrote some more unit tests and fixed up some bugs as a result. Overall we're making great progress but we've still got 3 conceptual tasks left: Evaluate the board position in a quantifiable manner, write an algorithm that emulates a tree structure so we can pick the best possible future outcome, and call all this sweet sweet awesomeness from our web api.


Stalemate and Checkmate

As part of evaluating a board position, we have to check for the end-of-game conditions: stalemate and checkmate. Stalemate should be pretty easy to check. Here are the conditions (based on whose turn it is):
  1. Is the player's king in check? (looking for false)
  2. Does the player have any valid moves available?  (looking for false)
If both of these conditions are met, then we're in luck!

And hey, guess what? Checkmate is just as easy. Here are the conditions for checkmate (based on whose turn it is):
  1. Is the player's king in check? (looking for true)
  2. Does the player have any valid moves available? (looking for false)
If both of these conditions are met, well you get the picture! And best of all, we already have methods that look for check IsKingInCheck() and any valid moves CalculateValidMoves(), so the code is actually done already. Yay us!


AI - Overview

There is such an incredibly body of work out there regarding chess AI; we could go on for years on the topic. Broadly speaking though, we really need 2 parts to our AI (we're keeping things simple):
  1. Evaluate a given board position;
  2. Calculate future board positions, and eventually pick the "best" move.
  3. Strategy: what's that? I wouldn't know a chess strategy if it mated me in 5 moves. We'll skip an attempt at strategy for now, and maybe forever.
We'll start first with evaluating the current board position. Take a couple minutes to think about how you might tackle this and then check back in when you're ready.
...
...
Before we jump into coding, a little background on my level of play. When I play chess, I almost always play against a computer of some sort. My current program of interest is called Shredder (the iPad version), and it has me ranked as "Casual" in human terms (thanks; BTW i own you Mr. computer, so nyah), with an Elo rating of 1290. Why do I tell you this? Well it's certainly not to brag about my rating of casual; that would be like bragging that you've already showered this month when it's only the 10th. I merely wish to begin setting your expectations of what we will achieve. I will be extremely excited if we can get our basic AI here playing anywhere near my level of 1290. The current chess world champion has a rating over 2800, and Master candidate+ ratings start around 2200. And no this doesn't mean 1100 is halfway to becoming a chess master :).

Now, with my 1290 Elo rating in the back of your brain, here are the criteria I would like to use to evaluate the board:
  • Material: more pieces = better odds of winning. Some pieces are better than others.
  • Board control: The more squares you control (threaten), the better your odds are of winning. 
    • Side note: we're going to keep our algorithm uber-simple. Some algorithms treat middle squares as more valuable than edge and corner squares, and really a pawn doesn't "threaten" a square in front of him just because he can move to it; but hey, we have to start somewhere and this blog is already 11 posts long.
And here are a few more that we'll ignore in order to keep things simple. If you're interested in this topic, I strongly encourage you to branch out on your own and try some of these:
  • Initiative: The player with the initiative is the one dictating the direction and pace of the game, and this gives the player an inherent advantage.
  • Pressure: see initiative. More important as a psychological tool against humans though.
  • Pawn structure: 
    • Pawns generally work best when not stacked together on a single file/column. 
    • Pawns work best with the smallest # of "islands". A pawn island is a contiguous section of pawns. For example, at the start of the game you could be considered to have 1 big pawn island. If you lose the pawn on the b-file and the e-file, you now have 3 pawn islands (a, c-d, f-h).
  • King protection in early and mid-game: in the early/mid game it's usually better to have your king protected behind a shield of pawns. Thus castling and other king protection options should be favored. Other than tweaking the algorithm for threatened squares, this would probably be my #1 choice of things to add to our algorithm.
  • Opening move database: Many of the first 2-10 moves have been mapped out and analyzed quite thoroughly, and all the best chess programs out there use such a database.
  • End-game database: There are databases out there for 5-6 pieces on the board where the entire possible game is completely mapped out. What an advantage! A computer with a hookup to these will be able to know the perfect path to checkmate or stalemate, whichever is better for it given the current board situation.
  • Some people think having 2 bishops is better than having 2 knights or a knight and a bishop. Is it accurate? I dunno, the jury's out.
  • We could get a lot more complicated with things like stacked rooks on a file, rook(s) on the 7th rank, x-rays, forks, etc, but these are also a topic best handled outside the blog. 

Board Evaluation - Material

For now we'll use somewhat of a standard in the chess evaluation world.We'll use a numeric evaluation of the board, where a positive number means white has a better position and a negative number means black has a better position. Pawns will count for 1 point, Knights and Bishops 3, Rooks 5, Queen 9, and the King is immeasurable in terms of value.

I've babbled enough, let's do some code! Funny how a coding blog can have over a full page of text before any code is even discussed huh? :P. If you need to download the source code from the last blog post do so now.

First, it's possible I may want (or you may want) to have multiple algorithms for board evaluation and best move calculation, so I want these driven by interfaces. Start by creating an interface in BlogChess.Backend.dll called IPositionEvaluator.

We'll just have a single property to represent the game, and a single method in there called Evaluate, which accepts no parameters and returns a value of type double.

namespace BlogChess.Backend
{
    public interface IPositionEvaluator
    {
        ChessGame Game { get; set; }
        double Evaluate(ChessGame game);
    }
}


Now create a new DLL in our solution to hold the AI logic. We'll call it BlogChess.AI.Basic1. Create a class in the DLL called PositionEvaluator. In this new dll add a reference to BlogChess.Backend.dll. Make sure the new class implements the new interface. You should have something like this so far:

using System;
using BlogChess.Backend;

namespace BlogChess.AI.Basic1
{
    public class PositionEvaluator : IPositionEvaluator
    {
        public ChessGame Game { get; set; }
        public double Evaluate()
        {
            throw new NotImplementedException();
        }
    }
}


I also want, for now, a new constants class here in the AI dll to hold a few things. Go ahead and create it, call it AIConstants.


For starters there won't be much in here, just some piece values. Hearken back to the BlogChess.Backend.Constants class where pieces on the board have a numeric representation of -6 thru +6 and you can see that these piece evaluation values in the below code snippet line up with those numeric representational values as far as indexing is concerned:

namespace BlogChess.AI.Basic1
{
    public class AIConstants
    {
        public static double[] PieceValues =
        { 
            0, //no piece on square
            1, //pawn
            3, //knight
            3, //bishop
            5, //rook
            9, //queen
            100000, //king
        };
    }
}


As you can see, nothing fancy in here. We're just defining some numeric values to represent how much a piece is worth.

I also wish to create another new class, we'll call this one MaterialEvaluator. Why do I want this separated out from the PositionEvaluator class? It seems like I could just as easily put the different evaluation criteria right there in the Evaluate method. However, there's a catch to putting it all in the same method; it's harder to verify that the code is doing what it should. It will be much easier to unit test this stuff if we separate out the different evaluation criteria into their own classes. I'm all about the unit testing, and I'm the one writing the blog so we're doing it my way! Go ahead and create that MaterialEvaluator class in the BlogChess.AI.Basic1 dll. Make it look like this:

using System;
using System.Linq;
using BlogChess.Backend;

namespace BlogChess.AI.Basic1
{
    public class MaterialEvaluator : IPositionEvaluator
    {
        public ChessGame Game { get; set; }
        protected ChessBoard CurrentPosition
        {
            get { return Game.Positions.Last(); }
        }

        public MaterialEvaluator(ChessGame game)
        {
            if (game == null)
                throw new ArgumentNullException("The game cannot be null", "game");
            if (game.Positions == null || game.Positions.Count() == 0)
                throw new ArgumentException("The game must have at least 1 position");
            Game = game;
        }

        public double Evaluate()
        {
            double result = 0.0;
            for (short row = 0; row < 8; row++)
            {
                for (short col = 0; col < 8; col++)
                {
                    var piece = CurrentPosition.Board[row, col];
                    result += AIConstants.PieceValues[Math.Abs(piece)] * Math.Sign(piece);
                }
            }
            return result;
        }
    }
}


As you can see, I went ahead and implemented the IPositionEvaluator interface on this class even though it's not meant to be a top-level evaluator. Why? Well it just made sense really. It needs a reference to a game object and it needs a single Evaluate() method, so it just fit right.We also gave it a constructor that takes a Game parameter, as the class needs to know what it's evaluating. The property CurrentPosition is just a helper property that we can use instead of having to call Game.Positions.Last repeatedly. Within the evaluate method all we do is loop through the squares of the board, and add up the material values contained therein.

We have one more task to do before we get back to the PositionEvaluator class that we created...we are going to evaluate the game based on the # of moves available to each player. For now we'll keep it simple and just value each available move exactly the same based on a constant. Go ahead and add the new constant to AIConstants.cs as below (new const is named AvailableMoveValue).

namespace BlogChess.AI.Basic1
{
    public class AIConstants
   {
        public static double[] PieceValues =
        { 
            0, //no piece on square
            1, //pawn
            3, //knight
            3, //bishop
            5, //rook
            9, //queen
            100000, //king
        };

        public const double AvailableMoveValue = 0.05;
    }
}


And we of course need to use this new constant somewhere. Guess what? Another class :). Create a new class in the AI dll named AvailableMovesEvaluator. This is also a fairly simple class, though it has slightly more meat than the one before. Here's a look-see at the class, I'll explain it after you take a look at the code:

using System;
using System.Collections.Generic;
using System.Linq;
using BlogChess.Backend;

namespace BlogChess.AI.Basic1
{
    public class AvailableMovesEvaluator : IPositionEvaluator
    {
        public ChessGame Game { get; set; }
        protected IList<ChessBoard> ValidMoves { get; set; }
        protected ChessValidMoveCalculator ValidMoveCalculator { get; set; }
        protected ChessBoard CurrentPosition
        {
            get { return Game.Positions.Last(); }
        }

        public AvailableMovesEvaluator(ChessGame game, IList<ChessBoard> validMoves, ChessValidMoveCalculator validMoveCalculator)
        {
            if (game == null)
                throw new ArgumentNullException("The game cannot be null", "game");
            if (game.Positions == null || game.Positions.Count() == 0)
                throw new ArgumentException("The game must have at least 1 position");
            if (validMoves == null)
                throw new ArgumentNullException("The validMoves cannot be null (it can be empty though)", "validMoves");
            if (validMoveCalculator == null)
                throw new ArgumentNullException("The validMoveCalculator cannot be null", "validMoveCalculator");
            Game = game;
            ValidMoves = validMoves;
            ValidMoveCalculator = validMoveCalculator;
        }

        public double Evaluate()
        {
            double result = 0.0;
            var colorMultiplier = Game.GameStatus == GameStatus.WhitesTurn ? Constants.WhiteTransform : Constants.BlackTransform;
            result += colorMultiplier * ValidMoves.Count() * AIConstants.AvailableMoveValue;
            var originalStatus = Game.GameStatus;
            Game.GameStatus = Game.GameStatus == GameStatus.WhitesTurn ? GameStatus.BlacksTurn : GameStatus.WhitesTurn;
            var oppositeMoves = ValidMoveCalculator.CalculateValidMoves();
            colorMultiplier = Game.GameStatus == GameStatus.WhitesTurn ? Constants.WhiteTransform : Constants.BlackTransform;
            result += colorMultiplier * oppositeMoves.Count() * AIConstants.AvailableMoveValue;
            Game.GameStatus = originalStatus;
            return result;
        }
    }
}


Again, quite similar to the last class. The only difference really, other than the criteria used for evaluation of course, is that we have 2 more parameters in the constructor. These are here purely for the sake of efficiency. We'll be evaluating potentially millions of board positions in a short amount of time, and rather than creating and calculating extra lists of valid moves and move calculation objects, I would rather pass them in. I need them in the Evaluate method anyways, as you can see in the above code.

Now back to the main evaluation class that we created earlier, PositionEvaluator.We need to check for checkmate and stalemate, then call our other 2 evaluation classes. This code is pretty simple:

using System;
using System.Collections;
using System.Collections.Generic;
using System.Linq;
using BlogChess.Backend;

namespace BlogChess.AI.Basic1
{
    public class PositionEvaluator : IPositionEvaluator
    {
        public ChessGame Game { get; set; }
        protected ChessBoard CurrentPosition
        {
            get { return Game.Positions.Last(); }
        }

        public PositionEvaluator(ChessGame game)
        {
            if (game == null)
                throw new ArgumentNullException("The game cannot be null", "game");
            if (game.Positions == null || game.Positions.Count() == 0)
                throw new ArgumentException("The game must have at least 1 position");
            Game = game;
        }

        public double Evaluate()
        {
            //setup some locals for later use
            double result = 0.0;
            var validMoveCalculator = new ChessValidMoveCalculator(Game);
            var validMoves = validMoveCalculator.CalculateValidMoves();
            var isKingInCheck = validMoveCalculator.IsKingInCheck(Game.GameStatus == GameStatus.WhitesTurn, CurrentPosition);

            //look for checkmate
            if (validMoves.Count() == 0 && isKingInCheck)
                return (Game.GameStatus == GameStatus.BlacksTurn) ? AIConstants.PieceValues[Constants.King] : -AIConstants.PieceValues[Constants.King];
            //look for draw
            if (validMoves.Count() == 0 && !isKingInCheck)
                return 0;

            //evaluate based on non-victory/draw conditions
            result += new MaterialEvaluator(Game).Evaluate();
            result += new AvailableMovesEvaluator(Game, validMoves, validMoveCalculator).Evaluate();

            return result;
        }
    }
}


Just like I said, simple. We look for victory, draw, and then delegate the rest of our activity to those other 2 classes we created.

What's Next?

Regarding the calculation of future board positions, you can take my word for it that we will not be able to figure out the best move by evaluating every possible chess position available. If today's supercomputers can't do it, we're not going to accomplish it with a starter web service. We'll go into this final piece of the AI more in-depth next week, but suffice it to say we will barely scratch the surface of chess AI programming with our simple board evaluation and the decision tree next week.

For those of you who wish to play with a copy of the latest code, I've placed a link to it below here. One thing I didn't cover in the blog this week is unit testing of the new code. Take my word for it that I did unit test the new code and it did in fact reveal some bugs that were eradicated before I put them in the blog post. You can find the new unit tests within the source code in a dll named BlogChess.AI.Basic1.Test.

The Code

Resources

Wikipedia - Computer Chess
Wikipedia - Elo Rating System

Thursday, March 27, 2014

A Chess Project, Part 10

Intro

We got a good start on our unit testing in the Chess Project Part 9 posting last week. We unit tested every possible move for white pieces, created a spiffy new html format for chess boards to ease our unit testing, and we tested many of our helper methods in other classes as well. This time around we will finish up unit testing the current suite of functionality. We have to add unit tests for some of the valid black piece moves (I only deem it worth our time to create tests for moves unique to black; his pawns and king castling moves, make sure black pieces can't put their own king in check) and we have just a few helper methods within ChessValidMoveCalculator to test out. Then we're green to move on to the super-fun part (next week), starting to figure out what the "best" move is for a given chess board!

The Code

Like last week, I think it best to start off by giving you this link to the code. There are too many new unit tests forming too much code to paste it in the blog, so at your leisure please download it from the link, open it up, build it, and take a look at the new unit tests. Then come on back so we can discuss them.

Unit Tests

We'll start with pawn moves. Obviously black's pawns move down the board while white's pawns move up the board, so their move calculations are different. This is why I decided to unit test black pawns separately from white pawns. You can see by looking at the unit test file that I mirrored all the white unit tests with black as far as pawns are concerned, so we should have full coverage.

I'm going to skip unit testing of black Knight, Bishop, Rook, and Queen moves. Why? These pieces move exactly the same whether they are white or black. The only difference is that white pieces can't put the white king in check, and black pieces can't put the black king in check, but I don't have to duplicate all my tests to check 1 situation per color. I did however recreate the majority of the king's unit tests as castling is different (white castles on row 7, black on row 0), so you can see in our unit test code that most but not all of the king testing is duplicated from white to black. I also renamed some of the unit tests to better denote color and direction.

We also added 8 more unit tests (4 each) for ColorThreatensSquare and IsKingInCheck, testing the positive and negative and black/white of each method.

You may have also noticed I had to fix more code. This just reaffirms my love of unit tests. See if you can find the code I had to fix. Here's a hint: it had to do with checking if a move would put the same-color king in check.

What's Next?

That's it for this week folks! We have 1 solution, 4 projects, dozens of classes, 80 unit tests, 1 web API, etc etc. Next week we'll FINALLY get to the whole point of this project, calculating the "best" move. I haven't a clue how long that will take us to do, it could be 1 post or 5, we'll just have to wait and see. 

Thursday, March 20, 2014

A Chess Project, Part 9

Intro

As promised last week in Part 8, this week is all about the unit tests. We've got a pretty sizable chunk of code going in this project and so far we have no way to test any of it. I don't plan on creating a GUI for this solution (at least not in this series of blog posts), so unit testing is the way to go. Please view my unit testing series of blog posts (UT1, UT2, UT3, UT4) for a quick refresher on unit testing if necessary.

The Code

I think it will be easier to understand what's going on if I give you a link to the code at the top of the article this time, so here you go. Once you have it pulled down, extracted and compiled come on back for the remainder of the article.

Unit Tests

As you can see in the screenshot below, I created a new unit test project in the solution named BlogChess.Backend.Test.
This is where all our unit tests for the project are going. As of the time I am writing this, there are 57 unit tests in the solution. That is a bit too many for us to walk through in the blog, so at your leisure please dig through the code and see what's going on. The unit tests at this point cover the vast majority of our functionality from the backend dll. We are testing the validation code, board size, and all the valid moves for white. The only things left to test are the black piece move validation methods, and we'll do that in the next blog post.

As a result of all this unit testing, I found 2 other things necessary. First, I had to fix some bugs. I know what you're thinking: "But Pete, you don't make mistakes!". Well I appreciate the kind words (you were thinking them, admit it!), but yes I actually do make mistakes. I bet I fixed a half-dozen of them thanks to the unit tests. I won't detail all of them (mostly because I don't remember what they were at this point), but suffice it to say they would have made this project rather useless if they had been left to fester. The second thing I found necessary while creating unit tests was to have a way to visualize a chess board so that I could set up specific positions in the unit tests, and validate piece movement. Cue dramatic new bold sub-heading...

New Format, New Formatter/Parser (use of html agility pack)

...So, I created a new chess format. Sure arrays are great for representing a chess board, but which is easier to work with when creating a unit test? This...

{ {-4, -2, -3, -5, -6, -3, -2, -4}, {-1, -1, -1, -1, -1, -1, -1, -1}, {0, 0, 0, 0, 0, 0, 0, 0}, {0, 0, 0, 0, 0, 0, 0, 0}, {0, 0, 0, 0, 0, 0, 0, 0}, {0, 0, 0, 0, 0, 0, 0, 0}, {1, 1, 1, 1, 1, 1, 1, 1}, {4, 2, 3, 5, 6, 3, 2, 4} }


or this?

So, I invented a new chess format (it sounds a lot more impressive than it really is) and created a class to import the new format. Believe it or not, the above screenshot is pure html/css. There are no images in that. Well the screenshot itself is an image obviously, but it's showing just html/css.

How did we accomplish this? If you're moderately familiar with html/css, it's easier than you might think. It turns out that unicode defines special characters for each of the chess pieces, so as long as the font you are using supports these values, then you can use plain-old-text to represent the pieces. After that it's just a simple matter of putting a board around the pieces you want, and voila! You can look at some of the many samples I put in the solution, using the screenshot below as a guide to finding the files. The essence of the export format though is much simpler than these files allude to. All you need is elements on the page that have a data-col attribute of "a" through "h", and those same elements should have a data-row attribute of "1" through "8". These of course represent the 64 squares of the chess board. For ease of formatting I've elected to use a table (you could use div's, span's, or whatever other html element you feel like using), a modified sample of which you can see below.

    <table>
        <tbody>
<tr>
            <td>8</td>
            <td data-col="a" data-row="8"></td>
            <td data-col="b" data-row="8"></td>
            <td data-col="c" data-row="8"></td>
            <td data-col="d" data-row="8"></td>
            <td data-col="e" data-row="8">♚</td>
            <td data-col="f" data-row="8"></td>
            <td data-col="g" data-row="8"></td>
            <td data-col="h" data-row="8"></td>
        <tr>
</tbody></table>

For some more thorough and much cleaner looking samples with css to format them nicely, take a look at any of the unit test files in the solution as you see highlighted below. These samples all import perfectly fine using our new formatter object, and are also very easy to use the mark-1 eyeball to see what's going on with the board itself by just viewing the file in any modern web browser. Again the above html table is just a sample; obviously you'd need the other 56 squares to make a full board :)


Now, on to the design and code of the formatter. In the future I can see myself wanting to import and export various other chess formats/notations (there are plenty of them), so let's use an interface to represent any type of formatter. We'll call the interface IChessBoardFormatter. Then, because the format we want right now is html based, we'll just call the class HtmlChessBoardFormatter and have the class implement the new interface.


IChessBoardFormatter defines 4 methods: Import, Export, ExternalPieceToNative, NativePieceToExternal. Import and Export should be pretty self-explanatory. ExternalPieceToNative converts an external representation of a piece (in whatever format) to a native piece (a short value from -6 (black king) to +6 (white king). NativePieceToExternal just goes the other direction.

HtmlChessBoardFormatter is the class we'll use to translate boards between our internal representation(arrays of short) and the new human-friendly format (html). For the moment I didn't implement the capability to export; just import. For now I only need this class in order to read in html files for unit testing. It's too much code to put in this blog post, so open up HtmlChessBoardFormatter and take a look at the Import and ExternalPieceToNative methods; they're where the magic is.

If you've never used the Html Agility Pack I highly recommend it for your HTML parsing needs in .net. I've used it in the Import method of the formatter class in order to find html elements with a data-row and data-col attribute, as they are the elements that contain our chess pieces. Here's a sample of it:

            var document = new HtmlDocument();
            document.LoadHtml(sourceBoard);
            foreach (var node in document.DocumentNode.SelectNodes("//*[@data-row]"))
            {
                var sourceRow = node.Attributes["data-row"].Value;
                var sourceCol = node.Attributes["data-col"].Value;


Spiffy huh? Resilient html parsing made easy in .net.

What's Next?

As you may have guessed, we'll have to hit up the unit tests for black pieces/movement and any other public methods of the valid move calculator next week. I can finally see the light at the end of the space-time continuum though, we're almost ready to start coding our "best move" logic! And, thanks to these unit tests, we'll actually be able to suggest valid moves.

Resources

Wikipedia Chess
Wikipedia en Passant
Wikipedia Chess Symbols in UnicodeHtml Agility Pack

Thursday, March 13, 2014

A Chess Project, Part 8

Intro

We're moving right along with this sizable project, a Web API that will tell you the "best" move to make for a given chess position/game. We've created a test page, a Web API for clients to call, and we're still in the middle of calculating valid moves. If you need a refresher, look back through the history of this blog and find parts 1-7; they'll give you the info you need. On to part 8!

Can't Put Your Own King in Check

As I mentioned last week, there is still one major restriction we need to code: you cannot make a move that puts your own king in check. Here is an illustration of such an illegal move:

(white's turn)


Normally the white pawn at d2 (the one with the red arrow pointing at it) could move forward/up one square to d3, or two squares to d4. However, because the black bishop on b4 would threaten the king if the pawn moved out of the way, the pawn cannot in fact move from its current location. This is the type of move we are trying to prevent, so let's figure out how to do that.

Logically speaking, the best thing I can come up with is to pretend that the white piece has moved, and then check the valid moves of all the black pieces. If a black piece would be capable of "taking" the white king, then the previous move was invalid. Keep in mind that this invalidity could count for any type of piece; a pawn move can't put your king in danger, a rook move can't, and so on. This means a logical place to put the code would be in AddMoveToList, as it's already called every single time we add a move to, well, the list.

This isn't where we'll start though. We'll first create a method that tells us if the king is in check. We'll be creative and call it IsKingInCheck. Here's the code for it:

        protected bool IsKingInCheck(bool colorIsWhite, ChessBoard board)
        {
            var kingPosition = FindKing(colorIsWhite, board);
            return ColorThreatensSquare(!colorIsWhite, board, kingPosition.Item1, kingPosition.Item2);
        }


Pretty short and sweet; we find the king, and then return a boolean telling us if the opposite color threatens the square that the king is on. We haven't yet created the FindKing function though, so let's do that now:

        protected Tuple<short, short> FindKing(bool colorIsWhite, ChessBoard board)
        {
            short kingPieceValue = (short)(Constants.King * (colorIsWhite ? Constants.WhiteTransform : Constants.BlackTransform));
            for (short row = 0; row < 8; row++)
            {
                for (short col = 0; col < 8; col++)
                {
                    if (board.Board[row, col] == kingPieceValue)
                        return new Tuple<short, short>(row, col);
                }
            }
            throw new Exception("King not found");
        }


This method determines what the short constant value is for the king based on the color we are looking for, then loops through the board to find the king on it. If there is no king we throw an exception.

It's worth pointing out now that we only need to traverse 1 branch into the tree to check for checks; after all, when you're checking if a piece threatens the king, you don't really care if the piece can actually make the move; you only care if the square is threatened. Because of this we now need to create a new field of class ChessValidMoveCalculator that tells us whether we should allow multi-layer traversal of the tree:

protected bool m_allowCheckSubTrees = true;


If you'll recall, IsKingInCheck calls the pre-existing function ColorThreatensSquare. It is in this function that we calculate the next color's valid moves to see if a square is threatened, so it's in this method that we need to set m_allowCheckSubTrees to false. Here's the updated version of this function:

        public bool ColorThreatensSquare(bool colorIsWhite, ChessBoard board, short row, short col)
        {
            var game = new ChessGame();
            var positions = new List<ChessBoard>();
            positions.Add(new ChessBoard(true) { Board = (short[,])board.Board.Clone() });
            game.Positions = positions.ToList();
            game.GameStatus = colorIsWhite ? GameStatus.WhitesTurn : GameStatus.BlacksTurn;
            var futureCalculator = new ChessValidMoveCalculator(game);
            futureCalculator.m_allowCheckSubTrees = false;
            var futurePositions = futureCalculator.CalculateValidMoves();
            var colorSign = colorIsWhite ? Constants.WhiteTransform : Constants.BlackTransform;
            foreach (var position in futurePositions)
                if (Math.Sign(position.Board[row, col]) == colorSign)
                    return true;
            return false;
        }


What did we do to this method? We first set the game.GameStatus to the turn of the appropriate color, based on who we are checking using the parameter colorIsWhite. I realized when I opened up this unit that I had never set whose turn it is in this "future" game, so I needed to do that in order to keep things from splodin. I then set futureCalculator.m_allowCheckSubTrees to false, so that we don't check to make sure the piece can actually move to determine if it threatens a square, as we don't want a nigh-infinite traversal of our logic tree.

The last thing we need to do is call our new method IsKingInCheck. As I said a few paragraphs ago, the best place to do this is in AddMoveToList.

        protected IList<ChessBoard> AddMoveToList(ChessBoard startingBoard, IList<ChessBoard> boards, short oldRow, short oldCol, short newRow, short newCol)
        {
            var resultArray = new ChessBoard[boards.Count];
            boards.CopyTo(resultArray, 0);
            var result = resultArray.ToList();
            if (newRow >= 0 && newRow < 8 && newCol >= 0 && newCol < 8)
            {
                //check the sign (color) of the current square and future square; if same, don't allow the move
                var startingPieceSign = Math.Sign(startingBoard.Board[oldRow, oldCol]);
                var futurePieceSign = Math.Sign(startingBoard.Board[newRow, newCol]);
                if (startingPieceSign != futurePieceSign)
                {
                    var futureBoard = (short[,])startingBoard.Board.Clone();
                    var piece = futureBoard[oldRow, oldCol];
                    futureBoard[oldRow, oldCol] = Constants.Empty;
                    futureBoard[newRow, newCol] = piece;
                    var newBoard = new ChessBoard(true);
                    newBoard.Board = futureBoard;
                    //check if new board and starting board are the same; if so don't add to valid moves list
                    var equal = futureBoard.Rank == startingBoard.Board.Rank &&
                        Enumerable.Range(0, futureBoard.Rank).All(dimension => futureBoard.GetLength(dimension) == startingBoard.Board.GetLength(dimension)) &&
                        futureBoard.Cast<short>().SequenceEqual(startingBoard.Board.Cast<short>());
                    //make sure the move wouldn't put the current color's king in check
                    var wouldPutSameColorKingInCheck = false;
                    if (m_allowCheckSubTrees)
                    {
                        var futureBoardContainer = new ChessBoard(true);
                        futureBoardContainer.Board = futureBoard;
                        wouldPutSameColorKingInCheck = IsKingInCheck(m_game.GameStatus == GameStatus.BlacksTurn, futureBoardContainer);
                    }
                    //add move to list of valid moves
                    if (!equal && !wouldPutSameColorKingInCheck)
                        result.Add(newBoard);
                }
            }
            return result;
        }


The addition to this function starts with the comment "make sure the move wouldn't put the current color's king in check". Here we first determine if we're supposed to check sub-trees, because if not then we don't care if the move would put the king in check. If we are allowed to check sub-trees we set a local variable wouldPutSameColorKingInCheck to the appropriate value by calling IsKingInCheck, passing in the potential future board. Lastly we add the move to our list of valid moves only if it would not put the king in check.

What's Next?

We're moving right along. Next week we'll create our unit tests. We won't make any actual progress on the "best" move calculation while creating our tests, but we'll give ourselves better confidence that what we've done so far is actually correct and most likely we'll be able to find and fix some bugs.

Here's the link to the current source code.

Resources

  • Online chess board editor "Apronus"

Thursday, March 6, 2014

A Chess Project, Part 7

Intro

Here we are in part 7 of the chess project. Last week we coded most of the valid moves available to our chess pieces. This week we'll tackle the remainder. What's left? En passant pawn captures and castling.


En Passant

I'm going to try not to plagiarize here, but I'm sure quite a bit has been written about en-passant so if you recognize these words, sorry. An en-passant capture is a pawn move where it captures an enemy pawn that has just moved two squares forward, pretending the target pawn has moved only a single square forward. The capturer must be on it's color's 5th rank. It's kind of hard to picture so let me refer you to this Wikipedia article which has some nice pictures.

Open up ChessValidMoveCalculator. Skip down to CalculatePawnValidMoves, as this is where we'll be doing our work. We already have calculations in there for moving forward-left and forward-right, and an en passant capture is a special case of these 2 moves. I won't bore you with too much detail, nor will I claim that this code is 100% perfect (darn my lack of unit testing!). Below you will see the modified portion ChessValidMoveCalculator.

                //forward-left diagonal (only if capturing opponent's piece)
                rowMovementAmount = (short)(1 * rowModifier);
                newRow = (short)(currentRow + rowMovementAmount);
                newCol = (short)(currentCol - 1);
                if (newRow >= 0 && newRow <= 7 && newCol >= 0 && newCol <= 7)
                {
                    if (Math.Sign(m_game.Positions.Last().Board[newRow, newCol]) == -Math.Sign(m_game.Positions.Last().Board[currentRow, currentCol]))
                    {
                        if (newRow == 0 || newRow == 7) //back rank promotions
                        {
                            for (short promotionPieceIndex = Constants.Knight; promotionPieceIndex <= Constants.Queen; promotionPieceIndex++)
                            {
                                short promotionPiece = (short)(promotionPieceIndex * rowModifier);
                                boards = AddMoveToList(m_game.Positions.Last(), boards, currentRow, currentCol, newRow, newCol);
                            }
                        }
                        else
                            boards = AddMoveToList(m_game.Positions.Last(), boards, currentRow, currentCol, newRow, newCol);
                    }
                    else if (m_game.Positions.Count() > 1) //big chunk of logic to see if en passant is possible
                    {
                        if ((currentRow == 3 && currentStatus == GameStatus.WhitesTurn) || (currentRow == 4 && currentStatus == GameStatus.BlacksTurn))
                        {
                            var priorPosition = m_game.Positions.ToArray()[m_game.Positions.Count() - 1].Board;
                            //pawn of opposite color moved up 2 squares next to the current piece
                            if (priorPosition[newRow + rowModifier, newCol] == Constants.Pawn * rowModifier && m_game.Positions.Last().Board[currentRow, newCol] == Constants.Pawn * rowModifier) 
                            {
                                boards = AddMoveToList(m_game.Positions.Last(), boards, currentRow, currentCol, newRow, newCol);
                            }
                        }
                    }
                }
                //forward-right diagonal (only if capturing opponent's piece)
                rowMovementAmount = (short)(1 * rowModifier);
                newRow = (short)(currentRow + rowMovementAmount);
                newCol = (short)(currentCol + 1);
                if (newRow >= 0 && newRow <= 7 && newCol >= 0 && newCol <= 7)
                {
                    if (Math.Sign(m_game.Positions.Last().Board[newRow, newCol]) == -Math.Sign(m_game.Positions.Last().Board[currentRow, currentCol]))
                    {
                        if (newRow == 0 || newRow == 7) //back rank promotions
                        {
                            for (short promotionPieceIndex = Constants.Knight; promotionPieceIndex <= Constants.Queen; promotionPieceIndex++)
                            {
                                short promotionPiece = (short)(promotionPieceIndex * rowModifier);
                                boards = AddMoveToList(m_game.Positions.Last(), boards, currentRow, currentCol, newRow, newCol);
                            }
                        }
                        else
                            boards = AddMoveToList(m_game.Positions.Last(), boards, currentRow, currentCol, newRow, newCol);
                    }
                    else if (m_game.Positions.Count() > 1) //big chunk of logic to see if en passant is possible
                    {
                        if ((currentRow == 3 && currentStatus == GameStatus.WhitesTurn) || (currentRow == 4 && currentStatus == GameStatus.BlacksTurn))
                        {
                            var priorPosition = m_game.Positions.ToArray()[m_game.Positions.Count() - 1].Board;
                            //pawn of opposite color moved up 2 squares next to the current piece
                            if (priorPosition[newRow + rowModifier, newCol] == Constants.Pawn * rowModifier && m_game.Positions.Last().Board[currentRow, newCol] == Constants.Pawn * rowModifier)
                            {
                                boards = AddMoveToList(m_game.Positions.Last(), boards, currentRow, currentCol, newRow, newCol);
                            }
                        }
                    }
                }


There are 2 additions, and both are else chunks that have a comment with "en passant" in it. If the current piece is a pawn, and the pawn is on the 5th rank for it's appropriate color, and if the prior move saw a pawn move 2 squares to get next to the current pawn, then en passant is available.


Castling

Castling is an important defensive maneuver in chess whereby the king gets to move 2 squares towards the edge of the board and the rook to that same side jumps 1 square to the opposite side of the king. In the early part of the game this has 2 important purposes: the first part is this gets the king nestled into the easily-defensible corner, usually behind a shield of protective pawns. This gives the king disposable cover that is tough to break through cheaply. The second purpose is it brings the rook closer into play. Rooks are more valuable in the center of the board where they have more room to roam.

 The king can castle in either direction (left and right), but with these limitations:
  1. there can be no other pieces between the king and the rook.
  2. the king and rook must still be on their starting square (they cannot have moved yet during the game).
  3. None of the opponents pieces may threaten squares that the king has to move through, to, or from.
  4. And of course you can't make any move that puts your king in check, including castling.

As you've guessed, the logic for this maneuver will go into the method CalculateKingValidMoves. As you can see below, I've split the castling logic out into 2 sections: 1 for black and 1 for white. It just looks a little cleaner this way:

        protected IList<ChessBoard> CalculateKingValidMoves(short currentRow, short currentCol, IList<ChessBoard> boards, GameStatus currentStatus)
        {
            short newRow;
            short newCol;
            short rowMovementAmount;
            short colMovementAmount;
            bool isWhitePiece = m_game.Positions.Last().Board[currentRow, currentCol] > 0;
            bool isBlackPiece = m_game.Positions.Last().Board[currentRow, currentCol] < 0;
            if ((currentStatus == GameStatus.BlacksTurn && isBlackPiece) || (currentStatus == GameStatus.WhitesTurn && isWhitePiece))
            {
                //+1+1,+1-1,-1+1,-1-1
                for (rowMovementAmount = -1; rowMovementAmount <= 1; rowMovementAmount++)
                {
                    for (colMovementAmount = -1; colMovementAmount <= 1; colMovementAmount++)
                    {
                        newRow = (short)(currentRow + rowMovementAmount);
                        newCol = (short)(currentCol + colMovementAmount);
                        boards = AddMoveToList(m_game.Positions.Last(), boards, currentRow, currentCol, newRow, newCol);
                    }
                }
                //black castle
                if (currentStatus == GameStatus.BlacksTurn && isBlackPiece && currentCol == 4 && currentRow == 0)
                {
                    //castle west
                    if (m_game.Positions.Last().Board[0, 0] == Constants.Rook * Constants.BlackTransform &&
                        m_game.Positions.Last().Board[0, 1] == Constants.Empty &&
                        m_game.Positions.Last().Board[0, 2] == Constants.Empty &&
                        m_game.Positions.Last().Board[0, 3] == Constants.Empty)
                    {
                        var futureBoard = (short[,])m_game.Positions.Last().Board.Clone();
                        futureBoard[0, 2] = Constants.King * Constants.BlackTransform;
                        futureBoard[0, 3] = Constants.Rook * Constants.BlackTransform;
                        boards = boards.ToList();
                        bool anySquareThreatened = false;
                        anySquareThreatened = anySquareThreatened || ColorThreatensSquare(true, m_game.Positions.Last(), 0, 0);
                        anySquareThreatened = anySquareThreatened || ColorThreatensSquare(true, m_game.Positions.Last(), 0, 1);
                        anySquareThreatened = anySquareThreatened || ColorThreatensSquare(true, m_game.Positions.Last(), 0, 2);
                        anySquareThreatened = anySquareThreatened || ColorThreatensSquare(true, m_game.Positions.Last(), 0, 3);
                        if (!anySquareThreatened)
                            boards.Add(new ChessBoard(true) { Board = futureBoard });
                    }
                    //castle east
                    if (m_game.Positions.Last().Board[0, 7] == Constants.Rook * Constants.BlackTransform &&
                        m_game.Positions.Last().Board[0, 6] == Constants.Empty &&
                        m_game.Positions.Last().Board[0, 5] == Constants.Empty)
                    {
                        var futureBoard = (short[,])m_game.Positions.Last().Board.Clone();
                        futureBoard[0, 6] = Constants.King * Constants.BlackTransform;
                        futureBoard[0, 5] = Constants.Rook * Constants.BlackTransform;
                        boards = boards.ToList();
                        bool anySquareThreatened = false;
                        anySquareThreatened = anySquareThreatened || ColorThreatensSquare(true, m_game.Positions.Last(), 0, 7);
                        anySquareThreatened = anySquareThreatened || ColorThreatensSquare(true, m_game.Positions.Last(), 0, 6);
                        anySquareThreatened = anySquareThreatened || ColorThreatensSquare(true, m_game.Positions.Last(), 0, 5);
                        anySquareThreatened = anySquareThreatened || ColorThreatensSquare(true, m_game.Positions.Last(), 0, 4);
                        if (!anySquareThreatened)
                            boards.Add(new ChessBoard(true) { Board = futureBoard });
                    }
                }
                //white castle
                if (currentStatus == GameStatus.WhitesTurn && isWhitePiece && currentCol == 4 && currentRow == 7)
                {
                    //castle west
                    if (m_game.Positions.Last().Board[7, 0] == Constants.Rook &&
                        m_game.Positions.Last().Board[7, 1] == Constants.Empty &&
                        m_game.Positions.Last().Board[7, 2] == Constants.Empty &&
                        m_game.Positions.Last().Board[7, 3] == Constants.Empty)
                    {
                        var futureBoard = (short[,])m_game.Positions.Last().Board.Clone();
                        futureBoard[7, 2] = Constants.King;
                        futureBoard[7, 3] = Constants.Rook;
                        boards = boards.ToList();
                        bool anySquareThreatened = false;
                        anySquareThreatened = anySquareThreatened || ColorThreatensSquare(false, m_game.Positions.Last(), 7, 0);
                        anySquareThreatened = anySquareThreatened || ColorThreatensSquare(false, m_game.Positions.Last(), 7, 1);
                        anySquareThreatened = anySquareThreatened || ColorThreatensSquare(false, m_game.Positions.Last(), 7, 2);
                        anySquareThreatened = anySquareThreatened || ColorThreatensSquare(false, m_game.Positions.Last(), 7, 3);
                        if (!anySquareThreatened)
                            boards.Add(new ChessBoard(true) { Board = futureBoard });
                    }
                    //castle east
                    if (m_game.Positions.Last().Board[7, 7] == Constants.Rook &&
                        m_game.Positions.Last().Board[7, 6] == Constants.Empty &&
                        m_game.Positions.Last().Board[7, 5] == Constants.Empty)
                    {
                        var futureBoard = (short[,])m_game.Positions.Last().Board.Clone();
                        futureBoard[7, 6] = Constants.King;
                        futureBoard[7, 5] = Constants.Rook;
                        boards = boards.ToList();
                        bool anySquareThreatened = false;
                        anySquareThreatened = anySquareThreatened || ColorThreatensSquare(false, m_game.Positions.Last(), 7, 7);
                        anySquareThreatened = anySquareThreatened || ColorThreatensSquare(false, m_game.Positions.Last(), 7, 6);
                        anySquareThreatened = anySquareThreatened || ColorThreatensSquare(false, m_game.Positions.Last(), 7, 5);
                        anySquareThreatened = anySquareThreatened || ColorThreatensSquare(false, m_game.Positions.Last(), 7, 4);
                        if (!anySquareThreatened)
                            boards.Add(new ChessBoard(true) { Board = futureBoard });
                    }
                }
            }
            return boards;
        }

It's a pretty fair amount of code here; we have to check both directions since the kings and rooks can castle both left and right. We also checked to make sure no pieces are between king and rook, and made sure no opposing pieces threaten the squares they are on or that they will be passing through.

Summary and What's Next

That's it for this week folks. This stuff is getting harder each week! The good news is that there are no more movement types left to code. The bad news is we still have one major restriction to code, and that being that you cannot make a move which puts your own king in check. We will code this one in the next blog post and apply it to all of the move calculations that we have done so far. I'm also becoming more and more wary of how complicated the code is getting; I'm not really trusting the accuracy of the code. We will need to start unit testing this stuff pretty soon, possibly even in the next post. Normally I would do the unit testing alongside the actual coding, but for the sake of keeping these posts reasonable and focused I have foregone unit testing to date.

And finally, here is the code

Resources

Castling