Intro
Did you know that you can create and modify your SQL Server databases from within Visual Studio? Further, did you know that you can then put your database modification scripts into source control? Yes that's right folks, fully source controlled SQL databases right from within your favorite code editor. This goes beyond just running SQL queries against your database (which you can also do from Visual Studio by the way) and into modifications of the structure of your database using DML.Why would you want to do this? Well you may have noticed, but as a coder you use source control. This allows you to easily version your code, branch your code, and it simplifies releasing of your code (somewhat) since you know what changes were done when and for what version of your system. If you've never source-controlled a database, which I'm sure many of you haven't, then you know releasing database modifications in tandem with code is an error-prone process. You have to rely too much on the right people remembering what they did at release time, and it can cause issues. Well having your SQL modifications in source control does the same thing for databases that source control does for code: it simplifies versioning. The rest of this blog will be dedicated to showing you how to perform the amazing feat of database development via Visual Studio. Hang on to your hats folks, this is gonna be a fun ride!
Note: The rest of this blog assumes that you have SQL Server 2014 Express Edition installed, or you have access to another SQL Server 2014 database engine. If you do not, please install from the previous link or contact your local friendly DBA for access to a non-production SQL 2014 box.
Create a New Database Project
To start things off we'll see how to create a new database using Visual Studio. Go ahead and fire up VS 2013. Once you get in there, create yourself a new project. Select "SQL Server Database Project" as the type of project and name it whatever you want. I've named mine BlogDatabase.
We've got an empty database project, which would make for a pretty boring deployment scenario. That script would be as blank as Keanu Reeves's whoa face. Let's create a table to put in this database to spruce it up a bit. Right-click the solution over in the Solution Explorer, then click "Add" and "Table...".


You can now modify your new table with either the designer or with script. Most of you will probably feel more comfortable with the designer portion, and in truth using it is a great way to get used to DML (data manipulation language) if you're not already used to it. Make a change in the designer view, and see what script is generated below it. This script is what SQL Server uses behind the scenes to make the actual database changes, so it's quite helpful to know what it's doing and how it's doing it. In the below screenshot, you can see I've added 2 fields: Id and Name.
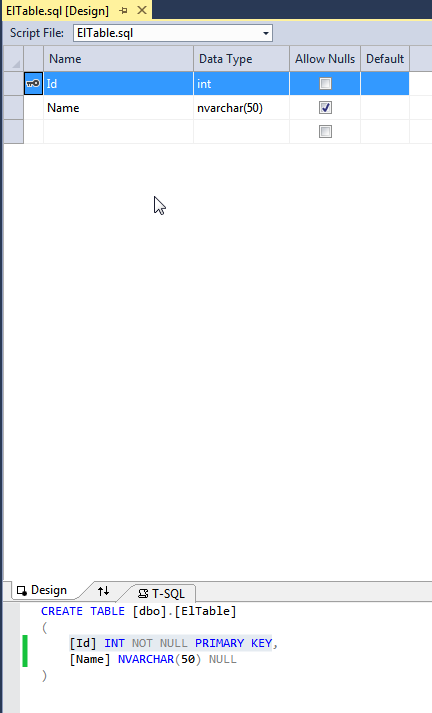
Id is an integer and is the primary key field, and Name is just a nullable nvarchar (string) column.
Well that's nifty huh? OK so where's the database that it made? Well, it hasn't actually created a database yet. All this has done is create a script that can setup a database. We still have to publish/deploy this lovely conceptual database before it molts and becomes a real database. First things first though: we need to make sure that our project has the correct version of SQL server selected. These projects can publish to SQL Server 2K8 and up, and it defaults to publishing to the latest which is currently SQL 2K14. Depending on your environment, you may not be working with the latest and greatest.
Right-click on your database in the solution explorer and select "Properties". Select the version of SQL Server that you will end up publishing your database to and save your project. Below you can see my screen where I've set the "Target platform" to SQL Server 2014.

Now that we've made sure we're publishing to the correct version of SQL server, on with publishing the database! In the solution explorer, right-click on your database and select "Publish". A dialog window will come up asking you what server to connect to. Click on the Edit button.


Don't bother hitting "Test Connection", as it will fail. Your database doesn't actually exist yet so it can't connect properly, but that's OK. We're about to create the database. Just hit the OK button when you have your information entered here.
Now back to the first dialog: you have 2 options for deploying the database. You can either click the "Publish" button to have Visual Studio automatically create the database and all of it's structure for you, or you can click the "Generate Script" button which will obviously generate the SQL scripts you need and you can then run them manually to set things up. For simplicity's sake, we'll just have Visual Studio publish the database for us, so click the "Publish" button. If all went well, your "Data Tools Operations" window should have a green success message like the following:

Go ahead and connect to your database server with SQL Server Management Studio (SSMS), you should see your new database along with the table you plopped into it:

You can query your database via SSMS or yell at it or whatever, as it's now a real database.
No comments:
Post a Comment