Sunday, December 29, 2013

Soap Web Services Troubleshooting Tip

Intro

On many an occasion I've had something go wrong with a web service. Maybe a user calls in to report an error message being returned, or perhaps I've got my own exception handling that reports an exception was handled. For the sake of this article I'll assume you've got good exception handling and are logging exceptions that are thrown in your web service. Now let's pretend though that the stack trace by itself just isn't good enough. I've had one web service that threw a tricky error during a sql call, and the exception said it didn't like one of the parameter values. Well thanks, that helps a ton! Now if I can just figure out which of the 20 parameters it was...

Tha Meat Yo!

We can log the entire soap request! If this doesn't help debug the problem then my name isn't Jehosephat McJunkNStuff. Let's see how to log the full soap request:

    /// 
    /// Retrieves the full xml of the raw soap request. We use this for logging purposes.
    /// 
    /// the full xml of the raw soap request
    private string GetRawSoapRequest()
    {
      string soapRequest = "";
      try
      {
        // Get raw request body
        if (HttpContext.Current != null && HttpContext.Current.Request != null && HttpContext.Current.Request.InputStream != null)
        {
          using (Stream receiveStream = HttpContext.Current.Request.InputStream)
          {
            // Move to begining of input stream and read
            receiveStream.Position = 0;
            using (StreamReader readStream = new StreamReader(receiveStream, Encoding.UTF8))
              soapRequest = readStream.ReadToEnd();
          }
        }
      }
      catch { /*eat it*/ }
      return soapRequest;
    }

Copy the above method into your web service. As you can see, what it does is get the full raw SOAP request as a stream and reads it into a string value, which it then returns. Because it's a soap request this value is XML. As for what you do with this value, well that's entirely up to you! Here's a quick sample containing some not-fully-fleshed-out code that logs the raw soap of the request in an exception handler:

try
{
    //...
}
catch (Exception e)
{
    DoLogException(e, GetRawSoapRequest());
}

Armed with the raw SOAP request XML, you can now set about debugging the exception by recreating the exact request to your web service, stepping through it in the debugger to see where the exception lies. Heck, you might not even have to; I've seen some requests where there was one obviously bad value so use of the debugger wasn't even required. That's it for this week's blog, stay tuned for next week! I suppose that phrase "stay tuned" really doesn't make sense in the context of teh interwebs. Heck it really wouldn't make sense in much of any context for a full week...who would "stay tuned" to a single tv station or radio station for an entire week? Well, have a good week anyways, hope you enjoy the blog.

Thursday, December 26, 2013

Custom Attributes in C#, Part 2

Intro

Back in Part 1 we looked at what attributes are, a reason or two why you might be interested in using them, and how to get their values through reflection. A bit more work was left to your imagination regarding custom attributes. Now it's time to get yer thinkin cap on (maybe it's a beer hat!) and get crackin!

Create Your Own Custom Attribute

Not only can you use built-in .Net framework attributes, you can also create your own custom attributes. I've used them for property validation, object serialization and storage, and many more things. Basically anywhere you need to describe, or give extra information about a code element, you should at least consider using a custom attribute to do the trick. Here's a silly example:

    public enum SillinessFactor
    {
        SuperSilly,
        KindaSilly,
        NotSoSilly,
    }

    public class SillyAttribute : System.Attribute
    {
        public SillinessFactor SillinessFactor { get; set; }

        public SillyAttribute(SillinessFactor sillinessFactor)
        {
            this.SillinessFactor = sillinessFactor;
        }
    }


In the above code we have created an enum to describe the level of silliness that something represents. Just below that enum we have a class called SillyAttribute that derives from the System.Attribute class. Creating your own custom attribute is as simple as that; just derive from System.Attribute. I decided that I would like users to be able to state the level of silliness when applying the Silly attribute to a piece of code, so I coded a constructor that allows the user to pass in one of the valid SillinessFactor enum values. Using this new custom attribute is just as easy as what you saw in the last lesson:

    [Silly(SillinessFactor.SuperSilly)]
    public class SillyClass
    {
    }


Well lookie there pilgrim! We've got a silly class here who is officially marked as being Silly (through the custom attribute), and is assigned a silliness factor of SuperSilly. Yee haw!

Limiting attributes to specific scope(s) 

It's also possible to limit the application of your custom attributes to specific scope(s). Let's say for example that only classes can be Silly, not properties or anything else. How would we accomplish such a monumental feat?

    [System.AttributeUsage(System.AttributeTargets.Class)]
    public class SillyAttribute : System.Attribute
    {
        public SillinessFactor SillinessFactor { get; set; }

        public SillyAttribute(SillinessFactor sillinessFactor)
        {
            this.SillinessFactor = sillinessFactor;
        }
    }


Oh, sweet irony! Yes you accomplish the limitation of attribute scope through another attribute! In the redone sample above, we've told the compiler to limit the Silly attribute to application on classes only. What happens if you try to stick it on an attribute? I could tell you, but then I'd be spoiling all the fun!

What's Next?

There's really not much left with attributes. Experiment with using some of the built-in ones, google around to see how other people use them, and make your own even if it's just a sample. Who knows, you might find a real-world application after you've cemented this little gem in yer noggin.

Resources

Thursday, December 19, 2013

Custom Attributes in C#, Part 1

Intro, Including Why to Use Them

Attributes are yet another tool in your programming arsenal (hee hee, I said "arse"). If they're not already, we'll fix that right now! What is an attribute? It's a declarative way to associate information (usually called meta-information) with your code. What can you use attributes for? Just about anywhere you want to associate information with your code. Helpful answer huh? Like a judge and jury, I try. Here's a sample that might give you an idea:

    public enum VehicleBody
    {
        [Description("Sedan")]
        Sedan,
        [Description("Coupe")]
        Coupe,
        [Description("Station Wagon")]
        StationWagon,
        [Description("Crossover")]
        Crossover,
        [Description("Mini-van")]
        MiniVan,
    }

Above we have a simple enumeration that represents a few possible vehicle body types. Those attributes above each body type associate a specific user-friendly string with each entry. If we had a GUI driven by this information we could fill a drop-down list with those descriptions as the text, and the enumeration value as the value. Ooh, gotta love foreshadowing...

Example of Using a Built-in .Net Attribute, and Hey Some Reflection!


using System;
using System.Collections;
using System.Collections.Generic;
using System.ComponentModel;
using System.Linq;
using System.Web;
using System.Web.UI;
using System.Web.UI.WebControls;
using BlogAttributes;
using System.Reflection;

namespace BlogWebGui
{
    public partial class Default : System.Web.UI.Page
    {
        protected void Page_Load(object sender, EventArgs e)
        {
            if (!Page.IsPostBack)
            {
                var enumNames = Enum.GetNames(typeof(VehicleBody)).ToList();
                foreach (var enumName in enumNames)
                {
                    var type = typeof(VehicleBody);
                    var member = type.GetMember(enumName)[0];
                    var attribute = member.GetCustomAttribute(typeof(DescriptionAttribute));
                    var bodyDesription = ((DescriptionAttribute)attribute).Description;
                    uxVehicleBody.Items.Add(new ListItem() { Value = enumName, Text = bodyDesription });
                }
            }
        }
    }
}
The first code snippet above shows a rather simple section from an aspx page. Just a dropdownlist here.
The second code snippet is the code-behind for the aspx page. In the page load we populate the dropdownlist with the names and descriptions of our enums. Let's look at the important lines:
  1. "var enumNames..." This line just gets the names of our enumerated type values. All this means is we get a generic list containing the .ToString() representation of all members of our enumeration.
  2. "var member = type.GetMember(enumName)[0];" This sets the value of "member" to the correct value from the enumeration. For example, if enumName is set to "StationWagon", this code sets member to the value VehicleBody.StationWagon.
  3. "var attribute..." Here we set attribute to the attribute placed on the current enumeration value. In this case the attribute is of type DescriptionAttribute.
  4. "var bodyDescription..."Now we're getting the meat of it! Here we take the attribute we got above and grab its Description property to get that actual value we put into the attribute. So if we are looking at [Description("Station Wagon")]StationWagon, then this code returns the value "Station Wagon".
  5. "uxVehicleBody.Items..." Now we add each enumeration name and description attribute value to the dropdown list.
Here's the relevant portion of the html generated by the above code, which should help to further explain what the code is doing:


Pretty cool huh? Yeah I know this doesn't use up any less code than creating an array which contains the descriptive strings, but this code does have one large advantage over that approach: with enums and attributes, the lists will not get out of synch. With separate arrays holding values associated with enumerated types it is very easy to get the lists out of synch.

What's Next?

You might be thinking "has Peeticus misled me? I thought this article was about CUSTOM attributes, not using pre-canned ones?". Sorry, I only have so much space on each individual post and my attention span is being artificially shortened by an angry cat. Feel free to peek ahead though! We'll create our own custom attributes next week, I promise.

Resources

  • http://msdn.microsoft.com/en-us/library/aa288454%28v=vs.71%29.aspx

Saturday, December 7, 2013

Unit Testing, Part 4 (More Tips and Tricks)

Intro

In Part1, Part2, and Part3 we covered the mechanics of unit testing, why to use unit tests, we created some of our own unit tests, we saw a tip for making your unit tests smaller and more focused, and we gained some knowledge of Dependency Injection and how to use it to make your unit testing life easier. In this final piece on unit testing (admit it, you were hoping I'd lay off this topic), We'll cover just a couple more useful tricks with unit testing.

 Test Method and Test Class Initialization

We've already seen how unit test methods require an attribute on the method named TestMethod (example below).

[TestMethod]
public void TestStuff()
{
  //test some stuff here...
}

Well there are a couple other attributes that you can use on methods within your test classes that will save you some time, and they are ClassInitialize and TestInitialize. A method marked with the ClassInitialize attribute is automatically run (as part of running unit tests) only a single time regardless of the number of TestMethod methods. A method marked with the TestInitialize attribute is automatically run (as part of running unit tests) once for each test method within the test class. Let's look at an example:

    [TestClass]
    public class BaseTemplateValidatorTest
    {
        public static BaseTemplate m_object;
        IEntityValidator validator;

        [TestInitialize]
        public void TestInitialize()
        {
            m_object = new BaseTemplate();
            validator = ValidatorFactory.GetValidator(m_object);
        }

        /// 
        /// title trim
        /// 
        [TestMethod]
        public void TestTitleTrim()
        {
            m_object.Name = " b ";
            var temp = validator.IsValid;
            Assert.IsTrue(m_object.Name == "b");
        }

        /// 
        /// title too long
        /// 
        [TestMethod]
        public void TestTitleTooLongChop()
        {
            m_object.Name = "b".PadLeft(ValidationConstants.TemplateNameMaxLength + 1, 'a');
            var temp = validator.IsValid;
            Assert.IsTrue(m_object.Name.Length == ValidationConstants.TemplateNameMaxLength);
        }

        /// 
        /// title max length
        /// 
        [TestMethod]
        public void TestTitleMaxLength()
        {
            string originalName = "b".PadLeft(ValidationConstants.TemplateNameMaxLength, 'a');
            m_object.Name = originalName;
            var temp = validator.IsValid;
            Assert.IsTrue(m_object.Name.Equals(originalName));
        }
    }
Here we have a method in our test class decorated with the TestInitialize attribute. Within this method we initialize a couple of member objects that we use in multiple TestMethods. This means that we don't have to initialize these member objects within each test method, thus saving us some code.

A method marked with ClassInitialize must be static. Why? For every test method that is run during unit testing, a new instance of your test class is created. So, in order for a method related to that class to only be run a single time (which ClassInitialize decorated methods are), it must be static. Here's an example:
    [TestClass]
    public class UnitTest1
    {
        private static Class1 m_class1;

        [ClassInitialize]
        public static void InitalizeTheClassYo(TestContext testContext)
        {
            m_class1 = new Class1();
        }

        [TestMethod]
        public void AddStuffNullParams()
        {
            var actual = m_class1.AddStuff(null, null);
            Assert.AreEqual(-1, actual, "AddStuff should return -1 when both parameters are null");
        }

        [TestMethod]
        public void AddStuffNullParam1()
        {
            var actual = m_class1.AddStuff(null, 3);
            Assert.AreEqual(-1, actual, "AddStuff should return -1 when the first parameter is null");
        }

        [TestMethod]
        public void AddStuffNullParam2()
        {
            var actual = m_class1.AddStuff(4, null);
            Assert.AreEqual(-1, actual, "AddStuff should return -1 when the second parameter is null");
        }

        [TestMethod]
        public void AddStuffValidNumbers()
        {
            var actual = m_class1.AddStuff(4, 3);
            Assert.AreEqual(7, actual, "AddStuff should return the sum of 2 numbers when numbers are passed in");
        }
    }
The method InitializeTheClassYo is decorated with the ClassInitialize attribute, so it is run once and only once as part of running our unit tests. We use it here to initialize a static class member, thus saving ourselves a little code and a little bit of processing time.

ExpectedException Attribute

ExpectedException is another attribute you'll end up using to decorate your test methods. When you write a method that purposely throws an exception under certain conditions, the ExpectedException attribute is how you tell your unit test to expect the correct type of exception. Here's an example:
        public int AddStuff(int? param1, int? param2)
        {
            if (!param1.HasValue && !param2.HasValue)
                throw new ArgumentNullException("param1 and param2", "param1 and param2 cannot both be null");
            if (!param1.HasValue || !param2.HasValue)
                return -1;
            else
                return param1.Value + param2.Value;
        }
There's nothing special about the above method, in fact you might recognize this method from a prior post. You can tell what it does pretty easily by looking at it. Take special note of the fact that it throws an ArgumentNullException if both of the parameters are null. Now here is one of the unit tests for this method:
        [TestMethod]
        [ExpectedException(typeof(ArgumentNullException))]
        public void AddStuffNullParams()
        {
            var actual = m_class1.AddStuff(null, null);
        }
That lovely little ExpectedException attribute takes a parameter that is the type of exception to look out for, and as long as the code within this unit test throws an exception of the appropriate type, the test passes! As you may have guessed, if your unit test doesn't throw the exception (for example, if the code within was "var actual = m_class1.AddStuff(null, 34);", then the unit test would fail because the code doesn't throw the expected exception.

What's Next?

  • There are other unit-test-related atrtributes you can use on methods. Look them up, you might find them useful.
  • What other parameters can you pass in to the ExpectedException attribute?
  • How would you test a private or protected method/field? Why would you want to? What are some arguments against testing fields and methods scoped private or protected?

Thursday, December 5, 2013

Unit Testing, Part 3 (Tips and Tricks)

Intro

In Part 1 we gave a brief overview of unit tests and when to use them. In Part 2 we learned how to create our own unit tests in C# and Visual Studio using MSTest. This week we'll cover a couple tips and tricks to get you really humming with unit testing.There's a ton to unit testing, so please stick with me here! There will be at least one more unit testing article after this one, but we're getting into the really meaty stuff in this post so if you can get past this, the rest will be a breeze.

Tip1: Small, Focused Unit Tests

One of the best pieces of advice I've seen regarding unit tests is to keep each individual test method small and focused. This makes your code (the code you're testing, and the actual production code) easier to maintain, due to simplification and clarity of purpose. Could I be more vague? Probably, but I'm not paid by the word so let's see an example:

(Production code)
        public int AddStuff(int? param1, int? param2)
        {
            if (!param1.HasValue || !param2.HasValue)
                return -1;
            else
                return param1.Value + param2.Value;
        }
(Focused unit testing)
        [TestMethod]
        public void AddStuffNullParams()
        {
            var actual = new Class1().AddStuff(null, null);
            Assert.AreEqual(-1, actual, "AddStuff should return -1 when both parameters are null");
        }

        [TestMethod]
        public void AddStuffNullParam1()
        {
            var actual = new Class1().AddStuff(null, 3);
            Assert.AreEqual(-1, actual, "AddStuff should return -1 when the first parameter is null");
        }

        [TestMethod]
        public void AddStuffNullParam2()
        {
            var actual = new Class1().AddStuff(4, null);
            Assert.AreEqual(-1, actual, "AddStuff should return -1 when the second parameter is null");
        }

        [TestMethod]
        public void AddStuffValidNumbers()
        {
            var actual = new Class1().AddStuff(4, 3);
            Assert.AreEqual(7, actual, "AddStuff should return the sum of 2 numbers when numbers are passed in");
        }
(Mosh pit unit testing)
        [TestMethod]
        public void AddStuffTests()
        {
            var actual1 = new Class1().AddStuff(null, null);
            Assert.AreEqual(-1, actual1, "AddStuff should return -1 when both parameters are null");
            var actual2 = new Class1().AddStuff(null, 3);
            Assert.AreEqual(-1, actual2, "AddStuff should return -1 when the first parameter is null");
            var actual3 = new Class1().AddStuff(4, null);
            Assert.AreEqual(-1, actual3, "AddStuff should return -1 when the second parameter is null");
            var actual4 = new Class1().AddStuff(4, 3);
            Assert.AreEqual(7, actual4, "AddStuff should return the sum of 2 numbers when numbers are passed in");
        }
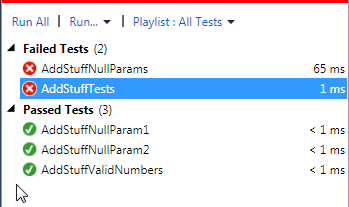
Now pretend somebody comes along and breaks the production code such that if both parameters are null, it starts throwing an exception. It might not seem like a big deal, but with the mosh pit unit test method you have a harder time telling what went wrong. You lose some extra time debugging the problem due to not knowing what could have happened. The error you get for the more focused unit tests is however more useful, as you can see in the screenshot below:


Yeah it's not a huge deal really, but every bit of assistance helps. The name "AddStuffNullParams" lets you know that the method no longer works properly when you have null params. The name "AddStuffTests" really tells you nothing and you have to dig a little longer to get to the same depth. Smaller and more focused methods also means less chance of ripple effects when you modify things, so it's a no-brainer.


Tip2: Dependencies, Dependency Injection (DI), and Mocks

What is Dependency Injection? Dependency Injection is just a fancy way of saying that you pass dependencies your code has, into your code. DI can easily be a full blog post of it's own, but I have to keep things short to account for my meager attention span so we'll just cover a quick scenario: You need to access a database in your code to pull in some data, so you write a method to pull in the data. You then write some other code to process that data. Now you wish to unit test the code that is processing the data...woops! Your code hits a database, so how in the world are you going to exercise that code with a unit test? It really adds no value to your tests to hit the database, as it's 1) comparatively slow, 2) volatile, and 3) difficult to setup test data. This is a problem that comes up fairly often with accessing external resources such as databases, files, web services, and many other things. Your unit tests should not exercise these external dependencies, they should exercise only your own code. Dependency Injection is your friend in these cases! First, here is some code that returns true if there are rows in a table. It directly accesses the table via a sql connection/command.
    public class DataProcessor
    {
        public bool ProcessData()
        {
            using (var conn = new SqlConnection("some conn string"))
            {
                var cmd = conn.CreateCommand();
                cmd.CommandText = "select count(1) from tblSomeTable";
                cmd.CommandType = System.Data.CommandType.Text;
                using (var reader = cmd.ExecuteReader())
                {
                    if (reader.Read())
                        return true;
                }
            }
            return false;
        }
    }
How would you unit test this? Well you could go through the trouble to setup sample data in the database at the beginning of a positive test and a negative test (one test where the db has data, one test where it doesn't), but you don't really care to test the data itself; just the code. So, instead you would pass in the data dependency using an interface and a mock.
    public class DataProcessor
    {
        private IDataRetriever m_dataRetriever;

        public DataProcessor(IDataRetriever dataRetriever)
        {
            m_dataRetriever = dataRetriever;
        }

        public bool ProcessData()
        {
            return m_dataRetriever.HasData();
        }
    }
First we see the revamped DataProcessor class. It now has a constructor which accepts an object of type IDataRetriever. The method ProcessData then uses this data retriever object to pull the data, and does what it needs to do based off of that call.
    public interface IDataRetriever
    {
        bool HasData();
    }
Here's the interface for IDataRetriever; short and sweet.
    public class ConcreteDataRetriever : IDataRetriever
    {
        public bool HasData()
        {
            using (var conn = new SqlConnection("some conn string"))
            {
                var cmd = conn.CreateCommand();
                cmd.CommandText = "select count(1) from tblSomeTable";
                cmd.CommandType = System.Data.CommandType.Text;
                using (var reader = cmd.ExecuteReader())
                {
                    if (reader.Read())
                        return true;
                }
            }
            return false;
        }
    }
And here is a concrete implementation of that IDataRetriever interface. This class is now responsible for communicating with the database, not our DataProcessor class.
    [TestClass]
    public class DataProcessorTest
    {
        [TestMethod]
        public void ProcessDataTrue()
        {
            var dp = new DataProcessor(new DataRetrieverMock() { EmulateHasData = true });
            Assert.IsTrue(dp.ProcessData(), "DataProcessor should have data");
        }

        [TestMethod]
        public void ProcessDataFalse()
        {
            var dp = new DataProcessor(new DataRetrieverMock() { EmulateHasData = false });
            Assert.IsFalse(dp.ProcessData(), "DataProcessor should not have data");
        }
    }
    class DataRetrieverMock : IDataRetriever
    {
        public bool EmulateHasData { get; set; }

        public bool HasData()
        {
            return EmulateHasData;
        }
    }
Now, through the magic of DI we are able to write unit tests that exercise the method ProcessData without hitting the database! You can see in the above 2 test methods when we create an instance of DataProcessor, we also pass in a brand new instance of DataRetrieverMock. DataRetrieverMock is a concrete implementation of IDataRetriever (just like ConcreteDataRetriever is) that doesn't actually hit the database. Yay dependency injection!

You may also be thinking to yourself "hey, with the logic code (the class DataProcessor) decoupled from the data retrieval code (IDataRetriever and DataRetriever), I bet it would be easier to switch out the data storage mechanism huh?" Well you're right! that's another side benefit of DI; in general, it keeps your external dependencies separate from the business logic, so if you need to retrieve the same data from somewhere else you just write another Concrete implementation of the external retriever interface. Spifferiffic!

What's Next?

I think your time would best be spent Christmas shopping, so get that out of the way. Come back refreshed next week for part 4.

References

http://msdn.microsoft.com/en-us/library/ms182517(v=vs.100).aspx

Tuesday, November 26, 2013

Unit Testing, Part 2 (A Tutorial on Creating Your First Unit Test in C#)

Intro

Back in Part 1 we talked about what unit tests are, why they are helpful, and when to use or not use them. This week we'll start coding our own unit tests. Never created a unit test before? Well now's the time! It really is quite easy, and the Visual Studio environment (even the latest express editions) makes it pretty painless. If you don't have a copy of Visual Studio already, you can click this to download Visual Studio Express 2013 for Web. For the examples below I am using Visual Studio Express 2013 for Web. If you are using a different version of VS your screens may look a little different.

Start the Project

The first step on the journey is to create our sample project. Fire up Visual Studio and create a class library (dll). Name the project/solution ItcProgBlogUnitTests.The IDE will create a default class for you named Class1. Open Class1.cs if the editor isn't already opened up for you. Create a single method in this class called AddStuff(). AddStuff should accept 2 parameters, both of type Nullable<int> (or int?). The return type should be int. This method should, assuming both integers have a value, return the sum of the 2 numbers. If one or both of the ints are null then return -1. If you want to take a sneak peek the method is pasted here, otherwise give yourselves a heapin helpin of pats on the back as you write it yourself.

        public int AddStuff(int? param1, int? param2)
        {
            if (!param1.HasValue || !param2.HasValue)
                return -1;
            else
                return param1.Value + param2.Value;
        }


Add a Unit Test Project

Tweak things until the project compiles; shouldn't take too long. Now add a unit test project to the solution. Name it ItcProgBlogUnitTests.Test.


Create a Unit Test

You should now have a brand-spankin-new unit test project in the solution. You should also have a single test class named UnitTest1 (yours may be slightly different) with a single TestMethod in the class.

    [TestClass]
    public class UnitTest1
    {
        [TestMethod]
        public void TestMethod1()
        {
        }
    }

There's nothing much going on here...notice that attribute [TestClass] on the class? This tells visual studio and MSTest (the testing framework that we're using) that this class is used for running unit tests. Your test method also has an attribute on it [TestMethod], which denotes that this method is an individual unit test. We now want to write a unit test that ensures the method AddStuff returns the value -1 when we pass in a null for both parameters. The first thing we need to do is add a reference to ItcProgBlogUnitTests (the initial class library project) into our unit test dll, so do that. I'm assuming you already know how to add references to another dll within the solution, but if not put something in the comments below and we'll help you out. You'll also have to add a line to the usings statement within the file UnitTest1.cs so do that too.

using ItcProgBlogUnitTests;
Now go ahead and refactor that single test method to call it AddStuffNullParams. Then add the 2 new lines shown below to the method:


        [TestMethod]
        public void AddStuffNullParams()
        {
            var actual = new Class1().AddStuff(null, null);
            Assert.AreEqual(-1, actual, "AddStuff should return -1 when both parameters are null");
        }

Save your project and compile it; all should be well.

Run a Unit Test

You might be thinking to yourself "well great, my code compiles but now what Mr Smartie Pants?". Well first, that's Monsignor smarty pantaloons to you. Second, now we get to run the unit test! This is really quite easy; if you look in the screenshot below, you can see 2 methods of doing so. Go ahead and do one of them.


The "Test Explorer" window now appears within Visual Studio. This shows you the result of your unit test run so you can make sure the test passed.


As you can see, our lonely little test passed with flying colors. Green=good, Red=bad.


Watch a Unit Test Fail

Now let's pretend another coder comes along and decides that you were an idiot; he says to himself smugly "the method AddStuff should CLEARLY throw an exception if both parameters are nulls." That chode happily modifies AddStuff to look like the following:

        public int AddStuff(int? param1, int? param2)
        {
            if (!param1.HasValue && !param2.HasValue)
                throw new Exception("doh!");
            if (!param1.HasValue || !param2.HasValue)
                return -1;
            else
                return param1.Value + param2.Value;
        }


Chode-boy saves, compiles, and runs the unit tests. What's that he says? A failed unit test! Yes that's right folks, your diligently created unit test has saved the chode's bacon. He can tell quickly that the code no longer passes muster and thus must be fixed.


He can double-click on the failed test and be taken straight to the failed test in the code editor, he can right-click (see above screenshot) to choose among the many options for that test, or he can hang his head in shame. Maybe a combination of the above options.

Just below the list of tests is a detail section that describes why the test failed. In this case, it's because the method AddStuff threw an exception during our test run.


What's Next?

There are tons more options for unit tests; explore, play around, see what all you can do. The best thing you can do for now, assuming you've been following along, would be to first fix the broken method so that the unit test passes again, and then create some more unit tests to fully flex the method's muscles. You want to hit all the edges/conditions, and a few have been missed after all! If you want a quick spoiler, look down a few lines. I suggest you try it on your own for a little bit first before doing so though. Happy coding everyone!


The aforementioned spoiler...one potential list of possible unit tests:
  • both parameters null, return -1 (already done)
  • param1 is null and param2 is not null, return -1
  • param1 is not null, param2 is null, return -1
  • neither parameter is null, make sure the result is the sum of the numbers

Friday, November 22, 2013

Open Closed Principle

The Open/Closed Principle states that a class or module should be open to extension but closed to modification.

This means that you want to build your classes or API's in ways that present interfaces to the consuming client.  Add new code, don't modify current code.  What's that?  You have a defect?  How could you ever follow this core tenant of the SOLID principles without modifying the current code?  You may not be able to.  Bertrand Meyer (the man who defined the Open Closed Principle) even claims that you will have to be open to modification for the sake of fixing defects.  The thing to keep in mind is that the defect you are about to "fix" may be modifying a dependency in code somewhere else.  This is why this principle is so key.  It prevents you from being on the wrong end of "Does he even know what the heck he's doing?"

There is power in this principle, but its power is much deeper.  This principle is best executed through abstractions.  Abstractions, while sometimes mind-bending, allow for greater flexibility with changes to the system.  It becomes easier to add another widget if that widget behaves like other, already defined widgets.

Want to read more about the Open/Closed Principle from the man who coined SOLID (Uncle Bob)?  Check out this document.

Thursday, November 21, 2013

Unit Testing, Part 1

What is Unit Testing?

Here is the Wikipedia definition of unit testing. To me, unit testing is the use of code whose sole purpose in life is to test other code. Surely you've written a method in the past where you thought to yourself "Man, I feel for the poor tester who gets to test this project. How will they ever run through all 150 scenarios of this method?". I bet you've even written demo programs just to test your code libraries, which is a very similar concept to unit testing. It's code that tests code. Unit tests are generally coded as very simple pass/fail methods where there is no room for interpretation. The test passed or it did not.


Why Should I Do It?

Unit testing can help you as the coder to test your own code, thus ensuring higher quality. It can also be argued that unit testing saves you time, though that seems to be a matter of opinion. From some Google-fu the current prevailing opinion seems to be that in the long-run you will save yourself time by baking unit tests into your projects from the start. It should seem pretty obvious to you now that writing extra code up-front will take extra time up-front, so then the next leap of logic would mean that you save time further down the road, which I have seen myself. Picture a user reporting a bug that they just found out in the field. They have to take the time to call/email support, who researches, sends it over to the group that does the coding, it gets routed to a coder, you have to spend a while tracking it down until you eventually come up with the problem and possibly a solution. Now picture even 25% of those being found through unit tests that are created in the project before its release. Depending on where you look, you can find studies that state bugs found after release cost 15 or 20 times what it costs to find and fix a bug during development, so if you catch even 8% of potential bugs you've saved time in the long-run. Plus, less-buggy software means happier users and a support department which harbors less desire to strangle you in your sleep. One other reason I've found is more of a side effect, but I find that exercising my code through unit tests forces me to design code that has less rigid dependencies and is thus easier to maintain. This is something we'll get into more in a future post.

When Should I Do It?

We are delving more into my own personal opinion here, but I feel that unit testing should be used for *most* code written, whether it be a new development or maintenance/additions. Most importantly, if a bug is found you can usually create a unit test to ensure the bug never returns. This is one of the most helpful uses of unit tests I have found; it acts as a regression test so you and potentially other coders cannot reintroduce a bug into software once it has been fixed. There might be times where unit testing is not appropriate. I hate to say it, but I do believe that if you're in a super time crunch at work and your family doesn't recognize your face anymore, take shortcuts to keep your sanity and ditch the unit tests if you have to, but only if you absolutely have to! Your family has pictures of you after all. You also do not generally want to unit test code that does nothing but hit external resources (flat files, databases, web services, etc), but we'll get into that more in a future post.

I've Heard About Test Driven Development, What's That?
Test Driven Development, or TDD, is a development process whereby the code you write is tested by unit tests prior to the code functioning. It sounds odd but it goes like this (some people show more or fewer steps, but the concept remains):
1) Decide on a specific piece of functionality (chunk of code) you want to write.
2) Write a unit test to call this non-existent piece of code.
3) Compile the unit test; it fails because the code it's calling doesn't yet exist.
4) Create a shell for the piece of functionality; it's usually something as simple as an empty method.
5) Compile+run the unit test; it passes. However, your code doesn't do anything yet, so...
6) Have the unit check that the appropriate resulting condition has occurred.
7) Run the unit test again; it fails because the functional code does nothing yet.
8) Make your code do what it's supposed to do.
9) Run the unit test again; it should pass.
10) Create more unit tests for edge cases, different input, etc etc. Refactor code as necessary to get unit tests created/passed.

There are plenty of people on teh interwebs who will insult your grandmother if you don't zealously enforce TDD in your professional life, but I don't judge (well not about this anyways) so I won't fault you for not using it. Heck I don't use it. I tried it but I find all the bouncing back and forth between the test code and production code to be time-consuming and a little distracting. I work best if I write a small, focused piece of production code first and then test the pants off of it, but do what works best for you. Give TDD a shot and see if you like it. I did, and I don't :)

What's Next?

Well that depends on if you're a teacher's pet or if you like suspense. There's no middle ground here! You can research unit testing further on your own by looking at some of the links below or maybe try some Google-fu, you could try writing some unit tests on your own in your favorite language (it's easy I promise!), or you can wait for next week's blog where I'll show you some introductory unit testing in C#.

Resources

http://en.wikipedia.org/wiki/Unit_testing

http://superwebdeveloper.com/2009/11/25/the-incredible-rate-of-diminishing-returns-of-fixing-software-bugs/

http://en.wikipedia.org/wiki/Test-driven_development

Sunday, November 17, 2013

SOLID Principles

The SOLID principles can lead to less technical debt, easier maintenance, and an ever increasing delivery of software on time.  Bob Martin can be thanked for the SOLID principles.

S - Single Responsibility Principle
O - Open/Close Principle
L - Liskov Substitution Principle
I - Interface Segregation Principle
D - Dependency Inversion Principle

What IS a principle?  Think of these as rules or concepts that, when followed, produce desirable results in your software.  It's a means to an end, so don't spend all of your time working on SOLID principles while you throw the book of common sense out the window.  There is a balance of each of these principles that, when that balance is met, you achieve software maintenance nirvana.  Be wary...  These principles are more like guidelines, not laws.  You won't be thrown in jail nor will your hair catch fire if it's not followed perfectly, because there are tradeoffs down the road and each of those tradeoffs have their own value.

So let's get started on 'S'.

Single Responsibility Principle  (SRP)

The "Responsibility" is applied to a class.  A class should have only one responsibility.  There are two types of responsibilities: knowing and doing.  As Robert Martin (Uncle Bob) puts it, a class having only one responsibility is like saying that a class should have only one reason for change.

So...  What's a reason for change?  This is where things get a little less obvious in my opinion.  I can argue with myself all day on why even a single method could have more than one reason for change.  I can even argue that if a method has more than one line of code, there's more than one possible "reason" for change.  This isn't the essence of this "guideline", er, I mean "principle".  The essence is in the idea of grouping your methods with other methods that serve a single "role".  Typical roles could be business model related or persistence related or interface related.  A role's interest could change, changing the requirements of the application, but since that role's interest is decoupled from other roles' interests, there's a minimal amount of coding and testing required to implement the requirements for this role's changing interests.

Let's be clear that a role may not be entirely obvious when you "File->New" your project or your new code file, but do remember that we should be refactoring like little boy scouts: Always leave things better than how you found them.

For a brief example, we could take a quick look at ORM's.  The ORM patterns help you separate the responsibility of persisting your data from representing your data (a doing from a knowing).     

Thursday, November 14, 2013

Debugging in Visual Studio, Conditionally

You can use conditional breakpoints to effectively stop your trace based on a predefined condition.  This is extremely useful when you are iterating through large collections of items and you only want to inspect members meeting a specific criteria.  I was going to discuss "Is true" and "Has changed" this week but it appears "Has changed" in Visual Studio 2010 has some unexpected results I want more time to look at before writing about.  So I am doing a shortened post this week.  Sorry. 
 

Simple "Is true" String Comparison Condition

In our first example we'll use a simple string comparison for our breakpoint.  We'll be using a bit of code from Pirate Tips http://www.piratetips.com that I use to display navigation links at the bottom of a page to let you return to the page you previously came from without using your browser's back button.  As you can see I've already added the breakpoint.
Now that I have my breakpoint for some reason I've decided I want to see what's happening in the code when a user is coming back from the page that gives you information about the dreaded Kitten monster from the game Barnacle Wars http://www.barnaclewars.com.  (Don't worry no kittens get killed in the game, they play with balls of yarn)  The title of my page is "Pirate Tips - Beasties: Kitten".
 
  • Right click on your breakpoint.
  • Click Condition on the pop-up menu.
  • Enter your break condition. 
    • Note on more modern versions of Visual Studio Intellisense is available to you as you fill in your condition.
    • When comparing strings I prefer to specify a StringComparison rather than using ToUpper()s, ToLowers()s, etc..
    • In this first example we are using the "Is true" criteria.  There is another criteria called "Has changed".
  • When your condition has been added, click OK.
  • Your breakpoint will now have a + sign in the middle of your red circle.  This means there is a condition on your breakpoint. 
 
  • Now run your debugger as we've discussed in previous posts.
  • Navigate your web page in a manner that will trigger your breakpoint.
  • When you hit your code you will see it highlighted in yellow.
  • In the image below I am indicating with an arrow that in this case I have elected to hover my cursor over PreviousPageTitle to see what the value is.
  • When you're finished simply use your chosen Escape Plan from a previous post to get out of the debugger.


Tuesday, November 12, 2013

3 Lesser-Known .Net Language Features, in C#

Overview

By the time you're done reading this post you're going to see more question marks than Jim Carrey wore in that God-awful batman movie. Ugh, comedians in tights. Anyways, on to the post. We're going to talk about 3 handy little gems, the conditional operator (?:), nullable types, and the null-coalescing operator (??).


Conditional Operator (?:)

I'm a big fan of writing the least amount of code required to get the job done. Partly due to laziness true (I know you were thinking it), but also because the less code that exists now, the less code has to be maintained in the future. Every bit helps. How does the conditional operator work? Let's look at an example:

if (anotherObject.BoolProperty) 
    myObject.StringProperty =  "Bob";
else
    myObject.StringProperty = "Fred";

Here we are setting the value of myObject.StringProperty to either "Bob" or "Fred" depending on the value of anotherObject.BoolProperty, a boolean field. This takes 4 lines of code. We can make this more succinct without losing any meaning or readability through usage of the conditional operator, as follows:

myObject.StringProperty = anotherObject.BoolProperty ? "Bob" : "Fred";

Easy neh? 4 lines of code is now a single line of code.

Nullable Types (?)

Nullable types are pretty cool. In .Net classes you frequently have properties that are basic value types such as integers, booleans, doubles, etc. As you probably know these types cannot be assigned a null value. Well with nullable types you can indeed assign null to these primitives. This might seem like a bit of a niche coding feature, but it really can be quite useful. Take for example an import of data from another system. If your object structure doesn't precisely match the source material, perhaps you want to be able to tell in your destination object structure which fields had a value set from the import process and which did not. If you have a boolean field in your destination object structure, but the import file does not contain this field, can you tell by looking at your object after the fact whether the value was set or not? Normally no you cannot, because the boolean property has only true/false values. However if it's a nullable boolean, a null value could easily be used to represent a lack of information from the import file. OK it's time for an example:

     public class Class1
    {
        public Nullable<int> AnInt { get; set; }
    }

    public class Class2
    {
        public Class2()
        {
            Class1 localObj = new Class1();
            localObj.AnInt = null;
        }
    }

Note the highlighted lines? We can set our property to a null value because it's a nullable type. There's a slightly shorter version of the same property definition as per the below:

public int? AnInt { get; set; }

This code has the exact same meaning as before, it just has fewer characters.

Null-Coalescing Operator (??)

I like to use the null-coalescing operator in conjunction with nullable types. The null-coalescing operator will return the left-hand operator if it is non-null, otherwise it returns the right-hand operator. Let's see another example:

    public class Class1
    {
        public string AString { get; set; }
    }

    public class Class2
    {
        public Class2()
        {
            Class1 localObj = new Class1();
            string localString = null;
            localObj.AString = localString ?? localObj.AString;
        }
    }


The highlighted line is once again the interesting one. Here we are telling the compiler to set localObj.AString to the value localString, unless localString is null (which it is) then localObj.AString gets assigned back to itself, and we did it with a single line of legible code!

Wrapping It Up

I hope you enjoyed this post and are excited to experiment with the above 3 simple yet extremely useful features of the .Net runtime. Drop me a line if you have questions or comments!

Resources


Tuesday, November 5, 2013

Refactoring in Visual Studio, Part 2

Overview

In addition to renaming which we covered in Part 1, Visual Studio has many other refactoring options including extracting a method from an existing block of code, encapsulating a field within a property, extracting an interface from a class, removing parameters, and reordering parameters. Let's see what they do and how to use them.

Extract Method

The "Extract Method" refactor option lets you move a block of code into a new method. Take a look at the below block of code. This code looks like a commonly used block to construct a database command. I would like to move it into a separate method so I can reuse this same logic elsewhere.


To extract a method from this code, you first must select the code as show above. Next right-click within the selected block and select "Refactor-->Extract Method...".


Now you are presented with a dialog where you name your new method, so type in the new name and hit OK.

Your class now has a new method named CreateCommand(), and the prior location serves only to call the new function.


Encapsulate Field

The Encapsulate Field refactoring option takes a field within a class and encapsulates it within a property. This can save you from writing a lot of plumbing when setting up properties with private members. Let's see how it works.

In this class I have a single private field, m_aField. I want to allow other classes to manipulate this value, but in a noble effort to hide the implementation details of this complex chunk of awesome I have decided I want a public property that clients can use. Refactoring to the rescue!


Right-click the field and select "Refactor-->Encapsulate Field...". Visual Studio will select a name for your new field (feel free to change it if you like). Click OK and your code has a brand-spankin-new public property which encapsulates that private field. Yay!


Extract Interface

Now let's take that useful class from the last refactoring option and mangle it further. I have decided that I want multiple classes with the same interface (public properties and methods) as the class RefactoringStuff. The best way to do this is with an interface, and Refactoring can help you here too. Right-click on the class and choose "Refactor-->Extract Interface...".


Visual Studio kindly gives you an opportunity to name your interface and select the properties and methods that will make up the interface definition, so type/select what you like then click the OK button.


Pretty sweet huh? You have a brand new interface named IRefactoringStuff, and the class RefactoringStuff now implements that new interface.

public class RefactoringStuff : ABDebug.IRefactoringStuff
  {
    private string m_aField;
 
    public string AField
    {
      get { return m_aField; }
      set { m_aField = value; }
    }
  }

  interface IRefactoringStuff
  {
    string AField { getset; }
  }

Remove Parameters

Why would you ever want to use a GUI to remove parameters? If your method is called a few times in a few different units, it can be a pain to first manually remove the parameter then go find and change every place that calls the method. So, Visual Studio helps us out once again with Refactor-->Remove Parameters. Take the class below:

  public class RefactoringStuff
  {
    public string AMethod(string param1, string param2)
    {
      return param1 + " !some text in the middle! " + param2;
    }
 
    public void Caller1()
    {
      string local = AMethod("hey""you");
    }
 
    public void Caller2()
    {
      string local = AMethod("hola""senor");
    }
  }

I want to remove param2 from the method AMethod. Right-click in the method and select "Refactor-->Remove Parameters". Select the parameter you want to remove and click the Remove button. Click OK when done.


You are presented with another dialog where you can preview the changes that Visual Studio is going to make. Review it's plan and click OK when ready.


Boom! code modded. But hey wait just a minute here fella, my code doesn't compile! Yeah well nobody's perfect, including Visual Studio. You'll notice in the code below that param2 is still referenced in AMethod. Just get rid of it manually and move along.

  public class RefactoringStuff
  {
    public string AMethod(string param1)
    {
      return param1 + " !some text in the middle! " + param2;
    }
 
    public void Caller1()
    {
      string local = AMethod("hey");
    }
 
    public void Caller2()
    {
      string local = AMethod("hola");
    }
  }

Reorder Parameters

The last option we'll cover is reordering parameters. I won't get into much in the way of screenshots as you've probably figured out the process by now and are just about tired of reading, so let's just take a quick look at some code. Here we're back to the class RefactoringStuff. I want to switch the order of param1 and param2 in the method AMethod.

  public class RefactoringStuff
  {
    public string AMethod(string param1, string param2)
    {
      return param1 + " !some text in the middle! " + param2;
    }
 
    public void Caller1()
    {
      string local = AMethod("hey""you");
    }
 
    public void Caller2()
    {
      string local = AMethod("hola""senor");
    }
  }

Right-click within the method AMethod and select "Refactor-->Reorder Parameters...". Use the dialog to reorder parameters as you desire, click OK, the preview window then comes up, review your changes, click Apply. The parameters in AMethod have been reordered and all calls to AMethod have had their parameters switch around as well.


    public string AMethod(string param2, string param1)
    {
      return param1 + " !some text in the middle! " + param2;
    }
 
    public void Caller1()
    {
      string local = AMethod("you""hey");
    }
 
    public void Caller2()
    {
      string local = AMethod("senor""hola");
    }
  }

Thanks for your time again folks, and if you enjoyed this post be sure give us a big happy +1 in google, share us on facebook and twitter, subscribe to the blog, tell your neighbors and your neighbor's dog. Comments are encouraged!

Sunday, November 3, 2013

Debugging in Visual Studio, Breakpoints

Breakpoints Basics

Last time we talked about the basics of running the debugger in Visual Studio.  Today let's talk about breakpoints.  There are several ways to add a breakpoint to your code.  A note about colors in this post: I will describe items in the color they appear in my IDE, it's possible you have your colors set differently than mine.  Either way, the colors mentioned in the writings will help guide you through the pictures included.

When Can I Add a Breakpoint?

  • A breakpoint can be added before you begin to run your code. 
  • A breakpoint can also be added during runtime by placing a breakpoint anywhere in the code.  If you expect to hit a breakpoint you added during runtime you should probably place it in a section you haven't yet passed in the code or at least in a section there is a way for you to return to.
  • A type of breakpoint can be added dynamically before running the debugger and without actually adding a breakpoint.  We'll call this Run To Cursor and cover this later in the post.

Where Can I Place Breakpoints?

You can add a breakpoint just about anywhere in your code.  Some places you cannot add breakpoints are listed below:
  • Whitespace.
  • Comments.
  • Decision structure with no actual code.  (i.e. if and else if are ok, the fall-through else will not be a place you can add a breakpoint)  Breakpoints can be added in a code block contained in the fall-through else.
  • Try and Finally cannot have a breakpoint added.  You can however add one to your Catch.  Breakpoints can be added in a code block contained in your Try/Finally.
  • Case and Default in a switch cannot have a breakpoint.  Breakpoints can be added in a block of code contained in your Case or Default.

Adding Your Breakpoint

  • One way to add a breakpoint is to click in the gray vertical space to the left of your code.  Your breakpoint will appear where you've clicked. 
 
  • Another way to add a breakpoint is to put your cursor where you want your breakpoint, click Debug then in the dropdown menu click Toggle Breakpoint.
 
  • If you are into keyboard shortcuts you may also add a breakpoint by putting your cursor on the line you wish to see a breakpoint and pressing the F9 key.
  • With your cursor on the line you'd like to add your breakpoint to you may also right click on your line of code, hover over Breakpoint on the pop-up menu, then click Insert Breakpoint on the pop-up menu that comes up after that. 

     
No matter which method you use to add your breakpoint, when you have an active breakpoint you will see a solid red circle in the gray vertical bar and the line of code your breakpoint is in will be highlighted in red like below:
 

Removing Your Breakpoint

Just like adding a breakpoint, you have several options to remove a breakpoint.  You can start by reversing the steps you've already been shown:
  • Click the solid red circle in the gray vertical bar to the side of your code.  Your breakpoint will go away.
  • With your cursor on the line of code for the breakpoint you want to get rid of, click Debug then in the dropdown menu click Toggle Breakpoint.
  • With your cursor on the line of code for the breakpoint you want to get rid of, press the F9 key.
  • With your cursor on the line of code for the breakpoint you want to get rid of right click in the line of code and hover over Breakpoint in the pop-up menu that displays, then click Delete Breakpoint on the menu that pops up after that.
 
There are also a couple of other ways to remove your breakpoints:
  • You can right click your breakpoint, a menu will pop-up click Delete Breakpoint.  There are other options available we will cover many of them in future posts. 
 
  • You can also click Debug then in the dropdown menu click Delete All Breakpoints.  This method will remove any other breakpoints you have added to this entire solution.
You will receive a confirmation message, click Yes if you truly wish to delete all breakpoints.
 
  • For those of you keyboard shortcut junkies, you can fire off Delete All Breakpoints by pressing Ctrl+Shift+F9 at the same time.

Run To Cursor

One last option to break on a line of code doesn't require breakpoints.  With your cursor on the line of code you wish to break on, right click and in the pop-up menu that displays click Run To Cursor.  Your code will launch.
To escape this type of debugging, you can close your browser if you are debugging a web application, close your executable if you are debugging a Windows application, or regardless of which type you are debugging you can click the Blue Stop Button on the toolbar menu.