Showing posts with label Unit Testing. Show all posts

Thursday, March 27, 2014

A Chess Project, Part 10

Intro

We got a good start on our unit testing in the Chess Project Part 9 posting last week. We unit tested every possible move for white pieces, created a spiffy new html format for chess boards to ease our unit testing, and we tested many of our helper methods in other classes as well. This time around we will finish up unit testing the current suite of functionality. We have to add unit tests for some of the valid black piece moves (I only deem it worth our time to create tests for moves unique to black; his pawns and king castling moves, make sure black pieces can't put their own king in check) and we have just a few helper methods within ChessValidMoveCalculator to test out. Then we're green to move on to the super-fun part (next week), starting to figure out what the "best" move is for a given chess board!

The Code

Like last week, I think it best to start off by giving you this link to the code. There are too many new unit tests forming too much code to paste it in the blog, so at your leisure please download it from the link, open it up, build it, and take a look at the new unit tests. Then come on back so we can discuss them.

Unit Tests

We'll start with pawn moves. Obviously black's pawns move down the board while white's pawns move up the board, so their move calculations are different. This is why I decided to unit test black pawns separately from white pawns. You can see by looking at the unit test file that I mirrored all the white unit tests with black as far as pawns are concerned, so we should have full coverage.

I'm going to skip unit testing of black Knight, Bishop, Rook, and Queen moves. Why? These pieces move exactly the same whether they are white or black. The only difference is that white pieces can't put the white king in check, and black pieces can't put the black king in check, but I don't have to duplicate all my tests to check 1 situation per color. I did however recreate the majority of the king's unit tests as castling is different (white castles on row 7, black on row 0), so you can see in our unit test code that most but not all of the king testing is duplicated from white to black. I also renamed some of the unit tests to better denote color and direction.

We also added 8 more unit tests (4 each) for ColorThreatensSquare and IsKingInCheck, testing the positive and negative and black/white of each method.

You may have also noticed I had to fix more code. This just reaffirms my love of unit tests. See if you can find the code I had to fix. Here's a hint: it had to do with checking if a move would put the same-color king in check.

What's Next?

That's it for this week folks! We have 1 solution, 4 projects, dozens of classes, 80 unit tests, 1 web API, etc etc. Next week we'll FINALLY get to the whole point of this project, calculating the "best" move. I haven't a clue how long that will take us to do, it could be 1 post or 5, we'll just have to wait and see. 

Thursday, March 20, 2014

A Chess Project, Part 9

Intro

As promised last week in Part 8, this week is all about the unit tests. We've got a pretty sizable chunk of code going in this project and so far we have no way to test any of it. I don't plan on creating a GUI for this solution (at least not in this series of blog posts), so unit testing is the way to go. Please view my unit testing series of blog posts (UT1, UT2, UT3, UT4) for a quick refresher on unit testing if necessary.

The Code

I think it will be easier to understand what's going on if I give you a link to the code at the top of the article this time, so here you go. Once you have it pulled down, extracted and compiled come on back for the remainder of the article.

Unit Tests

As you can see in the screenshot below, I created a new unit test project in the solution named BlogChess.Backend.Test.
This is where all our unit tests for the project are going. As of the time I am writing this, there are 57 unit tests in the solution. That is a bit too many for us to walk through in the blog, so at your leisure please dig through the code and see what's going on. The unit tests at this point cover the vast majority of our functionality from the backend dll. We are testing the validation code, board size, and all the valid moves for white. The only things left to test are the black piece move validation methods, and we'll do that in the next blog post.

As a result of all this unit testing, I found 2 other things necessary. First, I had to fix some bugs. I know what you're thinking: "But Pete, you don't make mistakes!". Well I appreciate the kind words (you were thinking them, admit it!), but yes I actually do make mistakes. I bet I fixed a half-dozen of them thanks to the unit tests. I won't detail all of them (mostly because I don't remember what they were at this point), but suffice it to say they would have made this project rather useless if they had been left to fester. The second thing I found necessary while creating unit tests was to have a way to visualize a chess board so that I could set up specific positions in the unit tests, and validate piece movement. Cue dramatic new bold sub-heading...

New Format, New Formatter/Parser (use of html agility pack)

...So, I created a new chess format. Sure arrays are great for representing a chess board, but which is easier to work with when creating a unit test? This...

{ {-4, -2, -3, -5, -6, -3, -2, -4}, {-1, -1, -1, -1, -1, -1, -1, -1}, {0, 0, 0, 0, 0, 0, 0, 0}, {0, 0, 0, 0, 0, 0, 0, 0}, {0, 0, 0, 0, 0, 0, 0, 0}, {0, 0, 0, 0, 0, 0, 0, 0}, {1, 1, 1, 1, 1, 1, 1, 1}, {4, 2, 3, 5, 6, 3, 2, 4} }


or this?

So, I invented a new chess format (it sounds a lot more impressive than it really is) and created a class to import the new format. Believe it or not, the above screenshot is pure html/css. There are no images in that. Well the screenshot itself is an image obviously, but it's showing just html/css.

How did we accomplish this? If you're moderately familiar with html/css, it's easier than you might think. It turns out that unicode defines special characters for each of the chess pieces, so as long as the font you are using supports these values, then you can use plain-old-text to represent the pieces. After that it's just a simple matter of putting a board around the pieces you want, and voila! You can look at some of the many samples I put in the solution, using the screenshot below as a guide to finding the files. The essence of the export format though is much simpler than these files allude to. All you need is elements on the page that have a data-col attribute of "a" through "h", and those same elements should have a data-row attribute of "1" through "8". These of course represent the 64 squares of the chess board. For ease of formatting I've elected to use a table (you could use div's, span's, or whatever other html element you feel like using), a modified sample of which you can see below.

    <table>
        <tbody>
<tr>
            <td>8</td>
            <td data-col="a" data-row="8"></td>
            <td data-col="b" data-row="8"></td>
            <td data-col="c" data-row="8"></td>
            <td data-col="d" data-row="8"></td>
            <td data-col="e" data-row="8">♚</td>
            <td data-col="f" data-row="8"></td>
            <td data-col="g" data-row="8"></td>
            <td data-col="h" data-row="8"></td>
        <tr>
</tbody></table>

For some more thorough and much cleaner looking samples with css to format them nicely, take a look at any of the unit test files in the solution as you see highlighted below. These samples all import perfectly fine using our new formatter object, and are also very easy to use the mark-1 eyeball to see what's going on with the board itself by just viewing the file in any modern web browser. Again the above html table is just a sample; obviously you'd need the other 56 squares to make a full board :)


Now, on to the design and code of the formatter. In the future I can see myself wanting to import and export various other chess formats/notations (there are plenty of them), so let's use an interface to represent any type of formatter. We'll call the interface IChessBoardFormatter. Then, because the format we want right now is html based, we'll just call the class HtmlChessBoardFormatter and have the class implement the new interface.


IChessBoardFormatter defines 4 methods: Import, Export, ExternalPieceToNative, NativePieceToExternal. Import and Export should be pretty self-explanatory. ExternalPieceToNative converts an external representation of a piece (in whatever format) to a native piece (a short value from -6 (black king) to +6 (white king). NativePieceToExternal just goes the other direction.

HtmlChessBoardFormatter is the class we'll use to translate boards between our internal representation(arrays of short) and the new human-friendly format (html). For the moment I didn't implement the capability to export; just import. For now I only need this class in order to read in html files for unit testing. It's too much code to put in this blog post, so open up HtmlChessBoardFormatter and take a look at the Import and ExternalPieceToNative methods; they're where the magic is.

If you've never used the Html Agility Pack I highly recommend it for your HTML parsing needs in .net. I've used it in the Import method of the formatter class in order to find html elements with a data-row and data-col attribute, as they are the elements that contain our chess pieces. Here's a sample of it:

            var document = new HtmlDocument();
            document.LoadHtml(sourceBoard);
            foreach (var node in document.DocumentNode.SelectNodes("//*[@data-row]"))
            {
                var sourceRow = node.Attributes["data-row"].Value;
                var sourceCol = node.Attributes["data-col"].Value;


Spiffy huh? Resilient html parsing made easy in .net.

What's Next?

As you may have guessed, we'll have to hit up the unit tests for black pieces/movement and any other public methods of the valid move calculator next week. I can finally see the light at the end of the space-time continuum though, we're almost ready to start coding our "best move" logic! And, thanks to these unit tests, we'll actually be able to suggest valid moves.

Resources

Wikipedia Chess
Wikipedia en Passant
Wikipedia Chess Symbols in UnicodeHtml Agility Pack

Thursday, March 13, 2014

A Chess Project, Part 8

Intro

We're moving right along with this sizable project, a Web API that will tell you the "best" move to make for a given chess position/game. We've created a test page, a Web API for clients to call, and we're still in the middle of calculating valid moves. If you need a refresher, look back through the history of this blog and find parts 1-7; they'll give you the info you need. On to part 8!

Can't Put Your Own King in Check

As I mentioned last week, there is still one major restriction we need to code: you cannot make a move that puts your own king in check. Here is an illustration of such an illegal move:

(white's turn)


Normally the white pawn at d2 (the one with the red arrow pointing at it) could move forward/up one square to d3, or two squares to d4. However, because the black bishop on b4 would threaten the king if the pawn moved out of the way, the pawn cannot in fact move from its current location. This is the type of move we are trying to prevent, so let's figure out how to do that.

Logically speaking, the best thing I can come up with is to pretend that the white piece has moved, and then check the valid moves of all the black pieces. If a black piece would be capable of "taking" the white king, then the previous move was invalid. Keep in mind that this invalidity could count for any type of piece; a pawn move can't put your king in danger, a rook move can't, and so on. This means a logical place to put the code would be in AddMoveToList, as it's already called every single time we add a move to, well, the list.

This isn't where we'll start though. We'll first create a method that tells us if the king is in check. We'll be creative and call it IsKingInCheck. Here's the code for it:

        protected bool IsKingInCheck(bool colorIsWhite, ChessBoard board)
        {
            var kingPosition = FindKing(colorIsWhite, board);
            return ColorThreatensSquare(!colorIsWhite, board, kingPosition.Item1, kingPosition.Item2);
        }


Pretty short and sweet; we find the king, and then return a boolean telling us if the opposite color threatens the square that the king is on. We haven't yet created the FindKing function though, so let's do that now:

        protected Tuple<short, short> FindKing(bool colorIsWhite, ChessBoard board)
        {
            short kingPieceValue = (short)(Constants.King * (colorIsWhite ? Constants.WhiteTransform : Constants.BlackTransform));
            for (short row = 0; row < 8; row++)
            {
                for (short col = 0; col < 8; col++)
                {
                    if (board.Board[row, col] == kingPieceValue)
                        return new Tuple<short, short>(row, col);
                }
            }
            throw new Exception("King not found");
        }


This method determines what the short constant value is for the king based on the color we are looking for, then loops through the board to find the king on it. If there is no king we throw an exception.

It's worth pointing out now that we only need to traverse 1 branch into the tree to check for checks; after all, when you're checking if a piece threatens the king, you don't really care if the piece can actually make the move; you only care if the square is threatened. Because of this we now need to create a new field of class ChessValidMoveCalculator that tells us whether we should allow multi-layer traversal of the tree:

protected bool m_allowCheckSubTrees = true;


If you'll recall, IsKingInCheck calls the pre-existing function ColorThreatensSquare. It is in this function that we calculate the next color's valid moves to see if a square is threatened, so it's in this method that we need to set m_allowCheckSubTrees to false. Here's the updated version of this function:

        public bool ColorThreatensSquare(bool colorIsWhite, ChessBoard board, short row, short col)
        {
            var game = new ChessGame();
            var positions = new List<ChessBoard>();
            positions.Add(new ChessBoard(true) { Board = (short[,])board.Board.Clone() });
            game.Positions = positions.ToList();
            game.GameStatus = colorIsWhite ? GameStatus.WhitesTurn : GameStatus.BlacksTurn;
            var futureCalculator = new ChessValidMoveCalculator(game);
            futureCalculator.m_allowCheckSubTrees = false;
            var futurePositions = futureCalculator.CalculateValidMoves();
            var colorSign = colorIsWhite ? Constants.WhiteTransform : Constants.BlackTransform;
            foreach (var position in futurePositions)
                if (Math.Sign(position.Board[row, col]) == colorSign)
                    return true;
            return false;
        }


What did we do to this method? We first set the game.GameStatus to the turn of the appropriate color, based on who we are checking using the parameter colorIsWhite. I realized when I opened up this unit that I had never set whose turn it is in this "future" game, so I needed to do that in order to keep things from splodin. I then set futureCalculator.m_allowCheckSubTrees to false, so that we don't check to make sure the piece can actually move to determine if it threatens a square, as we don't want a nigh-infinite traversal of our logic tree.

The last thing we need to do is call our new method IsKingInCheck. As I said a few paragraphs ago, the best place to do this is in AddMoveToList.

        protected IList<ChessBoard> AddMoveToList(ChessBoard startingBoard, IList<ChessBoard> boards, short oldRow, short oldCol, short newRow, short newCol)
        {
            var resultArray = new ChessBoard[boards.Count];
            boards.CopyTo(resultArray, 0);
            var result = resultArray.ToList();
            if (newRow >= 0 && newRow < 8 && newCol >= 0 && newCol < 8)
            {
                //check the sign (color) of the current square and future square; if same, don't allow the move
                var startingPieceSign = Math.Sign(startingBoard.Board[oldRow, oldCol]);
                var futurePieceSign = Math.Sign(startingBoard.Board[newRow, newCol]);
                if (startingPieceSign != futurePieceSign)
                {
                    var futureBoard = (short[,])startingBoard.Board.Clone();
                    var piece = futureBoard[oldRow, oldCol];
                    futureBoard[oldRow, oldCol] = Constants.Empty;
                    futureBoard[newRow, newCol] = piece;
                    var newBoard = new ChessBoard(true);
                    newBoard.Board = futureBoard;
                    //check if new board and starting board are the same; if so don't add to valid moves list
                    var equal = futureBoard.Rank == startingBoard.Board.Rank &&
                        Enumerable.Range(0, futureBoard.Rank).All(dimension => futureBoard.GetLength(dimension) == startingBoard.Board.GetLength(dimension)) &&
                        futureBoard.Cast<short>().SequenceEqual(startingBoard.Board.Cast<short>());
                    //make sure the move wouldn't put the current color's king in check
                    var wouldPutSameColorKingInCheck = false;
                    if (m_allowCheckSubTrees)
                    {
                        var futureBoardContainer = new ChessBoard(true);
                        futureBoardContainer.Board = futureBoard;
                        wouldPutSameColorKingInCheck = IsKingInCheck(m_game.GameStatus == GameStatus.BlacksTurn, futureBoardContainer);
                    }
                    //add move to list of valid moves
                    if (!equal && !wouldPutSameColorKingInCheck)
                        result.Add(newBoard);
                }
            }
            return result;
        }


The addition to this function starts with the comment "make sure the move wouldn't put the current color's king in check". Here we first determine if we're supposed to check sub-trees, because if not then we don't care if the move would put the king in check. If we are allowed to check sub-trees we set a local variable wouldPutSameColorKingInCheck to the appropriate value by calling IsKingInCheck, passing in the potential future board. Lastly we add the move to our list of valid moves only if it would not put the king in check.

What's Next?

We're moving right along. Next week we'll create our unit tests. We won't make any actual progress on the "best" move calculation while creating our tests, but we'll give ourselves better confidence that what we've done so far is actually correct and most likely we'll be able to find and fix some bugs.

Here's the link to the current source code.

Resources

  • Online chess board editor "Apronus"

Saturday, December 7, 2013

Unit Testing, Part 4 (More Tips and Tricks)

Intro

In Part1, Part2, and Part3 we covered the mechanics of unit testing, why to use unit tests, we created some of our own unit tests, we saw a tip for making your unit tests smaller and more focused, and we gained some knowledge of Dependency Injection and how to use it to make your unit testing life easier. In this final piece on unit testing (admit it, you were hoping I'd lay off this topic), We'll cover just a couple more useful tricks with unit testing.

 Test Method and Test Class Initialization

We've already seen how unit test methods require an attribute on the method named TestMethod (example below).

[TestMethod]
public void TestStuff()
{
  //test some stuff here...
}

Well there are a couple other attributes that you can use on methods within your test classes that will save you some time, and they are ClassInitialize and TestInitialize. A method marked with the ClassInitialize attribute is automatically run (as part of running unit tests) only a single time regardless of the number of TestMethod methods. A method marked with the TestInitialize attribute is automatically run (as part of running unit tests) once for each test method within the test class. Let's look at an example:

    [TestClass]
    public class BaseTemplateValidatorTest
    {
        public static BaseTemplate m_object;
        IEntityValidator validator;

        [TestInitialize]
        public void TestInitialize()
        {
            m_object = new BaseTemplate();
            validator = ValidatorFactory.GetValidator(m_object);
        }

        /// 
        /// title trim
        /// 
        [TestMethod]
        public void TestTitleTrim()
        {
            m_object.Name = " b ";
            var temp = validator.IsValid;
            Assert.IsTrue(m_object.Name == "b");
        }

        /// 
        /// title too long
        /// 
        [TestMethod]
        public void TestTitleTooLongChop()
        {
            m_object.Name = "b".PadLeft(ValidationConstants.TemplateNameMaxLength + 1, 'a');
            var temp = validator.IsValid;
            Assert.IsTrue(m_object.Name.Length == ValidationConstants.TemplateNameMaxLength);
        }

        /// 
        /// title max length
        /// 
        [TestMethod]
        public void TestTitleMaxLength()
        {
            string originalName = "b".PadLeft(ValidationConstants.TemplateNameMaxLength, 'a');
            m_object.Name = originalName;
            var temp = validator.IsValid;
            Assert.IsTrue(m_object.Name.Equals(originalName));
        }
    }
Here we have a method in our test class decorated with the TestInitialize attribute. Within this method we initialize a couple of member objects that we use in multiple TestMethods. This means that we don't have to initialize these member objects within each test method, thus saving us some code.

A method marked with ClassInitialize must be static. Why? For every test method that is run during unit testing, a new instance of your test class is created. So, in order for a method related to that class to only be run a single time (which ClassInitialize decorated methods are), it must be static. Here's an example:
    [TestClass]
    public class UnitTest1
    {
        private static Class1 m_class1;

        [ClassInitialize]
        public static void InitalizeTheClassYo(TestContext testContext)
        {
            m_class1 = new Class1();
        }

        [TestMethod]
        public void AddStuffNullParams()
        {
            var actual = m_class1.AddStuff(null, null);
            Assert.AreEqual(-1, actual, "AddStuff should return -1 when both parameters are null");
        }

        [TestMethod]
        public void AddStuffNullParam1()
        {
            var actual = m_class1.AddStuff(null, 3);
            Assert.AreEqual(-1, actual, "AddStuff should return -1 when the first parameter is null");
        }

        [TestMethod]
        public void AddStuffNullParam2()
        {
            var actual = m_class1.AddStuff(4, null);
            Assert.AreEqual(-1, actual, "AddStuff should return -1 when the second parameter is null");
        }

        [TestMethod]
        public void AddStuffValidNumbers()
        {
            var actual = m_class1.AddStuff(4, 3);
            Assert.AreEqual(7, actual, "AddStuff should return the sum of 2 numbers when numbers are passed in");
        }
    }
The method InitializeTheClassYo is decorated with the ClassInitialize attribute, so it is run once and only once as part of running our unit tests. We use it here to initialize a static class member, thus saving ourselves a little code and a little bit of processing time.

ExpectedException Attribute

ExpectedException is another attribute you'll end up using to decorate your test methods. When you write a method that purposely throws an exception under certain conditions, the ExpectedException attribute is how you tell your unit test to expect the correct type of exception. Here's an example:
        public int AddStuff(int? param1, int? param2)
        {
            if (!param1.HasValue && !param2.HasValue)
                throw new ArgumentNullException("param1 and param2", "param1 and param2 cannot both be null");
            if (!param1.HasValue || !param2.HasValue)
                return -1;
            else
                return param1.Value + param2.Value;
        }
There's nothing special about the above method, in fact you might recognize this method from a prior post. You can tell what it does pretty easily by looking at it. Take special note of the fact that it throws an ArgumentNullException if both of the parameters are null. Now here is one of the unit tests for this method:
        [TestMethod]
        [ExpectedException(typeof(ArgumentNullException))]
        public void AddStuffNullParams()
        {
            var actual = m_class1.AddStuff(null, null);
        }
That lovely little ExpectedException attribute takes a parameter that is the type of exception to look out for, and as long as the code within this unit test throws an exception of the appropriate type, the test passes! As you may have guessed, if your unit test doesn't throw the exception (for example, if the code within was "var actual = m_class1.AddStuff(null, 34);", then the unit test would fail because the code doesn't throw the expected exception.

What's Next?

  • There are other unit-test-related atrtributes you can use on methods. Look them up, you might find them useful.
  • What other parameters can you pass in to the ExpectedException attribute?
  • How would you test a private or protected method/field? Why would you want to? What are some arguments against testing fields and methods scoped private or protected?

Thursday, December 5, 2013

Unit Testing, Part 3 (Tips and Tricks)

Intro

In Part 1 we gave a brief overview of unit tests and when to use them. In Part 2 we learned how to create our own unit tests in C# and Visual Studio using MSTest. This week we'll cover a couple tips and tricks to get you really humming with unit testing.There's a ton to unit testing, so please stick with me here! There will be at least one more unit testing article after this one, but we're getting into the really meaty stuff in this post so if you can get past this, the rest will be a breeze.

Tip1: Small, Focused Unit Tests

One of the best pieces of advice I've seen regarding unit tests is to keep each individual test method small and focused. This makes your code (the code you're testing, and the actual production code) easier to maintain, due to simplification and clarity of purpose. Could I be more vague? Probably, but I'm not paid by the word so let's see an example:

(Production code)
        public int AddStuff(int? param1, int? param2)
        {
            if (!param1.HasValue || !param2.HasValue)
                return -1;
            else
                return param1.Value + param2.Value;
        }
(Focused unit testing)
        [TestMethod]
        public void AddStuffNullParams()
        {
            var actual = new Class1().AddStuff(null, null);
            Assert.AreEqual(-1, actual, "AddStuff should return -1 when both parameters are null");
        }

        [TestMethod]
        public void AddStuffNullParam1()
        {
            var actual = new Class1().AddStuff(null, 3);
            Assert.AreEqual(-1, actual, "AddStuff should return -1 when the first parameter is null");
        }

        [TestMethod]
        public void AddStuffNullParam2()
        {
            var actual = new Class1().AddStuff(4, null);
            Assert.AreEqual(-1, actual, "AddStuff should return -1 when the second parameter is null");
        }

        [TestMethod]
        public void AddStuffValidNumbers()
        {
            var actual = new Class1().AddStuff(4, 3);
            Assert.AreEqual(7, actual, "AddStuff should return the sum of 2 numbers when numbers are passed in");
        }
(Mosh pit unit testing)
        [TestMethod]
        public void AddStuffTests()
        {
            var actual1 = new Class1().AddStuff(null, null);
            Assert.AreEqual(-1, actual1, "AddStuff should return -1 when both parameters are null");
            var actual2 = new Class1().AddStuff(null, 3);
            Assert.AreEqual(-1, actual2, "AddStuff should return -1 when the first parameter is null");
            var actual3 = new Class1().AddStuff(4, null);
            Assert.AreEqual(-1, actual3, "AddStuff should return -1 when the second parameter is null");
            var actual4 = new Class1().AddStuff(4, 3);
            Assert.AreEqual(7, actual4, "AddStuff should return the sum of 2 numbers when numbers are passed in");
        }
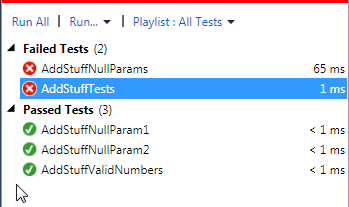
Now pretend somebody comes along and breaks the production code such that if both parameters are null, it starts throwing an exception. It might not seem like a big deal, but with the mosh pit unit test method you have a harder time telling what went wrong. You lose some extra time debugging the problem due to not knowing what could have happened. The error you get for the more focused unit tests is however more useful, as you can see in the screenshot below:


Yeah it's not a huge deal really, but every bit of assistance helps. The name "AddStuffNullParams" lets you know that the method no longer works properly when you have null params. The name "AddStuffTests" really tells you nothing and you have to dig a little longer to get to the same depth. Smaller and more focused methods also means less chance of ripple effects when you modify things, so it's a no-brainer.


Tip2: Dependencies, Dependency Injection (DI), and Mocks

What is Dependency Injection? Dependency Injection is just a fancy way of saying that you pass dependencies your code has, into your code. DI can easily be a full blog post of it's own, but I have to keep things short to account for my meager attention span so we'll just cover a quick scenario: You need to access a database in your code to pull in some data, so you write a method to pull in the data. You then write some other code to process that data. Now you wish to unit test the code that is processing the data...woops! Your code hits a database, so how in the world are you going to exercise that code with a unit test? It really adds no value to your tests to hit the database, as it's 1) comparatively slow, 2) volatile, and 3) difficult to setup test data. This is a problem that comes up fairly often with accessing external resources such as databases, files, web services, and many other things. Your unit tests should not exercise these external dependencies, they should exercise only your own code. Dependency Injection is your friend in these cases! First, here is some code that returns true if there are rows in a table. It directly accesses the table via a sql connection/command.
    public class DataProcessor
    {
        public bool ProcessData()
        {
            using (var conn = new SqlConnection("some conn string"))
            {
                var cmd = conn.CreateCommand();
                cmd.CommandText = "select count(1) from tblSomeTable";
                cmd.CommandType = System.Data.CommandType.Text;
                using (var reader = cmd.ExecuteReader())
                {
                    if (reader.Read())
                        return true;
                }
            }
            return false;
        }
    }
How would you unit test this? Well you could go through the trouble to setup sample data in the database at the beginning of a positive test and a negative test (one test where the db has data, one test where it doesn't), but you don't really care to test the data itself; just the code. So, instead you would pass in the data dependency using an interface and a mock.
    public class DataProcessor
    {
        private IDataRetriever m_dataRetriever;

        public DataProcessor(IDataRetriever dataRetriever)
        {
            m_dataRetriever = dataRetriever;
        }

        public bool ProcessData()
        {
            return m_dataRetriever.HasData();
        }
    }
First we see the revamped DataProcessor class. It now has a constructor which accepts an object of type IDataRetriever. The method ProcessData then uses this data retriever object to pull the data, and does what it needs to do based off of that call.
    public interface IDataRetriever
    {
        bool HasData();
    }
Here's the interface for IDataRetriever; short and sweet.
    public class ConcreteDataRetriever : IDataRetriever
    {
        public bool HasData()
        {
            using (var conn = new SqlConnection("some conn string"))
            {
                var cmd = conn.CreateCommand();
                cmd.CommandText = "select count(1) from tblSomeTable";
                cmd.CommandType = System.Data.CommandType.Text;
                using (var reader = cmd.ExecuteReader())
                {
                    if (reader.Read())
                        return true;
                }
            }
            return false;
        }
    }
And here is a concrete implementation of that IDataRetriever interface. This class is now responsible for communicating with the database, not our DataProcessor class.
    [TestClass]
    public class DataProcessorTest
    {
        [TestMethod]
        public void ProcessDataTrue()
        {
            var dp = new DataProcessor(new DataRetrieverMock() { EmulateHasData = true });
            Assert.IsTrue(dp.ProcessData(), "DataProcessor should have data");
        }

        [TestMethod]
        public void ProcessDataFalse()
        {
            var dp = new DataProcessor(new DataRetrieverMock() { EmulateHasData = false });
            Assert.IsFalse(dp.ProcessData(), "DataProcessor should not have data");
        }
    }
    class DataRetrieverMock : IDataRetriever
    {
        public bool EmulateHasData { get; set; }

        public bool HasData()
        {
            return EmulateHasData;
        }
    }
Now, through the magic of DI we are able to write unit tests that exercise the method ProcessData without hitting the database! You can see in the above 2 test methods when we create an instance of DataProcessor, we also pass in a brand new instance of DataRetrieverMock. DataRetrieverMock is a concrete implementation of IDataRetriever (just like ConcreteDataRetriever is) that doesn't actually hit the database. Yay dependency injection!

You may also be thinking to yourself "hey, with the logic code (the class DataProcessor) decoupled from the data retrieval code (IDataRetriever and DataRetriever), I bet it would be easier to switch out the data storage mechanism huh?" Well you're right! that's another side benefit of DI; in general, it keeps your external dependencies separate from the business logic, so if you need to retrieve the same data from somewhere else you just write another Concrete implementation of the external retriever interface. Spifferiffic!

What's Next?

I think your time would best be spent Christmas shopping, so get that out of the way. Come back refreshed next week for part 4.

References

http://msdn.microsoft.com/en-us/library/ms182517(v=vs.100).aspx

Tuesday, November 26, 2013

Unit Testing, Part 2 (A Tutorial on Creating Your First Unit Test in C#)

Intro

Back in Part 1 we talked about what unit tests are, why they are helpful, and when to use or not use them. This week we'll start coding our own unit tests. Never created a unit test before? Well now's the time! It really is quite easy, and the Visual Studio environment (even the latest express editions) makes it pretty painless. If you don't have a copy of Visual Studio already, you can click this to download Visual Studio Express 2013 for Web. For the examples below I am using Visual Studio Express 2013 for Web. If you are using a different version of VS your screens may look a little different.

Start the Project

The first step on the journey is to create our sample project. Fire up Visual Studio and create a class library (dll). Name the project/solution ItcProgBlogUnitTests.The IDE will create a default class for you named Class1. Open Class1.cs if the editor isn't already opened up for you. Create a single method in this class called AddStuff(). AddStuff should accept 2 parameters, both of type Nullable<int> (or int?). The return type should be int. This method should, assuming both integers have a value, return the sum of the 2 numbers. If one or both of the ints are null then return -1. If you want to take a sneak peek the method is pasted here, otherwise give yourselves a heapin helpin of pats on the back as you write it yourself.

        public int AddStuff(int? param1, int? param2)
        {
            if (!param1.HasValue || !param2.HasValue)
                return -1;
            else
                return param1.Value + param2.Value;
        }


Add a Unit Test Project

Tweak things until the project compiles; shouldn't take too long. Now add a unit test project to the solution. Name it ItcProgBlogUnitTests.Test.


Create a Unit Test

You should now have a brand-spankin-new unit test project in the solution. You should also have a single test class named UnitTest1 (yours may be slightly different) with a single TestMethod in the class.

    [TestClass]
    public class UnitTest1
    {
        [TestMethod]
        public void TestMethod1()
        {
        }
    }

There's nothing much going on here...notice that attribute [TestClass] on the class? This tells visual studio and MSTest (the testing framework that we're using) that this class is used for running unit tests. Your test method also has an attribute on it [TestMethod], which denotes that this method is an individual unit test. We now want to write a unit test that ensures the method AddStuff returns the value -1 when we pass in a null for both parameters. The first thing we need to do is add a reference to ItcProgBlogUnitTests (the initial class library project) into our unit test dll, so do that. I'm assuming you already know how to add references to another dll within the solution, but if not put something in the comments below and we'll help you out. You'll also have to add a line to the usings statement within the file UnitTest1.cs so do that too.

using ItcProgBlogUnitTests;
Now go ahead and refactor that single test method to call it AddStuffNullParams. Then add the 2 new lines shown below to the method:


        [TestMethod]
        public void AddStuffNullParams()
        {
            var actual = new Class1().AddStuff(null, null);
            Assert.AreEqual(-1, actual, "AddStuff should return -1 when both parameters are null");
        }

Save your project and compile it; all should be well.

Run a Unit Test

You might be thinking to yourself "well great, my code compiles but now what Mr Smartie Pants?". Well first, that's Monsignor smarty pantaloons to you. Second, now we get to run the unit test! This is really quite easy; if you look in the screenshot below, you can see 2 methods of doing so. Go ahead and do one of them.


The "Test Explorer" window now appears within Visual Studio. This shows you the result of your unit test run so you can make sure the test passed.


As you can see, our lonely little test passed with flying colors. Green=good, Red=bad.


Watch a Unit Test Fail

Now let's pretend another coder comes along and decides that you were an idiot; he says to himself smugly "the method AddStuff should CLEARLY throw an exception if both parameters are nulls." That chode happily modifies AddStuff to look like the following:

        public int AddStuff(int? param1, int? param2)
        {
            if (!param1.HasValue && !param2.HasValue)
                throw new Exception("doh!");
            if (!param1.HasValue || !param2.HasValue)
                return -1;
            else
                return param1.Value + param2.Value;
        }


Chode-boy saves, compiles, and runs the unit tests. What's that he says? A failed unit test! Yes that's right folks, your diligently created unit test has saved the chode's bacon. He can tell quickly that the code no longer passes muster and thus must be fixed.


He can double-click on the failed test and be taken straight to the failed test in the code editor, he can right-click (see above screenshot) to choose among the many options for that test, or he can hang his head in shame. Maybe a combination of the above options.

Just below the list of tests is a detail section that describes why the test failed. In this case, it's because the method AddStuff threw an exception during our test run.


What's Next?

There are tons more options for unit tests; explore, play around, see what all you can do. The best thing you can do for now, assuming you've been following along, would be to first fix the broken method so that the unit test passes again, and then create some more unit tests to fully flex the method's muscles. You want to hit all the edges/conditions, and a few have been missed after all! If you want a quick spoiler, look down a few lines. I suggest you try it on your own for a little bit first before doing so though. Happy coding everyone!


The aforementioned spoiler...one potential list of possible unit tests:
  • both parameters null, return -1 (already done)
  • param1 is null and param2 is not null, return -1
  • param1 is not null, param2 is null, return -1
  • neither parameter is null, make sure the result is the sum of the numbers

Thursday, November 21, 2013

Unit Testing, Part 1

What is Unit Testing?

Here is the Wikipedia definition of unit testing. To me, unit testing is the use of code whose sole purpose in life is to test other code. Surely you've written a method in the past where you thought to yourself "Man, I feel for the poor tester who gets to test this project. How will they ever run through all 150 scenarios of this method?". I bet you've even written demo programs just to test your code libraries, which is a very similar concept to unit testing. It's code that tests code. Unit tests are generally coded as very simple pass/fail methods where there is no room for interpretation. The test passed or it did not.


Why Should I Do It?

Unit testing can help you as the coder to test your own code, thus ensuring higher quality. It can also be argued that unit testing saves you time, though that seems to be a matter of opinion. From some Google-fu the current prevailing opinion seems to be that in the long-run you will save yourself time by baking unit tests into your projects from the start. It should seem pretty obvious to you now that writing extra code up-front will take extra time up-front, so then the next leap of logic would mean that you save time further down the road, which I have seen myself. Picture a user reporting a bug that they just found out in the field. They have to take the time to call/email support, who researches, sends it over to the group that does the coding, it gets routed to a coder, you have to spend a while tracking it down until you eventually come up with the problem and possibly a solution. Now picture even 25% of those being found through unit tests that are created in the project before its release. Depending on where you look, you can find studies that state bugs found after release cost 15 or 20 times what it costs to find and fix a bug during development, so if you catch even 8% of potential bugs you've saved time in the long-run. Plus, less-buggy software means happier users and a support department which harbors less desire to strangle you in your sleep. One other reason I've found is more of a side effect, but I find that exercising my code through unit tests forces me to design code that has less rigid dependencies and is thus easier to maintain. This is something we'll get into more in a future post.

When Should I Do It?

We are delving more into my own personal opinion here, but I feel that unit testing should be used for *most* code written, whether it be a new development or maintenance/additions. Most importantly, if a bug is found you can usually create a unit test to ensure the bug never returns. This is one of the most helpful uses of unit tests I have found; it acts as a regression test so you and potentially other coders cannot reintroduce a bug into software once it has been fixed. There might be times where unit testing is not appropriate. I hate to say it, but I do believe that if you're in a super time crunch at work and your family doesn't recognize your face anymore, take shortcuts to keep your sanity and ditch the unit tests if you have to, but only if you absolutely have to! Your family has pictures of you after all. You also do not generally want to unit test code that does nothing but hit external resources (flat files, databases, web services, etc), but we'll get into that more in a future post.

I've Heard About Test Driven Development, What's That?
Test Driven Development, or TDD, is a development process whereby the code you write is tested by unit tests prior to the code functioning. It sounds odd but it goes like this (some people show more or fewer steps, but the concept remains):
1) Decide on a specific piece of functionality (chunk of code) you want to write.
2) Write a unit test to call this non-existent piece of code.
3) Compile the unit test; it fails because the code it's calling doesn't yet exist.
4) Create a shell for the piece of functionality; it's usually something as simple as an empty method.
5) Compile+run the unit test; it passes. However, your code doesn't do anything yet, so...
6) Have the unit check that the appropriate resulting condition has occurred.
7) Run the unit test again; it fails because the functional code does nothing yet.
8) Make your code do what it's supposed to do.
9) Run the unit test again; it should pass.
10) Create more unit tests for edge cases, different input, etc etc. Refactor code as necessary to get unit tests created/passed.

There are plenty of people on teh interwebs who will insult your grandmother if you don't zealously enforce TDD in your professional life, but I don't judge (well not about this anyways) so I won't fault you for not using it. Heck I don't use it. I tried it but I find all the bouncing back and forth between the test code and production code to be time-consuming and a little distracting. I work best if I write a small, focused piece of production code first and then test the pants off of it, but do what works best for you. Give TDD a shot and see if you like it. I did, and I don't :)

What's Next?

Well that depends on if you're a teacher's pet or if you like suspense. There's no middle ground here! You can research unit testing further on your own by looking at some of the links below or maybe try some Google-fu, you could try writing some unit tests on your own in your favorite language (it's easy I promise!), or you can wait for next week's blog where I'll show you some introductory unit testing in C#.

Resources

http://en.wikipedia.org/wiki/Unit_testing

http://superwebdeveloper.com/2009/11/25/the-incredible-rate-of-diminishing-returns-of-fixing-software-bugs/

http://en.wikipedia.org/wiki/Test-driven_development