Showing posts with label Intermediate. Show all posts

Thursday, August 20, 2015

Operator Overloading in C#

Introduction

What happens when a natural disaster causes a backlog on 911 calls? Operator overload! Hahaha, I slay me. Ok so maybe there's a different form of operator overloading I'd like to discuss today, and it's the kind where you can overload the operators of the c# language. Want to redefine what == means for your class? Have at it. Want to add together two widgets and get a resulting mutant widget of doom? Go nuts I say! Operator overloading lets you redefine what most of the c# language operators mean for your class.


Here is the code, it is written using VS2013 Community Edition.

Example

I'm going to let an example do the talking for just a minute here:

using System;
using System.Linq;

namespace BlogOperatorOverload
{
    public class Monster
    {
        public string MonsterType { get; set; }
        public string Name { get; set; }

        public override string ToString()
        {
            return String.Format("{0}::{1}", MonsterType, Name);
        }

        public static Monster operator+(Monster monster1, Monster monster2)
        {
            if ((monster1.MonsterType.Equals("dragon", StringComparison.OrdinalIgnoreCase) && 
                monster2.MonsterType.Equals("man", StringComparison.OrdinalIgnoreCase)) || 
                (monster1.MonsterType.Equals("man", StringComparison.OrdinalIgnoreCase) && 
                monster2.MonsterType.Equals("dragon", StringComparison.OrdinalIgnoreCase)) 
                )
                return new Monster() { MonsterType = "Dragon-Man", Name = "Trogdor!" };
            else
                return new Monster() { MonsterType = monster1.MonsterType + "_" + monster2.MonsterType, Name = String.Join("", monster1.Name.Reverse()) + String.Join("", monster2.Name.Reverse()) };
        }
    }
}


So this first part of the sample is a class named Monster. It has 2 properties that define what it is to be a monster, an overridden ToString method that we'll use to check our output in a little bit, and most importantly it overloads the "+" addition operator. See the syntax of that? it's pretty easy; "public static [returntype] operator[operator_to_overload](params)". In this case I'm adding instance monster1 to instance monster2. I put some interesting logic in this method to handle a special edge case, and in the else I put the catch-all addition of 2 monsters. All we're doing here is creating a new resulting Monster instance that has a MonsterType and Name. Pretty cool huh? This has nothing to do with addition, but we can now add together 2 instances of the Monster class as though they were numbers! Let's see that part of the example now:

using System;

namespace BlogOperatorOverload
{
    class Program
    {
        static void Main(string[] args)
        {
            var aMan = new Monster() { Name = "Timmy", MonsterType = "Man" };
            var aDragon = new Monster() { Name = "Puff", MonsterType = "Dragon" };
            var troggy = aMan + aDragon;
            Console.WriteLine(troggy.ToString());
            var aBear = new Monster() { Name = "Billy", MonsterType = "Bear" };
            var aTiger = new Monster() { Name = "Tina", MonsterType = "Tiger" };
            var qtf = aBear + aTiger;
            Console.WriteLine(qtf.ToString());
            Console.ReadKey();
        }
    }
}


Another simple bit of code. We first declare an instance of Monster named aMan, declare another one named aDragon, and then add aMan to aDragon to get a 3rd instance variable named troggy. Any guesses as to the output of this line? If you feel like cheating the answer is a little further down the page.

Now we create an instance of Monster named aBear, another named aTiger, and add them together. Go ahead, be wild, guess what the output will be!

Or just cheat and check out this screenshot:

Yes that's right folks, it's really that easy to redefine operators in c#. When would you want to use this? Hell if I know, I haven't actually found a practical use for it yet. Drop me a line if you find one!

What's Next?

Create your own samples and play with some of the other overloadable operators. There's a link down in the Resources section that lists the overloadable operators.

Resources

Operator Overloading Tutorial
Overloadable Operators

Friday, June 19, 2015

.Net Web API Help Files

Intro

Help me Rhonda, help help me Rhonda...
Sorry about that, my parents used to listen to the Beach Boys all the time in the car and that tune is pretty catchy. So I was sitting here thinking about ways to help people, and I thought of Web API help files. When you make a Web API that you want to publish for people, creating documentation can get a bit tedious. Wouldn't it be great if there was an automatic way of generating help files? Yeah you know it baby, there is such a thing! And of course, it's a NuGet package that's nice and easy to plug into your existing Web API projects in .Net. Let's see what this sucker does for us!


Note: The sample project is in Visual Studio 2013, .Net 4.5.

Usage

So the NuGet package name is Microsoft ASP.NET Web API 2.2 Help Page. Bit of a mouthful there huh?

To start off our efforts, I've created a blank Web API project in Visual Studio. I created a single controller named SampleController, with a get method that returns "hi". Here's the code for it in case you want to play along:

using System.Web.Http;

namespace BlogWebApiHelp.Controllers
{
    public class SampleController : ApiController
    {
        public IHttpActionResult Get()
        {
            return Ok("hi");
        }
    }
}


If you run the project in your browser and look at http://[baseurl]/api/sample, you'll get back a json file (or xml depending on your browser) with the word "hi".

OK time to install the Help package to see what it does for us. Open up the package manager console via Tools-->NuGet Package Manager-->Package Manager Console. Type this text into the Package Manager Console and hit Enter: Install-Package Microsoft.AspNet.WebApi.HelpPage. The package is now installed and you'll notice your solution has a new folder named Areas. There's quite a bit of content in here that's all Mvc-style, and yes you can customize it all you like. It's what generates the help pages for your API that you're about to see.

There's one more small code change you have to make in order for this stuff to work. Open up your Global.asax.cs file and put this one line in your Application_Start method:

AreaRegistration.RegisterAllAreas();


Note that you will have to add using clause for System.Web.Mvc if you don't have one already.

Let's see this little sucker in action! Fire up the Web API and navigate to http://[baseurl]/help. You should see a badass little page like this one on yer screen:

That's sweet! It found the Sample controller and is showing us that it has a Get method which we can execute by calling api/Sample. Huh, this thing doesn't have a description though? Lame! Stupid package should document my methods for me. Well it isn't quite that cool, but it's pretty close. Close the browser and head back to Visual Studio. Put an XML comment on the Get method of SampleController. There's a small code change you have to make too. Open up the file Areas\HelpPage\App_Start\HelpPageConfig.cs. In here you need to uncomment this line:

config.SetDocumentationProvider(new XmlDocumentationProvider(HttpContext.Current.Server.MapPath("~/App_Data/XmlDocument.xml")));

As you can see, this line tells the Help package that it should look for a file within your web app named XmlDocument.xml within the app_data folder. We haven't created any such file so let's tell our project to autogenerate that xml file for us. Right-click on your project and open up the Properties window. Check the checkbox next to "XML documentation file:", and for the name type "bin\XmlDocument.xml". Save.


Run this thing again and open up the help url. Aww yeah baby, our XML documentation is now our Web API Help file documentation! It doesn't get much better than this folks. You can put documentation on methods and classes, it will pick up parameter documentation, and you can style these pages as you like. Awesome!


What's Next?

Try creating your own Web Api with help files, or download the source code from the link above and play with mine. Open up the two links below in the Resources section and see what other features this thing has. Tip: you can hide methods and controllers from the API documentation!

Resources

Microsoft ASP.NET Web API 2.2 Help Page
Creating Help Pages for ASP.Net Web API

Thursday, June 4, 2015

AutoMapper with C#

Intro

Our world is a cold, cruel place where mapping the properties of one type to the properties of another type is a tedious chore, best left to bleary, dreary late night work while buzzed on enough caffeine to bug-eye a rhino. But wait, what light yon winder breaks? or something...


AutoMapper! If you guessed that AutoMapper is a new way to create your own maps from within a car, you'd be wrong! AutoMapper is a NuGet package that you can use in .Net to map the properties of one type to the properties of another type. If for example you have a middle-tier Person class that needs to map to a backend database class called PersonDb, AutoMapper can take most of the tedium away from you. No more setting Person1.FirstName = Person2.FirstName, yadda yadda. All you have to do is make a single call to initialize the configuration, make another call to map object 1 to object 2, and you're golden! Let's see it in action.

Note: Sample Project is in VS2013 Community Edition.

Samples

OK let's get movin. Create yourself a console application. You'll then need to install the NuGet package named AutoMapper. I'll show you a different way than I've used in the past, maybe you'll find this easier or maybe not. Anyways...


then in the Package Manager Console, type "Install-Package AutoMapper"...


OK now we've got AutoMapper installed in our console app. Add yourself a couple classes to the project, named Type1 and Type2. Here is the code for each: 


using System;

namespace BlogAutoMapper
{
    public class Type1
    {
        public string FirstName { get; set; }
        public int Age { get; set; }
        public DateTime DateBoughtFirstCar { get; set; }
    }
}


using System;

namespace BlogAutoMapper
{
    public class Type2
    {
        public string FirstName { get; set; }
        public int Age { get; set; }
        public DateTime DateBoughtFirstCar { get; set; }
    }
} 

Pretty simple stuff here.Now let's use AutoMapper. First open up your Program.cs file and add a "using AutoMapper;" statement up in the using statements. Now plug the following code into your Main method:

using System;
using AutoMapper;

namespace BlogAutoMapper
{
    class Program
    {
        static void Main(string[] args)
        {
            var type1 = new Type1() { Age = 44, DateBoughtFirstCar = DateTime.Parse("01/01/2000"), FirstName = "Perriwinkle" };
            Mapper.CreateMap<Type1, Type2>();
            var type2 = Mapper.Map<Type2>(type1);
            Console.WriteLine("type2.DateBoughtFirstCar: " + type2.DateBoughtFirstCar.ToShortDateString() + "...type2.Age: " + type2.Age + "...type2.FirstName: " + type2.FirstName);
            Console.ReadKey();
        }
    }
}

That's it! If you had 10, 20, or even 50 properties, it would map them for you. Pretty handy huh? Here's what the output loooks like, just to prove it does what it says it does:


What's Next?

AutoMapper has a ton more features. I've shown you only the very basics. It can handle copying lists of objects, it can hit up sub-objects, you can customize the value copying (note how right now the source and destination properties have to be the same name), you can make it look at private member fields, and so much more. Play around with AutoMapper and see what it can do for you. I wonder if it could be used as a poor man's object cloning, hmm...

Resources

AutoMapper
Keith Durham: Thanks for pointing out this gem to me sir!

Thursday, May 14, 2015

A Partial Object Update Trick in C#

Intro

At least one time in my life someone has asked me a question that goes like this:

"I have a class with a bunch of properties. I want to update some or all of them, in any combination. How can I do this?"

Well you could just set the values of course, you could call a method that has an optional parameter for each property of the class, and you could of course pay a badger to write some clever new trick for you. We'll go with the badger option! The rest of the blog details what the badger would write.

Note: Sample code is in VS 2013.


Details

Within the class that you wish to update, create a SetAll or SetMany or whatever method where you pass in another instance of your class (source). Check each property and if it's non-null, you set the destination object's property value to the source object's property value. Note that this tactic will depend on nullable types, and assumes you can ignore null values passed into a new setter method. Here's an illustration:

using System;

namespace BlogPartialUpdateTrick
{
    public class SomeClass
    {
        public string FirstName { get; set; }
        public string LastName { get; set; }
        public int? HeightInches { get; set; }
        public DateTime? Dob { get; set; }

        public void SetAll(SomeClass source)
        {
            this.FirstName = source.FirstName ?? this.FirstName;
            this.LastName = source.LastName ?? this.LastName;
            this.HeightInches = source.HeightInches ?? this.HeightInches;
            this.Dob = source.Dob ?? this.Dob;
        }

        public override string ToString()
        {
            return String.Format("fn: {0}, ln: {1}, height: {2}, DOB: {3}", FirstName ?? String.Empty, LastName ?? String.Empty, 
                HeightInches.HasValue ? HeightInches.Value.ToString() : "null", Dob.HasValue ? Dob.Value.ToShortDateString() : "null" );
        }
    }
}


In this first code sample, We have my spiffy class SomeClass. It's got 4 properties, all of which are nullable. The noteworthy part of this class is the SetAllMethod where I can pass in a source object which is also of type SomeClass. It sets this instance's property values to the values passed in the source parameter, but only if they're non-null. Here's a 2nd code blurb where I'm using this stuff:

using System;
using System.Windows.Forms;

namespace BlogPartialUpdateTrick
{
    public partial class Form1 : Form
    {
        public Form1()
        {
            InitializeComponent();
        }

        private void button1_Click(object sender, EventArgs e)
        {
            var destination = new SomeClass() { FirstName = "Freddy", LastName = "Fingers", Dob = DateTime.Parse("01/01/1970"), HeightInches = 72 };
            var source = new SomeClass() { FirstName = null, LastName="Flippers", Dob = null, HeightInches = 80 };
            destination.SetAll(source);
            MessageBox.Show(destination.ToString());
        }
    }
}


Create a destination object, a source object, call the new method, voila! output is this:

"fn: Freddy, ln: Flippers, height: 80, DOB: 1/1/1970"

Thursday, May 7, 2015

Simple Lambda Expressions in C#

Intro

I'm not going to go too in-depth regarding Lambda expressions or how to use them in .Net. Rather, I will just show you a short sample to whet your appetite. If you've already used lambda expressions or LINQ then this post might not teach you much, but it's a short post so suffer through it if you can :)


Code samples are in VS2013, .Net 4.5. Other environments might work just fine too.

Example


using System;
using System.Collections.Generic;
using System.Linq;

namespace BlogLambda
{
    public class SomeClass
    {
        public int ANum;
        public string AString;

        public override string ToString()
        {
            return "(" + AString + ":" + ANum + ")";
        }
    }

    class Program
    {
        static void Main(string[] args)
        {
            var things = new List<SomeClass>();
            things.Add(new SomeClass() { ANum = 2, AString = "cheese" });
            things.Add(new SomeClass() { ANum = 1, AString = "bacon" });
            things.Add(new SomeClass() { ANum = 7, AString = "tires" });
            things.Add(new SomeClass() { ANum = 4, AString = "apples" });
            var orderedThings1 = things.OrderBy(t => t.ANum);
            orderedThings1.ToList().ForEach(thing => Console.Write(thing));
            Console.WriteLine("---");
            var orderedThings2 = things.OrderBy(t => t.AString);
            orderedThings2.ToList().ForEach(thing => Console.Write(thing));
            Console.WriteLine("---");
            Console.ReadKey();
        }
    }
}


As promised, a pretty small sample. First we declare a new class called SomeClass. It's got 2 fields, and int and a string. It's got a single ToString method that we'll use just to illustrate what's going on.

The real meat here is within the Main() method (as you may have guessed, this is a console application). We first create a new list of objects of type SomeClass and initialize it with 4 new instances. Things get interesting on line 27, where we have our first lambda expression. The OrderBy method lets us sort the things object by whatever we tell it to sort. In this case we're sorting on the ANum property. If you haven't seen lambdas before the syntax might look a little weird. To me it helps if i think of "things.OrderBy(t => t.ANum)" meaning "sort things by t such that t.ANum". Basically I pretend that " => " means "such that". It's not always a great way to conceptualize, but it's helped me.

Moving on, you can see that we then output the list (notice the cool use of the ForEach extension method which allows us to spit out the whole list to the console, with a single line of code). We then sort the list a 2nd time on the AString field and send the output to the console once again. Here's the output:

(bacon:1)(cheese:2)(apples:4)(tires:7)---
(apples:4)(bacon:1)(cheese:2)(tires:7)---

That's all there is to it! First list sorted by ANum, second list sorted by AString.

What's Next?

Lambda expressions can get way more useful and way more complicated. I've barely even slightly rubbed the surface, much less scratched it. Read up on them! If you haven't tried LINQ yet, jump into that too. It can be a great time saver for us coder types.

Resources

dotnetperls Lambda

Sunday, May 3, 2015

Reflection in C#, Part 2

Intro

This here posting is part 2 of 2 in our series on Reflection in C#. Review Part 1 first to see what we started with. All done? OK cool. You wouldn't lie to me about that would you? Nah of course not, I trust you. On with the blog! We saw in the last post how we can list the classes in an assembly and how to create an instance of a class through reflection. Useful stuff. We have more work to go though so let's get it on! Or something.


Note: Samples are VS2013 Community edition, .Net 4.5. Here is the sample project if you want to play along.

What Else Can Reflection Do?

Other than listing the classes in an assembly and creating an instance of a class, what else can we do with reflection? We can list and modify property values, and we can list and execute methods. There's a little more too, but those 4 things are what I want to cover right now. So, let's see some of it in action!

First we have here a class that doesn't do much. It's got a single string property that we're going to play with, and a constructor that sets a default value for said property.

namespace BlogReflection
{
    public class DummyClass
    {
        public string AValue { get; set; }

        public DummyClass()
        {
            AValue = "timmeh!";
        }
    }
}


This class by itself doesn't illustrate anything other than I can type the word Dummy. So, have a look-see at this second class:

using System;
using System.Reflection;
using System.Windows.Forms;

namespace BlogReflection
{
    public partial class MainForm : Form
    {
        public MainForm()
        {
            InitializeComponent();
        }

        private void MainForm_Load(object sender, EventArgs e)
        {
            var a = Assembly.GetExecutingAssembly();
            ListClassesEntry.Items.AddRange(a.GetTypes());
        }

        private void ListClassesEntry_SelectedIndexChanged(object sender, EventArgs e)
        {
            if (!String.IsNullOrWhiteSpace(ListClassesEntry.SelectedItem.ToString()))
            {
                var assembly = Assembly.GetExecutingAssembly();
                var formType = assembly.GetType(ListClassesEntry.SelectedItem.ToString());
                var constructor = formType.GetConstructor(new Type[] { });
                var instance = constructor.Invoke(new Object[] { });
                var methods = formType.GetMethods();
                string methodNames = "METHOD NAMES: ";
                foreach (var method in methods)
                    methodNames += method.Name + ",";
                MessageBox.Show(methodNames);
                var toStringMethod = formType.GetMethod("ToString");
                MessageBox.Show("ToString() : " + (string)toStringMethod.Invoke(instance, new Object[] { }));
                var properties = formType.GetProperties();
                string propertyNames = "PROPERTY NAMES: ";
                foreach (var property in properties)
                    propertyNames += property.Name + ",";
                MessageBox.Show(propertyNames);
                var selectedProperty = formType.GetProperty("AValue");
                MessageBox.Show("AValue: " + selectedProperty.GetValue(instance).ToString());
                selectedProperty.SetValue(instance, "some silly value");
                MessageBox.Show("AValue: " + selectedProperty.GetValue(instance).ToString());
            }
        }
    }
}


This class does 4 important things that illustrate the functionality of reflection:
  1. Find all methods of a class: Line 28, where we call GetMethods(), returns an array of methods in the class DummyClass.
  2. Execute a method: Line 34 uses Invoke, passing it a reference to the ToString method to call it. 
  3. Find all properties of a class: Line 35 calls GetProperties, which returns an array of all the properties of our class DummyClass.
  4. Get and set a property value: Lines 41 and 43 retrieve the value of the property AValue, while line 42 sets the value of the property AValue.

Not really all that complicated is it? Reflection sounds mean and nasty, but once you get into it it's as easy as theoretical physics. Or pie. Mmmm, pie.


Resources

C# Reflection

Thursday, April 16, 2015

Web API Global Exception Handling Made Easy

Intro

Exception handling can be a bit of a chore. It always ends up looking the same; the familiar try...catch pattern, maybe you log the exception, maybe you rethrow it, yadda yadda. In a Web API you might even throw back a server error 500 response when you encounter an exception.

I know you're all sitting there chanting impatiently, willing me to tell you I can make it better...easier even! You're probably sitting at your desk or staring at your phone, thinking "Peeticus, please save us from the doldrums of routine! Help us!!". Well OK, just this once.Only because I can see the tears of joy brimming in your eyes.

Example

So I've made a simple Web API. It has a single GET method that throws an exception. Here's the code:

using System;
using System.Web.Http;

namespace BlogWebApiExceptionHandling.Controllers
{
    public class HandlingController : ApiController
    {
        public IHttpActionResult Get()
        {
            throw new ApplicationException("hey, an error!");
        }
    }
}

Run this thing and send a request to it with Fiddler. Here's what you get:
HTTP/1.1 500 Internal Server Error
Cache-Control: no-cache
Pragma: no-cache
Content-Type: application/json; charset=utf-8
Expires: -1
Server: Microsoft-IIS/8.0
X-AspNet-Version: 4.0.30319
X-SourceFiles: =?UTF-8?B?YzpcdXNlcnNccGVldGljdXNcZG9jdW1lbnRzXHZpc3VhbCBzdHVkaW8gMjAxM1xQcm9qZWN0c1xCbG9nV2ViQXBpRXhjZXB0aW9uSGFuZGxpbmdcQmxvZ1dlYkFwaUV4Y2VwdGlvbkhhbmRsaW5nXGFwaVxoYW5kbGluZ1w=?=
X-Powered-By: ASP.NET
Date: Fri, 17 Apr 2015 01:20:24 GMT
Content-Length: 2176

{"Message":"An error has occurred.","ExceptionMessage":"hey, an error!"...}

Server error 500 with a message. That's not too bad I guess, though the exception is unhandled. What if we want to log it, or send a notification email to somebody? you can put a try...catch around it sure. What if you have 5 methods? 50? all that try...catch becomes a pain in the arse. So, let's do this the easy way.

Now I add a new class to my Web API. This new class will be named GlobalExceptionLogger, but you can name yours whatever you want. Because this is only a demonstration of exception handling, I won't do anything complicated in here. I'm just setting a local variable to the Message property of the exception. Here it be:

using System.Web.Http.ExceptionHandling;

namespace BlogWebApiExceptionHandling
{
    public class GlobalExceptionLogger : ExceptionLogger
    {
        public override void Log(ExceptionLoggerContext context)
        {
            var stuff = context.Exception.Message;
        }
    }
}

There's one more line of code necessary to make this work. This new line of code goes in your WebApiConfig.cs file, within the Register method:

config.Services.Add(typeof(IExceptionLogger), new GlobalExceptionLogger());

If you now set a breakpoint back in the Log method of GlobalExceptionLogger and fire up the Web API using Fiddler, you'll see that the Log method is called for the unhandled exception. Hey, now it's globally handled! Any further Web API controllers and methods will use this thing, which is exceptionally cool. Like me! :)

Resources

What's New in ASP.Net Web API 2.1

Thursday, April 2, 2015

Web Api Request Validation Made Easy

Intro

Validating inputs into your system can be quite a chore. Field X might be a required field, Field Y might need to be email format, Field Z might need to be a number between 1-100. Coding such requirements isn't very difficult, just tedious. Wouldn't it be great if there was something that would lessen the monotony? Yeah, you know where I'm headed...there is such a beast, and we can bask in its magnificence!

Note: I'll be using Visual Studio 2013 Community Edition and Fiddler to do my work.


Sample

For starters, create a new Web Api application. I've created such a solution and named it BlogWebApiValidation. Add a new controller to it named ValidationController.


 Now add a new class to your Models folder named ValidationSampleRequest. It'll have just three properties, so it'll be pretty simple. Here it is:

using System.ComponentModel.DataAnnotations;

namespace BlogWebApiValidation.Models
{
    public class ValidationSampleRequest
    {
        [Required]
        public string RequiredString { get; set; }

        [EmailAddress]
        public string SomeEmail { get; set; }

        [Range(1, 100)]
        public byte SomeNum1To100 { get; set; }
    }
}

Now go back to your ValidationController class. It doesn't need to do much, it just needs a single method named Post that accepts an object of type ValidationSampleRequest. Here's what yours might look like:

using System.Web.Http;
using BlogWebApiValidation.Models;

namespace BlogWebApiValidation.Controllers
{
    public class ValidationController : ApiController
    {
        public IHttpActionResult Post(ValidationSampleRequest request)
        {
            if (ModelState.IsValid)
                return Ok();
            else
                return BadRequest(ModelState);
        }
    }
}


This Post method is pretty bare-bones, as we're just demonstrating model validation. All it does is check the validity of the ModelState (the request), and returns a 200 OK HTTP result if good, and a 400 Bad Request HTTP result if bad. Simple! Go ahead and run the project. You'll get a 403 Forbidden error in your browser but that's OK. Our testing involves something a little more complex than just firing up a browser window. But hey, leave the browser window open :)

Fire up Fiddler and let's play with this sucker. I'll skip some of the explanations and just show you real quick how to use Fiddler to test your Web APIs. There's a lot more to it than what I'll cover, I just want to demonstrate the API for now. Anyways, launch Fiddler. You can install it from the link below if you don't already have it.

First, click on the "File" menu, and click on the "Capture Traffic" menu item. This will tell Fiddler not to capture everything you're doing on the internet. That's too much noise for us to sift through.

Now click on the Composer tab. This brings you to a window where you can create your own requests. Select "POST" as the verb, and type in the URL of your web api controller. You can see mine below, though yours (especially the port) may be slightly different. In the headers field right below the URL you can just copy what I have. In the Request Body field, you can also copy what I have below.

Headers:
User-Agent: Fiddler
Accept: application/json
Content-Type: application/json

Request Body:
{
"RequiredString": null,
"SomeEmail": "not an email",
"SomeNum1To100": 101
}


Now hit the big Execute button. You'll see you now have a single request shown in the left-hand side of the window, and it should have a 400 result. Double-click this response record, then on the right-hand side of the window click on the "Raw" button. If you look down there in the response section it now shows you the raw HTTP response.

2 key points here:
  1. You received 400 Bad Request response. Poifect!
  2. The body of the response contains a JSON object which has details on what precisely went wrong. What good is model validation if the client doesn't know what they did wrong? If you keep scrolling to the right you can see that all 3 fields failed validation.


What's Next?

Validation has a lot more options like regular expressions, you can use nullable types like bool? to make a normally non-nullable field required, it will validate sub-objects in complex requests, credit cards, comparison of 2 properties, you can even create your own custom class validation methods, custom error messages, and much much more.

Fiddler also has a lot more options than what I breezed on through. Play around with it, it's great for testing Web API's.

Resources

Fiddler 
DataAnnotations (more validation options)

Thursday, March 12, 2015

.Net Web API Compression

Intro

Web API projects are great. But hopefully I've already convinced you of that in past blogs :)  What could make them better? Optimization of course! As you can guess by the title, I'm specifically going to talk about compression. Compression has a dual-purpose: it can optimize bandwidth, and as a result on many devices it optimizes speed as well from the user's point of view. Out of the box, your Web API's don't accept compressed requests and won't send back compressed responses. Lazy API! But we've got an easy way to make this happen, so read on fellow optimizers!


Example

First, let's create a Web API project in C#. We'll go without web optimization for now just so you can see the difference. Fire up Visual Studio and create a new project. Make it a c# web project.


Make it a empty project and give it Web API and Web Forms capabilities:

 Now give your site a new web API controller. Name it TestController. 


Your Web API doesn't need much in it, just set your code to this:

using System.Net.Http;
using System.Web.Http;

namespace BlogWebApiCompress.Controllers
{
    public class TestController : ApiController
    {
        public HttpResponseMessage Get(string id)
        {
            var result = new List();
            for (int i = 0; i < 10; i++)
                result.Add(id);
            return Request.CreateResponse(result);
        }
    }
}


If you run your web api by hitting your base url plus "/api/test/hi", the web api will return back the list of strings string containing "hi" (10 times) to you. Not much to that. Now let's pretend you sent up a 100 page pamphlet worth of text. You'd have not only a large request, you'd have a very large response as well. Compression can lessen the burden on your systems.

How do we get compression? It turns out there's already a NuGet package for that. NuGet kind of reminds me when iPhones were still pretty new and people kept saying "there's an app for that". Well with Visual Studio and NuGet, "there's a package for that". The one we want is named Microsoft.AspNet.WebApi.MessageHandlers.Compression. Good luck memorizing that. I'll assume you have some familiarity with NuGet by now, but if not drop me a line in the comments below. Fire up the package manager and install the above package.

Now open up the file App_Start/WebApiConfig.cs. At the end of your Register() method, copy in this line of code:

GlobalConfiguration.Configuration.MessageHandlers.Insert(0, new ServerCompressionHandler(new GZipCompressor(), new DeflateCompressor()));

You may also have to add "using"s for these:

using Microsoft.AspNet.WebApi.MessageHandlers.Compression;
using Microsoft.AspNet.WebApi.MessageHandlers.Compression.Compressors;


Believe it or not, that's all you have to do on the server! Let's do another test of our Web Api using FireFox to see the compression in action. This time I'll put a much longer string into the request:


Notice how FireFox sent up the request header "Accept-Encoding: gzip, deflate" and the server sent back down gzip-encoded content? Sweet! That's all there is to it.


What's Next?

  • Go to the website of the NuGet package and see how to:
    • Only compress requests and responses that are above a certain size threshold, and
    • Write client-side code that tells the server you can accept a compressed response (hint, most browsers do this for you already if you are using JavaScript, but for C# clients you have a small amount of extra coding to do).


Resources

 Microsoft.AspNet.WebApi.MessageHandlers.Compression

Thursday, February 26, 2015

.Net ThreadPool (and the Task Parallel Library)

Intro

Threads are a great way to accomplish multiple tasks at the same time, while ensuring that you spread the joy among multiple cores on a multi-core system. They're excellent at improving the perceived response time of your applications and separating out disparate tasks to execute more quickly as a whole.

Even better, for a while now the .Net Framework has has a ThreadPool. This is a pool of background threads that are already created and ready to process things for you. Because they are already created, firing up one of these threads is a quicker process. They're performance-optimized threads ready for you to use with a minimal amount of code.

This blog assumes you have some knowledge of threaded programming in .Net. If you have no experience programming with threads, try this primer first: Multithreaded Programming Using C#.

Usage

Since .Net 4.0, the ThreadPool can be used with Generic tasks using the Task Parallel Library. I'd rather start off the explanation with an example so here we go:

using System.IO;
using System.Threading;
using System.Threading.Tasks;
using System.Windows.Forms;

namespace BlogThreadPool
{
    public partial class Form1 : Form
    {
        public Form1()
        {
            InitializeComponent();
        }

        private void ProcessFileGeneric(Object fileNumber)
        {
            var fileName = String.Format("file{0}.txt", fileNumber);
            if (File.Exists(fileName))
                File.Delete(fileName);
            File.WriteAllText(fileName, String.Format("file #{0} contents", fileNumber));
            Thread.Sleep(5000);
            File.AppendAllText(fileName, "\r\nsome more contents");
        }

        private void button1_Click(object sender, EventArgs e)
        {
            Task.Factory.StartNew(new Action<Object>(ProcessFileGeneric), 1);
            Task.Factory.StartNew(new Action<Object>(ProcessFileGeneric), 2);
            Task.Factory.StartNew(new Action<Object>(ProcessFileGeneric), 3);
        }
    }
}


This code simply creates 3 files and puts some content in them. The method ProcessFileGeneric is pretty self-explanatory. Delete a file if it exists, create the file and write some initial contents, wait 5 seconds, then append some more text to the file. The more interesting bit of magic is in button1_Click. This method creates 3 new tasks using the TPL, via Task.Factory.StartNew.Each call fires up one of the ThreadPool threads and feeds it a method to execute. In this case we are using the Action object and feeding it an Object parameter. Pretty cool huh?

As simple as that was, there's more to the ThreadPool than that. You might have already asked your computer "How many threads are sitting here waiting for my whimsy?". Well, there's an easy way to find out, and an easy way to set the value! See here:

        private void button2_Click(object sender, EventArgs e)
        {
            int maxWorkerThreads, completionPortThreads;
            ThreadPool.GetMaxThreads(out maxWorkerThreads, out completionPortThreads);
            int minWorkerThreads;
            ThreadPool.GetMinThreads(out minWorkerThreads, out completionPortThreads);
            int availableThreads;
            ThreadPool.GetAvailableThreads(out availableThreads, out completionPortThreads);
            var data = String.Format(
                "MaxThreads: {0}\r\n" +
                "MinThreads: {1}\r\n" +
                "AvailableThreads: {2}\r\n",
                maxWorkerThreads, minWorkerThreads, availableThreads);
            MessageBox.Show(data);
        }


This cool new method shows us the usage of GetMaxThreads, GetMinThreads, and GetAvailableThreads. GetMaxThreads shows the max # of threads we can have active in the ThreadPool at any one time. GetMinThreads shows the minimum number that are awaiting our whims (including threads that are already working for us). GetAvailableThreads shows the # of unused threads available to us (excluding those that are already working for us). There are also setter methods SetMaxThreads and SetMinThreads. Under normal circumstances you won't use these much, but hey, you never know. If you run into performance issues with your ThreadPool code, play around with these and see what you get.

What's Next?

That's it for today folks. There is more to know about ThreadPool, background vs foreground threads, when you might want to use threads, and how to use them effectively in a desktop UI, but hey this blog can't go on forever. Check out the links in the Resources section below if you want to read more info. Happy learning!


Resources


The Managed Thread Pool
ThreadPool Class
Multithreaded Programming Using C#
Foreground and Background Threads

Thursday, February 19, 2015

.Net Sorted Dictionary

Intro

Have you ever sat around and thought to yourself "Gee, I sure could use a list that has an identifier of some sort associated with an object of some sort!". You find the Dictionary class, bust out some code, and you're a happy camper. A month later your customer tells you "Hey lazy coder-boy, your code's too slow!". You dig into things and with a little bit of that special coder magic you find out that putting items in the Dictionary is fine, but reading items from the Dictionary is super-slow! You've got an integer Key and a TWidget (class/object) Value. So now you think to yourself "Gee, I sure wish that Dictionary was faster at finding random Keys!". Well golly folks, I've got a solution for you! SortedDictionary.

Usage

According to MSDN, a SortedDictionary "Represents a collection of key/value pairs that are sorted on the key.". Sorting is great at solving the aforementioned problem of slow seeks/scans, or at least it is in combination with a sorted-list-optimized search algorithm. SortedDictionary gives you automatic sorting and the usage of optimized search algorithms to find your data. If you've ever coded a bubble sort, quick sort, binary search, or one of the other array of searching/sorting algorithms, you'll feel blessed that the .Net framework has already done the plumbing for you. Let's look at a simple sample:

        private void SortedDict()
        {
            var dict = new SortedDictionary<int, string>();
            dict.Add(1234, "hi!");
            dict.Add(4321, "yo!");
            dict.Add(9876, "werd!");
            string value;
            if (dict.TryGetValue(1234, out value))
            {
                //hey, we found the value! alert the media!
            }
        }

This method creates a simple SortedDictionary whose key will be an int and whose value is a string. It then adds the values to the dictionary and attempts to find the specified value in the dictionary. For such a small sampling of data, you aren't likely to gain anything by using a SortedDictionary. There's not set cutoff point, but I don't bother optimizing until I need to for performance reasons and until I have at least 1k items in the list. I was recently working with a list of 500k items and switching from Dictionary to SortedDictionary sped things up by a factor of nearly 10! YMMV.

What's Next?

Tidwell wrote a blog for you guys on the ITCProgBlog just a day or two ago about the basic Dictionary class. This blog here told you about SortedDictionary. There's also a ConcurrentDictionary you could go read about if you like, it'll help you when you get into threading. You could also just write your own samples, and perhaps pontificate presciently on your next project requiring performant code. (ie think of ways to a SortedDictionary in your real-life projects).

Resources

SortedDictionary

Thursday, February 5, 2015

ASP.Net Web.config Transformation

Intro

Did you know there's an easy way to change your web.config when you deploy it? This doesn't involve you manually modifying the web.config after or prior to deployment, or writing some special script to edit the file for you on the live server. Nay fellow coders, nay! All you have to do is create something called a transformation file, put a little bit of xml in it, and when you deploy, the web.config that gets deployed will be magically transformed by Visual Studio. Let's see how the magic is woven.

Note: This blog was done using VS 2013 Community Edition. VS 2013 Express should work the same. Earlier and later versions of VS may differ.

Howdie-Do

First, fire up Visual Studio and create a new Web Application. Make it an empty web application. We don't need any special technologies like Web Forms or MVC as the site won't do anything. We're just demoing how to transform web.config files.

You should now have a web application in Visual Studio that looks like the below screenshot. It's pretty sparse, but that's ok; that's what we want. Notice how your web.config file can be expanded with that little arrow to the left of it? Go ahead and click that. You'll see that 2 files live underneath web.config, namely web.debug.config and web.release.config.


These 2 gems are where we cast our spell. First things first though, let's see what's in the web.config. Open 'er up. Yours should look similar to the one below. Not much in here either, and that's perfect. It will make illustrating this technique easier.


The key element for our purposes will be the compilation tag. See that debug="true" in there? It's generally considered bad practice to leave that in your deployed web.config file, as it creates potential performance issues and security vulnerabilities. Our goal then is to have the configuration transformation process set debug to false or remove it.

OK let's get crackin! Open up your Web.Release.config. I'll assume that when you want to push your website live you'll be building the solution in release mode, but I'll show you how to set the compilation mode during deployment in a little bit.

This file has more content than the web.config. Still not very many tags though. And hey, what's that? A compilation tag? Yeppers it is! Visual Studio has assumed for you that you'll want to modify the compilation tag when deploying in release mode. Most importantly, see the xdt:Transform attribute? This attribute, with its value of "RemoveAttributes(debug)", tells Visual studio to remove the debug attribute from your web.config during deployment. Well slap me and call me Jill, that's precisely what we wanted. Yeehaw! No coding necessary even!


Now it's time to see how to deploy the site. Right-click the web application project in Solution Explorer and choose the menu item "Publish".


Normally you might deploy to Azure or something else equally nifty, but for the sake of brevity we'll deploy to the local machine. Choose "Custom" as the publish target. A popup window will come up asking what you want to name the publish profile. Name it whatever you like.


On the next screen choose "File System" as the publish method, and point the Target location wherever you like on your computer.


On the next screen of the wizard choose "Release" as your Configuration, then click the "Publish" button.


Once VS is done publishing, use Windows Explorer to browse to the directory you published the site to. Open up the deployed web.config in whatever text editor you like. See that lovely compilation tag? No debug attribute! Success! FYI, if the debug attribute is not present, its value defaults to false.


What's Next?

There is a lot more you can do with Web.config Transformation files. You can replace elements, remove elements, add elements, add/remove/modify attributes and more. Check out the link below in the Resources section to see how to do all that you could possibly want and then some.

Resources

Web.config Transformation Syntax

Thursday, January 22, 2015

VS 2010 Web Deploy Projects and web.config File Section Replacement

Intro

Let's pretend you want to have a different web.config file for live vs qa vs dev. If you're working on a web site (not web application) in Visual Studio you don't have access to web.release.config and web.debug.config, the easiest of the transformation methods. However, don't fret! With a web site you still have the option of creating a Web Deployment Project and enabling web.config file section replacement.

Why might you want to use this? Here's one common scenario. It's common knowledge that in the compilation element of your web.config, you don't want to leave it set to debug="true" in your production deployment. This has both security and performance implications and is just a good idea to have your site set to live mode rather than debug mode. Using web.config file section replacement with a Web Deployment project makes this quick and easy.

Creating a Web Deployment Project

For the remainder of this blog I'm assuming you already have a VS2010 solution with a web site project in it. If not, find one or create one. Onward...

Step #1 in getting all this going is creating a Web Deployment Project. Open up your VS 2010 solution (feels weird doing that; I've done nothing but VS2013 for this blog so far). Hey I suppose this probably works in VS2013 too, I just haven't tested it there. But I digress. Right-click the web site and select "Add Web Deployment Project...".


Name it whatever you like on the next screen and click "OK" when ready.


That was painless. You've got your first web deployment project ready to roll.


Web.config File Section Replacement

Open up the web.config if your site and scroll down to the "compilation" tag. It probably looks something like this:

    <compilation debug="true" targetFramework="4.0">

It's that debug attribute we want to do something about. You want to leave it true when you're debugging, as it makes debugging possible. But when you push this somewhere that the outside world can get at it, say on a production server, you want that set to false as it's more performant and more secure than the alternative. Let's do this! Right-click on your new web deployment project and select "Property Pages". On the window that comes up, click on "Deployment" in the left-side view. Check the box that says "Enable Web.config file section replacement" and put the following text in the big textbox: "system.web/compilation=web.compilation.config;". I tend to do this for both the Debug configuration (the drop-down in the upper-left) as well as the Release configuration, and if you're not sure which build configurations are used for what just do this in both of them. Click OK when you're done.


That's half the picture; we told the web deploy project to use a file called web.compilation.config, but that file doesn't exist yet. Create this file in your web site. Open up your web.config, copy the contents of the "compilation" tag and it's children, and paste it all into your new web.compilation.config file. Now set that debug attribute to "false" in the web.compilation.config file and save it. Mine looks like this, yours will be similar (though my sub-tags are probably different):

<compilation debug="false" targetFramework="4.0">
  <assemblies>
    <add assembly="System.Design, Version=4.0.0.0, Culture=neutral, PublicKeyToken=B03F5F7F11D50A3A"/>
    <add assembly="System.Windows.Forms, Version=4.0.0.0, Culture=neutral, PublicKeyToken=B77A5C561934E089"/>
    <add assembly="System.Web.Extensions.Design, Version=4.0.0.0, Culture=neutral, PublicKeyToken=31BF3856AD364E35"/>
    <add assembly="System.Speech, Version=4.0.0.0, Culture=neutral, PublicKeyToken=31BF3856AD364E35"/>
  </assemblies>
</compilation>


Arrsome! Now we have web.config file section replacement running, so what do we do with it? Post the site!

Deploying The Site Manually

The simplest method of posting your site to take advantage of replacement is to just copy the files. Right-click on the web deployment project and select "Build". When it's done building, right-click the web-deployment project in VS again and select "Open Folder in Windows Explorer". Open up either the "Debug" or "Release" folder (depending on which build configuration you're using), and voila! Them files be yer website. If you want to verify that your web.config file was properly transformed, just open it up from this folder and find the compilation element. It should have debug set to false.

Caveats

Web deployment projects are kind of slow to compile. For that reason you don't want to build the deploy project every time you compile your website. You can tell VS to only compile your web deploy project when you explicitly compile it (by right-clicking it and selecting "Build"). To do this, right-click your solution in VS and select "Configuration Manager...".


 On the Configuration Manager screen select the solution configuration(s) you want to change (I usually set both Debug and Release), and uncheck the "Build" checkbox for the deploy project. Click "Close" when you're done and save everything. Now when you build the solution the deploy project won't compile.


What's Next?

Web applications (not web sites) have a cleaner method of web.config transforms, using web.debug.config and web.release.config. Play around with it, see if you like it.

You could also see what other transforms are possible using the above method. Hint: You can transform just about any element, not just the "compilation" element!

Friday, December 26, 2014

Visual Studio: SQL Server Database Projects Part II

Intro

Last week in Part I of this 2-part series we saw how easy it is to setup a database project in Visual Studio, allowing us to treat databases similarly to how we treat our other code. Because our creations and changes are represented as .sql files, we can source-control our database systems which makes releasing and deploying our systems just a little bit easier and more predictable. Last week we saw how to create a new database via one of these projects. This week, we'll see how to create a database project for a database that already exists, as well as how to compare your project schema to the target database's schema. Hold on to yer hats! Or if you're Dan, eat a hat.

Hook up to an Existing Database

If you created a solution file last week for the databases in Visual Studio blog, open that solution file back up. If not you can just create a new solution, however the instructions given here are using last week's solution file as the base. You may have to make slight modifications to your own steps if you create a new solution but I bet you can get there. I also have a pre-made database named BlogLinq.ZooContext. This is one we made many moons ago in a blog posting far far away. If you don't have a pre-made database you can hook up to then go create one real quick and add a small table or two to it. OK, on with the show!

Right-click your solution in the Solution Explorer and add a new project. Select "SQL Server Database Project" as the project type, name it whatever you want, and click OK. You should have a new project in your solution.


Right-click on the new database project and select Import-->Database.

On the "Import Database" screen that comes up, click the "New Connection..." button. Type in the proper information for your connection and click the "Test Connection" button. Assuming things work out OK, click the OK button.


This takes you back to the "Import Database" screen where you can click the "Start" button, which will import your database schema into the database project. If all goes well, you now should have new folder(s) and within those some new sql files that represent your tables. Cool huh?


Schema Comparison

Now that we've seen how to create a database project from an existing database, what do we do with it? As you can imagine, we're going to want to make changes to the schema and eventually deploy said changes. I'm going to open up the Shows table and add a new column for the time of the show. Here's my new table structure:

I've added a column, so obviously this definition is different from the live database schema. Let's prove it by comparing the schemas. Right-click the project in Solution Explorer and select "Schema Compare...".

This brings up the schema comparison window. On the left side is your database project. On the right-side is nothing! Open up the drop-down and choose "Select Target...".

This brings up the "Select Target Schema" window. Select your database and click the "OK" button.

Now click the "Compare" button.

You are presented with the results of the comparison. Yippee! It can tell that we've added a new column to the Shows table named showtime. This is so freakin sweet. I don't want to get too in-depth on what you can do from here, but if you take a look at those other buttons in this window you can see there is an option to deploy the changes, generate sql scripts for later deployment, view unchanged items, and more. Have fun!


What's Next?

Play around with some of the other options available to you. Make a couple databases, update them, etc. It's fun! If you have any questions or comments, leave them in the comments section below and I'll be happy to help out.

Resources

SQL Server Database Development in Visual Studio

Thursday, December 18, 2014

Visual Studio: SQL Server Database Projects

Intro

Did you know that you can create and modify your SQL Server databases from within Visual Studio? Further, did you know that you can then put your database modification scripts into source control? Yes that's right folks, fully source controlled SQL databases right from within your favorite code editor. This goes beyond just running SQL queries against your database (which you can also do from Visual Studio by the way) and into modifications of the structure of your database using DML.

Why would you want to do this? Well you may have noticed, but as a coder you use source control. This allows you to easily version your code, branch your code, and it simplifies releasing of your code (somewhat) since you know what changes were done when and for what version of your system. If you've never source-controlled a database, which I'm sure many of you haven't, then you know releasing database modifications in tandem with code is an error-prone process. You have to rely too much on the right people remembering what they did at release time, and it can cause issues. Well having your SQL modifications in source control does the same thing for databases that source control does for code: it simplifies versioning. The rest of this blog will be dedicated to showing you how to perform the amazing feat of database development via Visual Studio. Hang on to your hats folks, this is gonna be a fun ride!

Note: The rest of this blog assumes that you have SQL Server 2014 Express Edition installed, or you have access to another SQL Server 2014 database engine. If you do not, please install from the previous link or contact your local friendly DBA for access to a non-production SQL 2014 box.

Create a New Database Project

To start things off we'll see how to create a new database using Visual Studio. Go ahead and fire up VS 2013. Once you get in there, create yourself a new project. Select "SQL Server Database Project" as the type of project and name it whatever you want. I've named mine BlogDatabase.


We've got an empty database project, which would make for a pretty boring deployment scenario. That script would be as blank as Keanu Reeves's whoa face. Let's create a table to put in this database to spruce it up a bit. Right-click the solution over in the Solution Explorer, then click "Add" and "Table...".


Name your table ElTable. Yeah, I'm feeling quite creative this evening. So sue me.

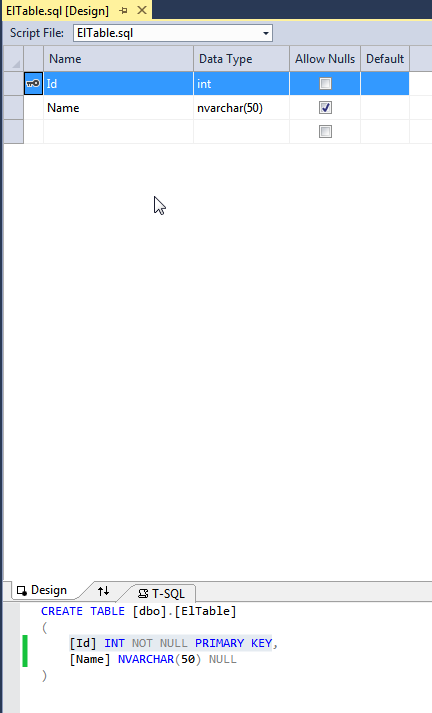
You can now modify your new table with either the designer or with script. Most of you will probably feel more comfortable with the designer portion, and in truth using it is a great way to get used to DML (data manipulation language) if you're not already used to it. Make a change in the designer view, and see what script is generated below it. This script is what SQL Server uses behind the scenes to make the actual database changes, so it's quite helpful to know what it's doing and how it's doing it. In the below screenshot, you can see I've added 2 fields: Id and Name.


Id is an integer and is the primary key field, and Name is just a nullable nvarchar (string) column.

Well that's nifty huh? OK so where's the database that it made? Well, it hasn't actually created a database yet. All this has done is create a script that can setup a database. We still have to publish/deploy this lovely conceptual database before it molts and becomes a real database. First things first though: we need to make sure that our project has the correct version of SQL server selected. These projects can publish to SQL Server 2K8 and up, and it defaults to publishing to the latest which is currently SQL 2K14. Depending on your environment, you may not be working with the latest and greatest.

Right-click on your database in the solution explorer and select "Properties". Select the version of SQL Server that you will end up publishing your database to and save your project. Below you can see my screen where I've set the "Target platform" to SQL Server 2014.


Now that we've made sure we're publishing to the correct version of SQL server, on with publishing the database! In the solution explorer, right-click on your database and select "Publish". A dialog window will come up asking you what server to connect to. Click on the Edit button.


This will bring up another dialog where you can specify your database server connection properties. Enter whatever information you have for the connection. For me you can see it's a local SQL installation on my compie named Peeticus-PC\SQLExpress.


Don't bother hitting "Test Connection", as it will fail. Your database doesn't actually exist yet so it can't connect properly, but that's OK. We're about to create the database. Just hit the OK button when you have your information entered here.

Now back to the first dialog: you have 2 options for deploying the database. You can either click the "Publish" button to have Visual Studio automatically create the database and all of it's structure for you, or you can click the "Generate Script" button which will obviously generate the SQL scripts you need and you can then run them manually to set things up. For simplicity's sake, we'll just have Visual Studio publish the database for us, so click the "Publish" button. If all went well, your "Data Tools Operations" window should have a green success message like the following:

Go ahead and connect to your database server with SQL Server Management Studio (SSMS), you should see your new database along with the table you plopped into it:


You can query your database via SSMS or yell at it or whatever, as it's now a real database.

What's Next?

Next week we'll see how to hook up a database project to an existing database, how to compare your current set of modifications to the target database, and we'll see some advanced options you can set within a database project. 


Resources

SQL Server Database Development in Visual Studio