Intro
We're going to continue our chess project, the one we introduced last week in Part 1 of the series. In week 1 we covered the requirements of the project. The capabilities we are looking for and the input and output required. Here in Part 2 we will start creating the "interface" that our clients will use. This interface will be in the form of a Web API HTTP Service that client code can call from anywhere, as long as they have an internet connection.Introduction to Web API
What is Web API? Web API is Microsoft's platform for building RESTful HTTP services. I'll assume you already know what HTTP is, but let's take a look at RESTful. First, REST stands for Representational State Transfer. The concept of RESTful architecture has been around for some time in the programming world; the Web is based on it. It basically means that the client doesn't necessarily need to know anything about what information and processes the server contains, as long as it has a uniform way to communicate with the server (via HTTP for the web). For our purposes we will be able to call our service RESTful if it properly applies HTTP verbs and resources. For example, if we want to post information to the service to have it calculate the best move and return it, we would use an http POST to accomplish this. There are of course other HTTP verbs such as GET, DELETE, PUT, and more, but for our small service POST will be the only applicable one. With Microsoft Web API HTTP Services you can rely on JSON and/or XML data. They are extremely portable due to accepting both JSON (very easy to find libraries based on JSON) and XML (also easy to find libraries based on XML). The coding is really quite simple I promise, so let's see how to create one.Step-by-Step Instructions for Creating our Web API HTTP Service
First off, I assume that you have Visual Studio 2013. I am using Express for Web 2013 myself, so your screens may look a little different if you are using a different version.Start by clicking on File-->New Project. Choose Visual C#, and ASP.Net Web Application. Type in the name BlogChess for the solution and hit the OK button.

On the next screen choose "Empty", click the checkbox to add folders and core references for Web API and hit the OK button.

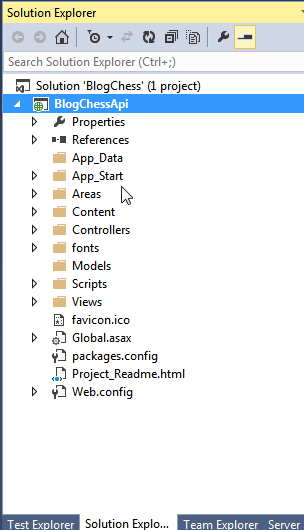
You now have your very own Web API Service. I'd like to rename the project (not the solution, the project) to BlogChessApi so do that now. Right-click on the project, click Rename, type in the name BlogChessApi. Your Solution Explorer window should now look like this:

The next step is to decide how the client will communicate with the service. I believe a single post should do nicely for us, so we only need a single method. We'll call it CalculateMove. What will the client send for data? We'll create a ChessGame class that has a list of boards, and a single enum for whose turn it is. The board object will actually be just an 8x8 2-dimensional array of short where each short value represents a different piece (or no piece).
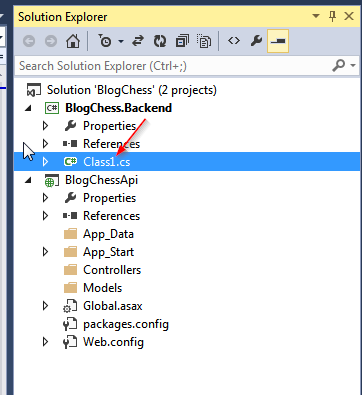
Just in case we use the ChessGame class elsewhere (and we probably will!), let's put it in a DLL rather than directly in the web service. Add a new DLL (class library) named BlogChess. Right-click the solution, choose Add and New Project.

In the window that comes up choose Visual C#, Windows, Class Library, type in the name BlogChess.Backend, and hit the OK button.

Now rename the file Class1.cs to ChessGame.cs, as this will be our data class.
Go ahead and add a public struct to BlogChess.Backend as well. This struct will be named ChessBoard. It's the easiest way we have to ensure that everywhere we want to represent a board as an 8x8 array of shorts that we will get it right. The code for Chessboard.cs is shown below.
using System;

namespace BlogChess.Backend
{
    public struct ChessBoard
    {
        public short[,] Board;

        ///
        /// Constructor
        ///
        /// as implied by the parameter name, this parameter is useless.
        /// It is only here because you cannot have a parameterless constructor in a struct.
        public ChessBoard(bool throwAway) : this()
        {
            Board = new short[8, 8];
        }
    }
}
Now we need to setup the ChessGame class so that it contains a list of ChessBoard objects as well as an enum that represents the status of the board position (black's turn, white's turn, draw, win for black, win for white). The code for ChessGame.cs is shown below.
using System.Collections.Generic;

namespace BlogChess.Backend
{
    ///
    /// Current status of a chess game
    ///
    public enum GameStatus
    {
        BlacksTurn,
        WhitesTurn,
        Draw,
        BlackWin,
        WhiteWin,
    }

    ///
    /// A game of chess
    ///
    public class ChessGame
    {
        public IEnumerable<chessboard> Positions { get; set; }
        public GameStatus GameStatus { get; set; }
    }
}
Lengthy post huh? Hang in there, we're making good progress here. If you've made it this far, drop by my office sometime and I'll give you a hearty pat on the back.
We've done what we needed to do in the backend dll, so let's dive back into the Web API Service.Web API Services follow the Model-View-Controller pattern (we'll probably discuss this more in the distant future) so you have to add a Controller class. The controller is what contains your methods that clients of your web service can see.
Right-click the Controllers folder in the BlogChessApi project and select Add, Controller.

On the next dialog select "Web API 2 Controller - Empty" and click the Add button.

Name the controller BlogChessController.

We're about to create the method BestMove that our clients will call, but first we need to add a reference in BlogChessApi to BlogChess.Backend. In the BlogChessApi project, right-click References, and click Add Reference.

Click Solution, BlogChess.Backend, and click OK.

The reference to BlogChess.Backend from BlogChessApi is now complete. It's time to get codin! Below you can see the entire BlogChessController.cs unit. It's really pretty sparse:
using System.Linq;
using System.Net;
using System.Net.Http;
using System.Web.Http;
using BlogChess.Backend;

namespace BlogChess.Controllers
{
    public class BlogChessController : ApiController
    {
        public HttpResponseMessage PostBestMove(ChessGame game)
        {
            //basic input validation...if required fields not specified, return an error message wrapped in an http "bad request" 400 result
            if (game == null || game.Positions == null || game.Positions.ToList().Count == 0)
                return Request.CreateErrorResponse(HttpStatusCode.BadRequest, "The game and at least 1 position must be specified.");
            //calculate move here
            string bestMove = "e4";
            //return the best move wrapped in an http "ok" result
            return Request.CreateResponse(HttpStatusCode.OK, bestMove);
        }
    }
}
Yes that's the entire unit. The first thing to note is our class descends from ApiController. This was already here when we generated the class. ApiController is a basic web api controller class that gives us a few goodies to make life a little easier.
The 2nd part of note is our single method PostBestMove. Let's start with the return type HttpResponseMessage. Here we are telling the service to return a valid HttpResponseMessage so that our result conforms to http message protocol. We could return a 404 (url not found), 400 (invalid request), 200 (OK), or any other http response we want by specifying this as the return type. The next noteworthy item is the name of the method, PostBestMove. When you put the word Post in the front of a method name in a Web API controller, you tell .Net what HTTP method your method will accept and respond to. In our case we want the user to send an HTTP post containing the information, so we use the word Post. You can also see that we accept a single parameter of type ChessGame. This is the list of board positions that we expect the client to provide in order for us to calculate and return the best move.
The 3rd thing to be aware of is our input validation section. The validation itself isn't very interesting; pretty mundane actually. The interesting part here is the return statement. Using Request.CreateErrorResponse, we can tell .Net to create an HTTP error response with the specified error code (in our case it's 400, Bad Request) and optionally tack a helpful string for the client onto the response.
The last thing to note is the calculation and return of the best move. The calculation is bare-bones for now. We'll fill that in a couple blogs from now. The return statement looks similar to the last return statement, except here we use CreateResponse instead of CreateErrorResponse. We're just telling the client that all is hunky dory.
Calling and debugging your brand new service is pretty easy; however, this post is already huge so I'll save that for next week. Teaser: you can access the debug version of your Web API service at http://localhost:11482/api/BlogChess/bestmove. You'll have to replace the port # with whatever port # your asp.net server runs on though.
What's Next?
That's it for this week guys! Tune in next week to see how to call the web api service using JavaScript and C#. I'll also cover how ASP.Net knows to access your service at http://localhost:11482/api/BlogChess/bestmove. Hint: the magic of routing!
Feel free to read up on routing, Web API, and of course chess if you want to get ahead of the class. We've still got a good amount of work to do to round out this series!
Resources
http://www.asp.net/web-apihttp://www.asp.net/web-api/overview/getting-started-with-aspnet-web-api/tutorial-your-first-web-api
No comments:
Post a Comment