Intro
This is part 3 in a series on creating a chess Web API HTTP Service. In Part 1 we gave an overview of the project requirements. In Part 2 we created the very basic Web API Service skeleton. Here in Part 3 we cover how to connect to a Web API Service two different ways, one using c# code and one using JavaScript. For the purposes of this tutorial we will do all our communication via JSON, though you could almost as easily communicate via XML or even create your own serialization scheme.Viewing Sample Data
Before we get started on connecting to the API with client code I thought I'd make a small modification to the ChessBoard struct from last week, just for the purpose of visualization. Specifically, I want to initialize the 8x8 array of short that represents the pieces on the board. It currently is an empty 8x8 array, but I want to initialize the values to all 0's. I plan on using 0 to mean that the square is empty, so it's logical that we would want to start with an empty board. The updated code is shown below:using System;
namespace BlogChess.Backend
{
public struct ChessBoard
{
public short[,] Board;
///
/// Constructor
///
/// as implied by the parameter name, this parameter is useless.
/// It is only here because you cannot have a parameterless constructor in a struct.
public ChessBoard(bool throwAway) : this()
{
Board = new short[8, 8];
for (int row = 0; row < 8; row++)
{
for (int column = 0; column < 8; column++)
Board[row, column] = 0;
}
}
}
}
It's not really much of a change, as you can see. The only difference is the addition of the nested for loops. The real reasons behind doing this is so that you can visualize better what a ChessBoard object looks like in JSON, and so it will be easier to create the appropriate classes in JavaScript.
In this next snippet of code I've added a new method to the BlogChessController class, GetSampleGame. This method is here solely to return a default-populated ChessGame object, thus making it easier for a JavaScript client to know what to send up. That's it; it's just an aid for clients and peoplezez.
////// This is a simple get method so someone can see the structure of a chess game object and its sub-objects /// ///A default-state chess game object public HttpResponseMessage GetSampleGame() { var result = new ChessGame() { GameStatus = GameStatus.BlackWin }; var positions = new List<ChessBoard>(); positions.Add(new ChessBoard(true)); result.Positions = positions; return Request.CreateResponse(result); }
As you can see above, this method has the same return type as the method from Part 2 of the tutorial. What we are doing here is creating a ChessGame, populating it's positions property (an enumerable of type ChessBoard) with a single default ChessBoard (all 0's), and returning that ChessGame. The WebMethod above starts with th word "Get", so it will respond to the HTTP Get verb. This should be your first moment of ah-ha excitement for the week; you can now fire up the service in the VisualStudio debugger and browse to the url for this WebMethod http://localhost:11482/api/BlogChess/SampleGame (note that your port may be different). You will probably be asked (it depends on your browser) if you want to open a .json file. If so click yes. You will then see the following output:
{"Positions":[{"Board":[[0,0,0,0,0,0,0,0],[0,0,0,0,0,0,0,0],[0,0,0,0,0,0,0,0],[0,0,0,0,0,0,0,0],[0,0,0,0,0,0,0,0],[0,0,0,0,0,0,0,0],[0,0,0,0,0,0,0,0],[0,0,0,0,0,0,0,0]]}],"GameStatus":3}
Huzza! We have now called a quick and dirty sample webmethod (albeit one that we don't need for the final result of the project) using nothing but a web browser! The end part of the URL shown above is our web method; Note that you just use "SampleGame", not "GetSampleGame" as the purpose of the word Get above is just to denote which HTTP verb we respond to.
Connecting via C# Client
OK now it's time to really roll up the sleeves and get crackin. We're going to connect to the original API Method PostBestMove via some C# code. Go ahead and add a new Web Application to your BlogChess solution.
Choose Visual C#, Web, ASP.Net Web Application. Change the name to BlogChessApiFlexer, click OK.

Choose the "Empty" template, check the box for "Web Forms", and click the OK button.

Now you've got a project in your solution named BlogChessApiFlexer. But hey, you already knew that because you just did it. Add a new web form to this new project; name the web form Default. Right-click on the new project, click Add, then Web Form, type in the name and hit OK.


The easiest way to call our Web API Service using C# is to add the Web API Client Libraries to our project. You already have this thing installed into your solution, you just need to add it to the BlogChessApiFlexer project. Go to Tools, Library Package Manager, Manage NuGet Packages for Solution.

Click on Installed Packages, All, Microsoft ASP.Net Web API Client Libraries, and click the Manage button.
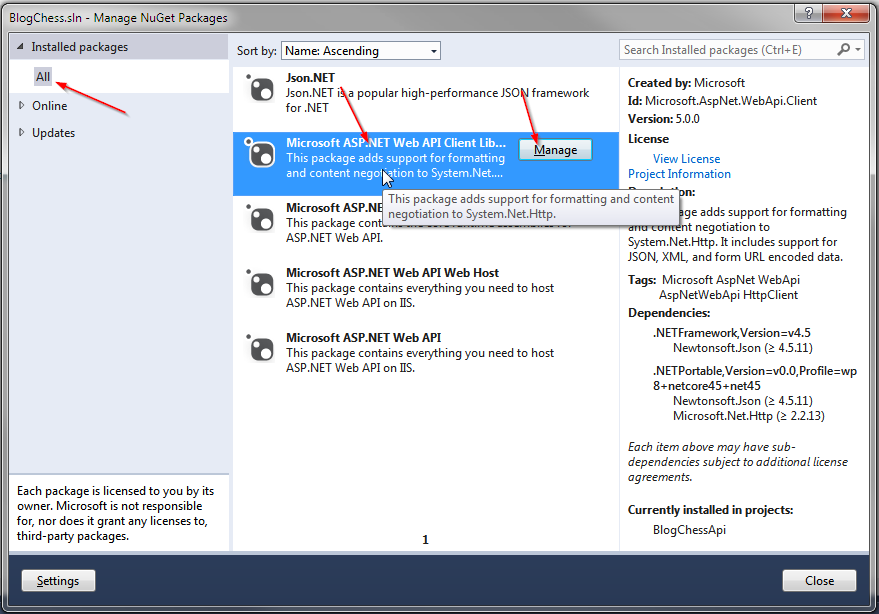
Click the checkbox next to BlogChessApiFlexer and click the OK button.

Close the NuGet packages window. You'll also need to add a reference to BlogChess.Backend in the BlogChessApiFlexer project. Go ahead and do that, I'll wait.
Now it's time to mess with Default.aspx. We're going to keep the page pretty simple. It needs 2 buttons and 1 label, that's it. One button will postback to the server and have a server-side Click event handler. The other button we'll deal with later. The label will have the results of our tests in it, but for now it can be empty. Here is the full default.aspx file as of right now:
<%@ Page Language="C#" AutoEventWireup="true" CodeBehind="Default.aspx.cs" Inherits="BlogChessApiFlexer.Default" %>
<html xmlns="http://www.w3.org/1999/xhtml">
<head runat="server">
Ooh, Web API Sample Clients
</head>
<body>
<form id="form1" runat="server">
</form>
</body>
</html>
Here is the C# code-behind file, Default.aspx.cs. I'll explain it below the source code.
using System;
using System.Collections.Generic;
using System.Net.Http;
using System.Net.Http.Headers;
using BlogChess.Backend;

namespace BlogChessApiFlexer
{
    public partial class Default : System.Web.UI.Page
    {
        protected void btnServerTest_Click(object sender, EventArgs e)
        {
            //1. Create and setup client object
            HttpClient client = new HttpClient() { BaseAddress = new Uri("http://localhost:11482/") };
            client.DefaultRequestHeaders.Accept.Add(new MediaTypeWithQualityHeaderValue("application/json"));
            //2. Create a blank chess game to send up in the post request
            var game = new ChessGame() { GameStatus = GameStatus.Draw };
            var positions = new List<ChessBoard>();
            positions.Add(new ChessBoard(true));
            game.Positions = positions;
            //3. Send the request
            var response = client.PostAsJsonAsync("api/BlogChess/BestMove", game).Result;
            if (response.IsSuccessStatusCode)
            {
                //4. Read the result from the response, display the "best move"
                var bestMove = response.Content.ReadAsStringAsync().Result;
                lblResult.Text = "Success! :" + bestMove;
            }
            else //5. Request failed; tell the user what happened
                lblResult.Text = "Failzor'd!: " + response.StatusCode.ToString() + "::" + response.ReasonPhrase;
        }
    }
}
In section 1 we create an HttpClient object and assign it headers that will tell the server we expect a JSON response. This HttpClient object is what we will use to connect to the Web API Service. In section 2 we create a blank chess game that will be used as the single request parameter in the server post. Section 3 posts the request to the server; note that using the PostAsJsonAsync method will automatically convert that 2nd parameter to json for us. Section 4 assumes success, and reads the resulting "best move" from the response, displays it to the user. Section 5 assumes failure, displaying the HTTP error code and reason for failure.
Now run the website, loading up the default.aspx page. Click on the button "Server Test". You should see a result of 'Success!: "e4"'. Your C# client code has now called your server-side Web API Service. That's about it for the C# client! On to JS...
Connecting Via JavaScript Client
One easy way to connect to a Web API Service is through the use of a JavaScript library called JQuery. We'll probably get into JQuery more in a future blog post, but for now what you need to know is how to use it in your page. Modify the header of Default.aspx to look like this:
Ooh, Web API Sample Clients
The change above is the addition of the script tag. We're just referencing the jquery library so we can use it. Now we have to add some more JavaScript in order to call the API, but you probably guessed that. Gold star for you! But no soup; the soup is mine. Here are the changes, and I'll explain the changes below the code:
Note: the above script tag goes in your header, below the script tag we added earlier for referencing JQuery. Section 1 of this new script tag is the definition of our JavaScript function bestMove(). This function will be used to call the API. Section 2 is where we setup some initial variables before making the call. Not much special, we just need an object of the proper format to send to our API method. Section 3 is where we call the API, and this is the most interesting part of the JS code. the jquery $.ajax() method is an easy way to make calls to services. As you can see, it is very easy to specify the url, type (post, get, etc), the content type (we want json!), and functions to call on success and failure. By default this function call is asynchronous, so these handlers (success function and error function) are how you will know that the call to the service is done. Section 4 is where we hook up the button click event to the function we declared above.
Now run the website, loading up default.aspx. Click the button market "Client Test". You should see the resulting string 'e4'. That wasn't too bad was it? You've now created a Web API and called it using 2 different languages. Fun stuff, highly useful, and highly portable. Gotta love Web API.
What's Next
Next week we'll have to code in some game validation and the logic for checking for victory, draw, etc. I believe that leaves us a 5th and hopefully final posting in this series for tackling the AI. Thanks for reading, and I hope you are looking forward to post #4!Resources
- http://www.asp.net/web-api/overview/web-api-clients/calling-a-web-api-from-a-net-client
- http://www.codeproject.com/Articles/424461/Implementing-Consuming-ASP-NET-WEB-API-from-JQuery
- http://www.json.org/
- http://jquery.com/
- http://api.jquery.com/jquery.ajax/
No comments:
Post a Comment